diy solar

diy solar

Stripped the terminals, how to re-thread them safely

  • Thread starter Deleted member 9967
  • Start date
D

Deleted member 9967

Guest
Ok so I was very careful as I have worked with the flimsy aluminum before and know how soft and pathetic it is.
And yet even though I was VERY careful, I still managed to strip two of the terminals on my cells.

So does anyone have a practical and real life method of fixing these?
AND safe as well of course.


The bolts are steel as you probably know already, but just in case.

I would especially like to here from someone that has messed theirs up and fixed them if possible.
Speculators, please abstain just for today ok? Thanks guys. :)
 
Agree with Luthj. And had the same issue. My threads came out just because I installed the bolt a couple of times. the last time I removed, the threads came out too, attached to the bolt. I was torquing these with a screwdriver and even then kept my Dad strength in reserve :D

Make sure you don't drill deeper - so measure the current depth first then mark your bit with tape. And you might need a flat head tap (maybe called bottoming). The helicoil kit comes with a tap. But they can have different profiles. My tap in the kit was pointed, which limited the amount of threads it could apply - so I ground it mostly flat. And you might have to cut off the extra coils. My kit coils were longer than the original holes.

BTW - they are most likely M6 or maybe M5 threads.

Good luck,
Doug
A helicoil kit eh?
They look almost exactly like a 1/4 inch bolt but they won't take a 1/4 inch nut so I am guessing they are 6 mm.
I am half tempted to "jam" a 1/4 inch threaded rod into the hole and then just use nuts from the top down to secure the bus bars in place.

As it is they do not grab many threads anyhow with the bus bars on top and the BMS tabs etc. So not going to deep is not a problem.

Thanks :)
 
Why are you being rude to Luthj? He offered great advice. I notice your first post doesn't say anything about how to do it??? Or providing videos or links or pictures.
Go for the jamming solution. Sounds easier. Report back. Better yet, take a video and pictures.
 
Agree with Luthj. And had the same issue. My threads came out just because I installed the bolt a couple of times. the last time I removed, the threads came out too, attached to the bolt. I was torquing these with a screwdriver and even then kept my Dad strength in reserve :D

Make sure you don't drill deeper - so measure the current depth first then mark your bit with tape. And you might need a flat head tap (maybe called bottoming). The helicoil kit comes with a tap. But they can have different profiles. My tap in the kit was pointed, which limited the amount of threads it could apply - so I ground it mostly flat. And you might have to cut off the extra coils. My kit coils were longer than the original holes.

BTW - they are most likely M6 or maybe M5 threads.

Good luck,
Doug
Guessing that this is what you meant?
https://www.canadiantire.ca/en/pdp/thread-repair-kit-m6x1-0251212p.html#srp
They also have a 1/4 inch one as well.
https://www.canadiantire.ca/en/pdp/thread-repair-kit-1-4-20-0251220p.html#srp
Thanks again. :)
 
Why are you being rude to Luthj? He offered great advice. I notice your first post doesn't say anything about how to do it??? Or providing videos or links or pictures.
Go for the jamming solution. Sounds easier. Report back. Better yet, take a video and pictures.
You did not read either as it clearly states the following in the first post.
"So does anyone have a practical and real life method of fixing these?
AND safe as well of course."

And a bit later:
"Speculators, please abstain just for today ok? Thanks guys."

So I was not being rude. They were by invalidating my post and ignoring what I said.
Total disrespect.
 
Nothing personal, but if you can't google "helicoil" and follow the instructions that come with the kit, you probably shouldn't be playing with batteries.

I am not a speculator, I have installed dozens of threaded inserts myself, and specified them in thousands of repairs.

As warned in numerous threads, the screws provided with most of these cells are not suitable for repeated disassembly.

I will refrain from offering any assistance to you from here on. Good luck.
Yes please block me thank you. Having someone as disrespectful and obtuse as you are pretending to offer help when all you really want to do is have your ego stroked is not needed here.
So please block me thank you.
Ignoring you from now on. Please go away thank you and have a nice day. :)
 
You got the best answer anyone could give (Helicoil). What else do you want, someone to hold your hand or do it for you?
 
Check out this link for a quick primer on Helicoil installation: https://www.youtube.com/results?search_query=how+to+helicoil

I agree that switching to studs installed in the threads is a great idea to help prevent potential thread issues in the future.

Hope it helps. I haven't had a thread failure on a battery cell, but I was a mechanic for years and used Helicoil thread repair all the time back then... The idea is to use a thread tap it comes with, tap the thread out to the larger size, then use the tool they provide to install the thread insert which is really just like a little spring looking insert thing that threads into the new larger thread, then they have you break off the tang in the bottom once it's inserted into position. The videos should help to illustrate the process, good luck to ya...
 
You got the best answer anyone could give (Helicoil). What else do you want, someone to hold your hand or do it for you?
I got the reply I asked for from DW SD. I don't see the problem here.
He has experience in this and that is what I asked for and that is what I got.
 
Check out this link for a quick primer on Helicoil installation: https://www.youtube.com/results?search_query=how+to+helicoil

I agree that switching to studs installed in the threads is a great idea to help prevent potential thread issues in the future.

Hope it helps. I haven't had a thread failure on a battery cell, but I was a mechanic for years and used Helicoil thread repair all the time back then... The idea is to use a thread tap it comes with, tap the thread out to the larger size, then use the tool they provide to install the thread insert which is really just like a little spring looking insert thing that threads into the new larger thread, then they have you break off the tang in the bottom once it's inserted into position. The videos should help to illustrate the process, good luck to ya...
Thanks. I did watch a couple of videos after DW SD suggested the helicoils.
It seems that the only real problem is the depth. Other than that it appears that they will do the job just fine. :)
However, as I am using the short bolts given to me and thick bus bars, I see no reason to break off the tang. :)
So a win win. :)
Thanks again for the suggestion based on your experience with these things. :)
 
Speculator here (I haven't done lithium or stripped cell terminals, just many other applications of threads)
While helicoil is an option (with fixed length of engagement), another is to thread the hole oversize. First with a tapered tap (gently and measure/mark with tape for target depth so it doesn't puncture bottom of terminal.) Follow up with flat-bottom tap.

The problem may have occurred (based on other posters) because threads only engage part way due to bolt length and thickness of attached hardware.
Better to put in a stud, with loctite and backed off a fraction of a turn after bottoming. That gives maximum engagement length, and no wear from repeated use. Nut on long stud accommodates any thickness of terminals.
 
Thanks. I did watch a couple of videos after DW SD suggested the helicoils.
It seems that the only real problem is the depth. Other than that it appears that they will do the job just fine. :)
However, as I am using the short bolts given to me and thick bus bars, I see no reason to break off the tang. :)
So a win win. :)
Thanks again for the suggestion based on your experience with these things. :)

Yeah for sure, hope it works out perfectly for you.

Yeah you could leave the tang there no problem (as they can be a real pain to break off when at the bottom against the thread hole) as long as it doesn't interfere with your bolt seating all the way. If you want, you can thread on the bolt without the bus bars, all the way down to where it touches the tang, and see if the bolt is down far enough (at least going down slightly farther than the thickness of the bus bars), and then you know you're good. If it did bottom out too soon (where you can't get enough clamping against the bus bars), you could use a Dremel tool with a carbide disc and just barely shave a little length off the tip of the bolt, just enough so you know it isn't bottoming against the tang once you've tightened it all down with the bus bars in place. And of course, be super careful not to over tighten.

And like Hedges is saying other option is to just thread it to the next size larger (however, if you care about aesthetics at all, the bolt will be a different size than the rest and look different in case that mattered to you). If you're taking the bus bars off and on a lot, the Helicoil will be stronger metal and not wear out with bolt threads going in and out a lot.

Also the advice to change over to studs is a good tip if you could do it, because it lowers the chance of damaging the threads by far, when there is only a pulling force on a stud, and not a pulling force combined with a friction force against a moving thread on a soft metal. My new cells I bought from a supplier in Colorado, he sent all the cells with studs installed, and I am really happy about that. Also, studs will make it so the length isn't critical.

When we used to build our race cars, we always put in studs on the main bearing caps, and to replace the head bolts with studs, as we could use a higher strength stud, and clamp them down to a higher torque and get much better holding on a high horsepower motor... Plus it's not beating on the block threads constantly as we would be pulling the engines apart all the time since the studs just stay in after install.

Anyways, good luck on it...
 
Speculator here (I haven't done lithium or stripped cell terminals, just many other applications of threads)
While helicoil is an option (with fixed length of engagement), another is to thread the hole oversize. First with a tapered tap (gently and measure/mark with tape for target depth so it doesn't puncture bottom of terminal.) Follow up with flat-bottom tap.

The problem may have occurred (based on other posters) because threads only engage part way due to bolt length and thickness of attached hardware.
Better to put in a stud, with loctite and backed off a fraction of a turn after bottoming. That gives maximum engagement length, and no wear from repeated use. Nut on long stud accommodates any thickness of terminals.
I tried locktite and it does not work. I think because there are literally no threads left.
They came out like a piece of wire on me.
 
Yeah for sure, hope it works out perfectly for you.

Yeah you could leave the tang there no problem (as they can be a real pain to break off when at the bottom against the thread hole) as long as it doesn't interfere with your bolt seating all the way. If you want, you can thread on the bolt without the bus bars, all the way down to where it touches the tang, and see if the bolt is down far enough (at least going down slightly farther than the thickness of the bus bars), and then you know you're good. If it did bottom out too soon (where you can't get enough clamping against the bus bars), you could use a Dremel tool with a carbide disc and just barely shave a little length off the tip of the bolt, just enough so you know it isn't bottoming against the tang once you've tightened it all down with the bus bars in place. And of course, be super careful not to over tighten.

And like Hedges is saying other option is to just thread it to the next size larger (however, if you care about aesthetics at all, the bolt will be a different size than the rest and look different in case that mattered to you). If you're taking the bus bars off and on a lot, the Helicoil will be stronger metal and not wear out with bolt threads going in and out a lot.

Also the advice to change over to studs is a good tip if you could do it, because it lowers the chance of damaging the threads by far, when there is only a pulling force on a stud, and not a pulling force combined with a friction force against a moving thread on a soft metal. My new cells I bought from a supplier in Colorado, he sent all the cells with studs installed, and I am really happy about that. Also, studs will make it so the length isn't critical.

When we used to build our race cars, we always put in studs on the main bearing caps, and to replace the head bolts with studs, as we could use a higher strength stud, and clamp them down to a higher torque and get much better holding on a high horsepower motor... Plus it's not beating on the block threads constantly as we would be pulling the engines apart all the time since the studs just stay in after install.

Anyways, good luck on it...
Well I am afraid to make them too much wider. Might use the helicoils as they do have one in stock [see links above] where I live.
No clue how to change to studs.

For now I do have to redo them a lot. For one thing I got a BMS woohoo [does the happy dance].
I also will be adding some accessories to my mobility scooter as well.
I already added the juntek. Soon new lights. A home made headlight. I now have a heated seat [just in time for the very cold].
So I need to find a way to repair it fast and also to keep them from breaking again.

Good to know you have experience with the helicoils and can tell me they are stronger than the aluminum terminals. :)

Should things go well. I expect I can have everything in a permanent manner by next spring though. :)
Then with the batteries lasting 20 years I never have to change anything again LOL.

Thanks for your help. :)
 
Glad to hear you got your BMS, it's always fun to get new toys :)

Yeah, I know when we built racing engines, on the racing aluminum engine blocks and heads, every bolt hole has a Helicoil in it from the factory... And we would usually just stud every bolt hole anyways, even oil pan bolts and valve cover bolts and all. Studs gave us more confidence...

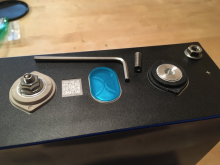
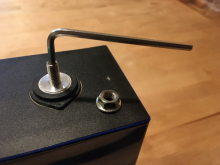
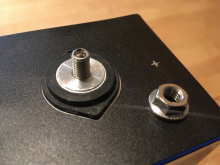
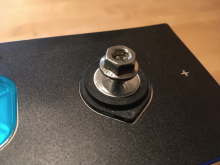
I am going to paste in some pics below showing the studs on my new cells I got, they're super simple to install. I believe they use M6 6mm on the typical 280ah cell (not sure if this is the size of yours, you'll have to confirm it)...

Something like this:

With allen wrench hole in the end to gently but snugly cinch them down, using an M6 6mm flange nut:

1605031622004.png

1605031649981.png

1605031676733.png

1605031706692.png
 
Last edited:
Glad to hear you got your BMS, it's always fun to get new toys :)

Yeah, I know when we built racing engines, on the racing aluminum engine blocks and heads, every bolt hole has a Helicoil in it from the factory... And we would usually just stud every bolt hole anyways, even oil pan bolts and valve cover bolts and all. Studs gave us more confidence...

I am going to paste in some pics below showing the studs on my new cells I got, they're super simple to install. I believe they use M6 6mm on the typical 280ah cell (not sure if this is the size of yours, you'll have to confirm it)...

Something like this:

With allen wrench hole in the end to gently but snugly cinch them down, using an M6 6mm nut:

View attachment 27194

View attachment 27195

View attachment 27196

View attachment 27197
So basically I could use the helicoils to re-thread the holes.
And then just put in short pieces of threaded rod to make posts?
Well, heck. I had no clue it would be that easy. :)
Thank you VERY much Samsonite. :)
Might be worth redoing all of the holes now. That is very cool.
Thanks for the pictures etc once again.
It made it all so clear for me. :)

Some of us are very visual. So thanks again. :)
 
Yeah, I'm visual too hehe, best when I can see what blank it is I'm hitting up against hehe...

So yeah, just repair the damaged ones with Helicoil repair kit, then just screw in all the studs where bolts went before, and snug them down. In a racing engine we would glue the studs in with Locktite threadlocker compound, but we don't need to worry about that here as there is no shock or vibration on a stationary application (Locktite might hamper current flow on the threads. Just put the studs in dry, and cinch them down a little bit (helps them to stay in when you go to unscrew the nut later)...

I wouldn't convert all the holes over to Helicoil though not necessary, just repair the ones that are stripped and put the studs in all the factory threads on the rest, that is all you need here...
 
Loctite was to keep studs in place after rethreading. Alcohol could be used as a no-residue cutting fluid.
Stud is just a long thread without hex head.
Either helicoil or oversize tap makes a larger thread in the terminal.
I've got some good epoxy (JB weld) that I would consider using to epoxy a 6mm stud in a stripped 6mm hole. Think the torque for the nut is low enough it is strong. Needs to be clean of oil and loctite, would use slightly larger than 6mm drill to chase and clean hole.

Studs- buy those, ideally with that hex socket as Samson showed.
 
Yeah, I'm visual too hehe, best when I can see what blank it is I'm hitting up against hehe...

So yeah, just repair the damaged ones with Helicoil repair kit, then just screw in all the studs where bolts went before, and snug them down. In a racing engine we would glue the studs in with Locktite threadlocker compound, but we don't need to worry about that here as there is no shock or vibration on a stationary application (Locktite might hamper current flow on the threads. Just put the studs in dry, and cinch them down a little bit (helps them to stay in when you go to unscrew the nut later)...

I wouldn't convert all the holes over to Helicoil though not necessary, just repair the ones that are stripped and put the studs in all the factory threads on the rest, that is all you need here...

Oh, and make sure when you do the thread repair, where you tap the new thread with the included tap, you make sure it is perfectly perpendicular, so it doesn't dig threads in at an angle. So straight up from your view left to right vertical, but also vertical forward and backward...

Usually go in like 1/2 turn, maybe out like 1/4 turn, in like 1/2, out like 1/4, so it kind of cleans the thread as your digging... Be mindful if the tap bottoms out in the hole. If it gets hard to turn all the sudden, then it may have bottomed out.


Only other caveat I can think of here:

Now here's the kicker, since a tap is tapered on the end bit of it, make sure the threads are cut all the way (like square and straight), at least down to the depth that the Helicoil will go into. Meaning if the tap bottoms out first and didn't groom the threads all the way straight all the way down past the depth of how far the Helicoil insert will rest at, then we may need to make a homemade tap to finish the tap job (I've had to do this before).. Like, where you get a bolt the same size and thread pitch as the tap, use a Dremel disc and grind a tap style tooth in it (kind of like self-tapping bolts look like), then carefully thread it into the newly tapped hole, and since the bolt doesn't have any taper to it, it can finish grooming the threads nearly right to the bottom of the hole. Hopefully this situation doesn't happen here, but if it does, then this is how to get around it. You just don't want to screw in the Helicoil into any threaded area where the threads aren't parallel (you want non-taper, no cone shape in your thread cut), or the Helicoil will form and follow to the same taper, which would make it so the real bolt will screw in, and start getting tighter and tighter as it gets down to the area of the taper.
 
After the 1st time I tried to get the screws included with my cells to work with a double bus-bar, I knew that I would end up stripping some, no matter how careful I was, so I shut my project down for a couple days and ordered the 25mm long set screws recommended in other threads. If I had stripped one, the 1st thing I would try would be to get a 1/4" bottoming tap and see if it would cut enough thread to hold a 1/4" set screw, which is a tiny bit bigger than the 6mm threads that the cell was produced with. If that looked like it might hold, I'd thread it in with thread locker or epoxy. If it didn't cut enough thread to trust it, I'd go with a thread insert like the helicoil. I've been very happy that I went with the set-screws and nuts. The number of times I've had the nuts on and off during the top balancing would have surely resulted in stripped threads had I tried to use the included bolts.
 
Every stripped thread is a different challenge. I have successfully used a larger thread, IE; 1/4inch us into 6mm. Careful work with a bottoming tap. Then stay with studs and nuts, no bolts. If you don't know some terms use google to educate yourself instead of trashing someone trying to help you.
 

diy solar

diy solar
Back
Top