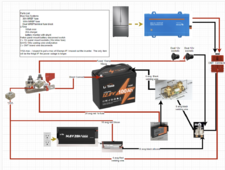
diy solar

diy solar

12v 10a 230Wh 18ah system with low temp protection under $200 without panels

AmpD

New Member
Joined
Nov 12, 2022
Messages
143
scc $13

mppt style

battery options with low temp cutoff

$33 12ah roypow (153wh)
$50 18ah roypow (230wh)
$90 30ah roypow (384wh)

fusing $50

dual terminal mrbf block (connections for battery, inverter, and panel positive lines)
mrbf 30A (scc to terminal block positive)
mrbf 100A (inverter to terminal block positive)

80A on off switch $8 (connect both the inverter and scc negatives to this switch mounted to the battery negative terminal)
48v 275A 1-2 bank kill switch $12 (connections for battery, inverter, and panel negative lines)

pure sine inverter options $30-$50 (least expensive pure sine inverters on 'zon.)

400w continual $50

300W continual $40

500w continual $32

All that is needed is a 50-200w of panel and the wiring. $50-100

I would use 10-12 awg for all wiring but inverter which is 8awg.
Use 8wag for all wiring and 6awg for the line going to inverter (thanks @robbob2112)


*note with a 20a scc this system can theoretically produce up to 800w at 40A between battery and scc input if inverter wires (6awg) and fuse (100a) are sized correctly and given enough panel input. The intent of this system is not an 800w draw but rather powering loads less than 100w that may surge up to 100w like my danby or midea. at a 10Wh average draw and 100w surge each I could power both units from this system at the same time. 20w (2A) continual 200w (16A) surge

critique?
I know it's the cheapest of the cheap. Think it would work for the intended purpose or just make a nice ball of flames?
 
Last edited:
I have been called a cheapskate by some people, but I cannot recommend the proposed System. It may be okay to dabble a bit in solar with this System but I would not attempt to power anything of value because it may very well turn your fridge into a brick.
 
I have been called a cheapskate by some people, but I cannot recommend the proposed System. It may be okay to dabble a bit in solar with this System but I would not attempt to power anything of value because it may very well turn your fridge into a brick.
at $12 for 20w I even thought of using foldable 6v 20w panel arrays in 2p2s configurations with an $8 blade fuse box as the mini combiner box and busbar system. They have multiple fuse ranges from 1a -40a.

I could put them in the little small areas around my yard that don't get shaded out. I could even connect them with usbc cables and barrel jacks to make it a "deployable" system.

In reality 100w or 50w panels would be just fine if not more affordable but the idea did strike me when I was trying to find the "cheapest" build on 'zon I could.

And yes interested as an introduction to solar low investment idea as well as the real practicality of it and if you think it would serve the stated purpose of powering a 20wh load with up to 200w surge capacity.

I know it's laughable but I think it is also doable. I earnestly do want to hear the opinions on it and thank you for both the read and response.

truth if I was to build this system I would pay the extra 50 for a victron inverter at least. (laughs)
 
Not thrilled with the component selection but it will run your 20w load for around 9 hours give or take a bit. I assume those little fridges are the compressorless variety. If it is the type with a compressor you will need a much larger inverter for the inductive load.

Anything on the 100 awg fuse should be using 6 awg. Fuse protects the wire. For 8 awg I would drop the fuse to 60 amps. If you use 12 awg cut that fuse to 20 amps.

You would be better off with something like this or better the big brother to it.
 
solid. thanks for the review.

Good catch on the fuses. I was thinking it would never see more than 40a input and sizing it at x 2.56 over that at 100a. Definitely need bigger wires then. Same with the 30a runs. I didn't see anything smaller than 30a for the mrbf.

Yeah I wasn't sure on the switch really. It was again rated above the amps it would see. Cheap as hell and looked like it would fit the application. An extra 10 here and there as a safety or efficiency factor isn't going to kill the project idea. I would like something that could be left unattended at some point.
 
Are you going to have utility power?

I built a battery backup for my cpap/oxygen concentrator. Much higher price point. And without the solar. But, a very similar design as you will have. In my case it will run the full size fridge about 15 hours or my cpap and concentrator for 10. Price was right around $500. I put it inside a plastic box from the thrift shop, looks like it was a sewing box.
 

Attachments

  • cpap backup.png
    cpap backup.png
    400.9 KB · Views: 4
Realize that many cheap inverters deliberatly mis-state their output wattage. These seem like they may be ok, but I would find the manual before purchase and read the fine print.. for your expected load it probably won't matter.
 
very similar indeed. smaller battery capacity in my setup with solar input instead of an ups style. Again it was just a theorized cheapest system and what do we need to tweak to make it safe.

6awg welding on that negative switch to your phoenix as well right? The 12v sockets that is a dual purpose input output isn't it?

I am looking at powering the given fridge and freezer units direct from solar without need for grid use and enough juice to get them thru the night and that would be it. I may upgrade to the 30ah battery just to give it the extra capacity but I think 10 hours runtime would get them thru the night just fine. They are insulated and nobody is using them between 8pm and 6am. I have put them on a killowatt for 3 months and they each don't go over 100w in surge and average 10wh.

how about this $9 switch for an upgrade? I pretty much saw that first one as a busbar to tie in the negative side as well as disconnect if I needed. I understand it is scary looking and in hindsight a potential hazard if the connection loosens somehow. I can still have the inverter and solar connections stacked on it with ring terminals either way.
 
Last edited:
Realize that many cheap inverters deliberatly mis-state their output wattage. These seem like they may be ok, but I would find the manual before purchase and read the fine print.. for your expected load it probably won't matter.
yeah I put them in there as stated "Cheapest pure sign wave" available. I liked the 400w model best of the 3. The ol' hippy and I were trying to see what the cheapest system we could toss together would be.

I personally would spend the extra for a victron inverter. (mV versus watts for idle consumption) That still puts the system around $225-250 and removes about 40W of wasted power every 10 hours

one of the biggest questions I have I suppose is we are good with mrbf on the LifePo4 at this low of voltage right? Does anyone see the need for class T on this setup?
 
Last edited:
MRBF is fine, it has good arc extinguishing characteristics. One problem with 12v is that the cables are larger because the current draw is larger. Larger amperage means higher chance of an arc. But at lower amperage like we are using the arc isn't very likely in the first place.

If it was something much larger, say a 5000w inverter I would use a class T. On my computer UPS, same general design, I use a 2000w inverter with just the MRBF.
 
very similar indeed. smaller battery capacity in my setup with solar input instead of an ups style. Again it was just a theorized cheapest system and what do we need to tweak to make it safe.

6awg welding on that negative switch to your phoenix as well right? The 12v sockets that is a dual purpose input output isn't it?

I am looking at powering the given fridge and freezer units direct from solar without need for grid use and enough juice to get them thru the night and that would be it. I may upgrade to the 30ah battery just to give it the extra capacity but I think 10 hours runtime would get them thru the night just fine. They are insulated and nobody is using them between 8pm and 6am. I have put them on a killowatt for 3 months and they each don't go over 100w in surge and average 10wh.

how about this $9 switch for an upgrade? I pretty much saw that first one as a busbar to tie in the negative side as well as disconnect if I needed. I understand it is scary looking and in hindsight a potential hazard if the connection loosens somehow. I can still have the inverter and solar connections stacked on it with ring terminals either way.
I would double the battery for sure, maybe even go to 50ah. What would happen if you had a full charge battery at sunset but the next day was cloudy or rainy all day? The 50ah would maybe get you through 24 hours and maybe not.. The 100ah mini would do a couple of days and is only 19lbs.

Yes 6 awg 105c welding wire to the phoenix. The disconnect is for hauling it around, but I only need the inverter if grid power is out so the inverter sits in my office downstairs.

The 12v outlets are for the cpap and concentrator. Both have a dc-dc power adapter that are 12v for the car. I could also plug a 12v to USB power adapter into one if I needed to charge a phone. They have 16awg wires with a 10 amp fuse inline and could be used as input. I think if I ever wanted to add a SCC and few panels I would either add another disconnect like the victron uses or connect it in place of the charger.

I think I am going to have to trade my 12v outlets, the cheap pair I have now do not hold the cpap adapter very firmly. I already have a pair of the 30amp flavor with 10awg wire.

The $9 switch is even better. Everything covered. Note, it has the little slide out panels, instead of leaving panels out drill them for your wire size and put the ends on after sliding through. Took me a while before that occured to me.

On stacking lugs and ring terminals, biggest current draw on bottom and limit as much as you can. Also get some No-Ox and use it at the contact points to keep corrosion away.

On my MRBF terminal I used a pure copper washer 10mm id, 20mm od, 2.5mm thick, then the lug for the 6awg to inverter, then the charger then a steel washer, then the steel nut. The same type copper washer, 12v outlet ring terminal (crimped both togther in one), then steel washer then the nut. No-Ox grease on all connections.

The bottom pure copper washer is controversial but it was the only way to get good contact with the top of the fuse and these smaller connectors.

As long as your crimps on the wires are good there is nothing gonna start a fire. I use a Temco hydraulic crimper, but that is as expensive as your original project. I spent the money knowing I would use it when I get around to a DIY solar system for the house.
 
Last edited:
I thought that was how I understood the mrbf break ability from another thread. I wanted to be certain.

I also understand the copper washer thing. It is acting like a busbar and is sized for the load. I did find it interesting that you ran the input from charger and output to inverter on the lug terminal. Do you think I will have any issues with the mrbf terminal bar's m10 hole on an m6 stud?

I was going with one input for panels and one output for inverter and direct connect the terminal bar itself to the battery. No stacking on the mrbf terminals. The stacking I intended was the negative wires on the disconnect. Might go for this switch instead. It would let me avoid stacking and even let me run the system from panels, batteries, or both.

There are a number of kits available for sure. The kits do not include things like low temp battery, fuses. “Busbar”, pure sine inverter, and a kill switch. There are many sccs at the $30 and under price point that might work better I agree. Many kits do come with free mppt controllers. There are a few variants of this same controller with terminal inputs instead of dc jacks as well. Probably a better idea since they will handle the 10a-20a. I noticed the dc jacks are 5a rated. He liked the barrel connector. I updated the link above to terminal style and will inform him of the risk on that.

There better deals on solar panels. 200w $100 and a 50w $50 would meet minimum requirements of battery (200w in 4 hours).

Mostly it is for the learning factor. The original inspiration is the old hipster wanting to map the stars 24hrs/day with a microPC at about 10wh on an usb c cable. I likely will build a comparable small system with higher tier equipment that can be compatible with the bigger system I want to build later. 2 swaps I should make for example are the victron inverter, and 30ah battery upgrade. Possibly at some point a 100/20 smart upgrade so it can be used later if I go to 48v with the big system. I already have 2 x 150/45 in a box I could use one initially in my case. This isn't just for me. I know he is pretty intent on making this happen and thought I might post it up here to spitball, tweak, and get the safety factor to a reasonable level at minimal cost.

Thanks again for the advice and help on it. You got to admit any system that can safely power a 200w load for $140-$175 + panel cost is of value to many people. How many times has some like me come in here ignorant of how a solar panel system really works.

Well for $200 you can find out. It is a 3-4 year ROI for an overblown laptop charger. So to all of you at diy. Thank you for your knowledge, advice, and time to help pave the way for those that follow.
 
Last edited:
I thought that was how I understood the mrbf break ability from another thread. I wanted to be certain.

I also understand the copper washer thing. It is acting like a busbar and is sized for the load. I did find it interesting that you ran the input from charger and output to inverter on the lug terminal. Do you think I will have any issues with the mrbf terminal bar's m10 hole on an m6 stud?
I don't remember why I originally did that, I am certain i had some sort of reason. The stud doesn't carry the current, the contact surface does. So you may need to look hard at the contact pad and if it isn't large enough rethink the battery or figure out a washer with a 6mm hole and 15mm to 20mm OD. You could make one out of a short piece of copper pipe flattened or some thick copper stock about 1mm thick. Maybe a hole saw 15mm with a pilot drill that is 6mm. I can find lots of 6mm center holes but they average 10mm OD which doesn't seem like it is enough

Upgrade to 50ah and you get 8mm stud

I was going with one input for panels and one output for inverter and direct connect the terminal bar itself to the battery. No stacking on the mrbf terminals. The stacking I intended was the negative wires on the disconnect. Might go for this switch instead. It would let me avoid stacking and even let me run the system from panels, batteries, or both.

There are a number of kits available for sure. The kits do not include things like low temp battery, fuses. “Busbar”, pure sine inverter, and a kill switch. There are many sccs at the $30 and under price point that might work better I agree. Many kits do come with free mppt controllers. There are a few variants of this same controller with terminal inputs instead of dc jacks as well. Probably a better idea since they will handle the 10a-20a. I noticed the dc jacks are 5a rated. He liked the barrel connector. I updated the link above to terminal style and will inform him of the risk on that.

There better deals on solar panels. 200w $100 and a 50w $50 would meet minimum requirements of battery (200w in 4 hours).

Mostly it is for the learning factor. The original inspiration is the old hipster wanting to map the stars 24hrs/day with a microPC at about 10wh on an usb c cable. I likely will build a comparable small system with higher tier equipment that can be compatible with the bigger system I want to build later. 2 swaps I should make for example are the victron inverter, and 30ah battery upgrade. Possibly at some point a 100/20 smart upgrade so it can be used later if I go to 48v with the big system. I already have 2 x 150/45 in a box I could use one initially in my case. This isn't just for me. I know he is pretty intent on making this happen and thought I might post it up here to spitball, tweak, and get the safety factor to a reasonable level at minimal cost.

Thanks again for the advice and help on it. You got to admit any system that can safely power a 200w load for $140-$175 + panel cost is of value to many people. How many times has some like me come in here ignorant of how a solar panel system really works.

Well for $200 you can find out. It is a 3-4 year ROI for an overblown laptop charger. So to all of you at diy. Thank you for your knowledge, advice, and time to help pave the way for those that follow.

You are doing good and researching before buying and thinking things through. And you have an idea of what you want to power. Most importantly being willing to learn.

I only started down this road in October and plan to install a full blown house sized solar system not this summer but next. We are talking about moving from Blackhawk CO to Cortez CO this summer or early in the new year. We are talking about buying land and having a house built. Need to move from 9144ft lower. Cortez is about 6100.

First thing I did was decide I wanted to do was power 2 cpaps and 2 concentrators. So I sized thihgs accordingly and bought stuff then figured out it was WAY to loud. And my wife can't do cpap so I downsized a lot and prioritized quiet. So I ended up $2500 in and had 2 complete systems. About $700 was on tools and other stuff. They rest was batteries and inverters and sundry other bits and pieces. So I ended with 2 complete systems, one for the pap and concentrator and could be used for the fridge in a pinch. This weighs 30lbs without the inverter and is built in a plastic sewing box. The other weighs 100lbs and is a UPS for the computers downstairs and could be used to run the furnace for 4 hours.

Then I stopped and read a bunch and learned a lot and I am to the point I know how much I don't know.
 
Last edited:
The stud doesn't carry the current, the contact surface does. So you may need to look hard at the contact pad and if it isn't large enough rethink the battery or figure out a washer with a 6mm hole and 15mm to 20mm OD. You could make one out of a short piece of copper pipe flattened or some thick copper stock about 1mm thick. Maybe a hole saw 15mm with a pilot drill that is 6mm. I can find lots of 6mm center holes but they average 10mm OD which doesn't seem like it is enough

Upgrade to 50ah and you get 8mm stud
Sure you don't sell batteries for a living. *jk

Thanks for setting me straight on that too. As you said learning is a constant process and you have to be receptive to all the information not just the bits you want to hear.

I also realize there is some tool investment to be made. Tools are an investment and always retain some value even if you decide you are done. I'll have to re-watch some of Wills vids and put together a basic needs list of those too at some point. Advice always welcome.
 
Will doesn't do the best job listing out good tools and he gets so many things free from places so he will review or just mention them and he has his favorites. But he never lists out the specs of the tools he uses and what is best. Oh, he does it in various videos but nothing concise.

A torque screwdriver capable of 7nM for most of the nuts and bolts. 5ish ftlbs. The one he uses costs $170, which is great if you are a pro, but the $69 one from homedepot works as well.

For UL listing on a grid tied system the lugs must be imprinted with the wire size. The cheap ones don't do that, the Temco set for $179 is a great choice. The cheap harbor freight set or AMMZ or knock off on amazon are a waste or money. They aren't marked correctly for size. Wish I had seen this: temco sells their tools cheaper directly verse through amazon.
https://temcoindustrial.com/cart.php?suggest=b14148f6-f9fb-44d6-acc6-74cf11bb8178

Things like that.. Wire strippers of good quality are a must, otherwise you will nick or damage wires. For larger cables the southwire cable cutter isn the bomb.
 
Last edited:
Back
Top