I'm newer than a newbie here...
We are thinking about getting the Bluetti EB150 solar generator, as we heard many good things about it.
To charge it we know A/C is most preferred and of course via solar panel, however we also have a Power inverter rated at 500w at 4.2AMPS
Can we charge the Bluetti EB150 while in transit using our inverter which is plugged into the cigarette outlet?
If we need to use 10AWG wiring, we can do so straight from the battery if it's best preferred.
Thank you in advance for good advise...
Your 12V inverter will power the Bluetti's AC charger but the inverter should be a pure sine wave inverter (to cleanly energize the Switch Mode power supply of the AC charger.)
Hobotech recommends this inverter for vehicle-charging a Bluetti EB240 (only while the motor is running)
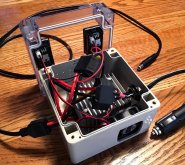
I've built a different solution for vehicle-charging the EB240, that's more efficient the inverter+AC charger but, in truth, offers no significant advantage while the motor is running, except for having less "stuff" strung around inside the car. It will charge the Bluetti with a steady 240 Watts, pulling only 5A from my vehicle's 12V power jack and stays cool with a small 12V, low-amperage, low-CFM fan installed inside the project box. LED voltmeters show input and output voltages, allowing me to keep an eye on input voltage, if I want to take the rusk of charging the Bluetti when the motor isn't running. (Not recommended, but I stop using the car battery if it gets down to 11.5V - I want my car to start - and the same goes for using an inverter+AC charger.)
12V-to-48V DC-to-DC Step-Up Converter
1x
https://www.amazon.com/gp/product/B06W2M2CXM/
Two Terminal Blocks (for connecting input and output cables to the step-up converter)
2x
https://www.amazon.com/gp/product/B0195UWAQ2/
40x40x20mm 0.03A 12V Fan (connected to 12V input terminal block, to pull air across the heat sink to exit through holes drilled in the other side of the box)
1x
https://www.amazon.com/gp/product/B07V4GGPW3/
Two LED Voltmeters to display input and output voltages (one at each terminal block, mounted in the clear box lid)
2x
https://www.amazon.com/gp/product/B01N65379V/
4.7x4.7x3.5-in. Project Box (it's just big enough)
1x
https://www.amazon.com/gp/product/B07PZ4BSFQ/
Input Cable with fused 12V cigarette lighter plug (cut off and discard crimped terminals)
1x
https://www.amazon.com/gp/product/B07JBM6DWW/
Output Cable with 8mm connector for Bluetti (cut off and discard the Anderson connectors)
1x
https://www.amazon.com/gp/product/B07WP4696G/
BlueTack to easily affix components inside the box
1x
https://www.amazon.com/Blu-Tack-S050Q-Reusable-Adhesive-75g/dp/B001FGLX72/
You'll need a drill or Dremel, screwdrivers and wirecutters/strippers (no soldering required), plus a lot of THINKING before you start drilling holes in the box. Pass the cables thru holes on opposite sides of the box, then tie knots inside to act as strain relief, before attaching the stripped leads to the tetminal blocks that are shared with the converter's four leads.