diy solar

diy solar

Compression orientation & SOC level when tightening

Gurusi

New Member
Joined
Aug 10, 2022
Messages
172
Hey, I am currently awaiting X32 eve 280ah cells from Docan. I have gone down the rabbit hole of discussions as regard compression and went from a no compression stance to to prepping for a compression setup!

I was unsure whether to start a new thread or jump long train discussion post.

I have two questions that will likely not have absolute answers due to the nature of compression; however may help me decide.

Should I place my cells in their end point series configuration and purchase extended bus bars so as to connect them in parallel for the purpose of top balancing?

Ive read that if I top balance and then change the config there may be bulging. I read one or two posts that reducing to a certain SOC post top balance may relieve the bulge so as to remove the cells and change the cell orientation but ive couldn’t find the best SOC.

Compressing them once and for all and then adapting bus bars between series and parallel seemed safer

My second common question is tightness/torque/level of compression. I don’t have the tools/mathematical equations or scientific knowledge to calculate the compression accurately so just plan to do as others and go just beyond finger tight. I plan to place some Plastazote (closed cell foam) in-between each cell. Is there a ideal SOC level that I should tighten/compress the cells? Or am I overthinking it?

Thanks
 
Compression is described in the cell's datasheet.
(pressure, method, materials, SOC)
As I don't have the equipment to measure the correct compression at the given SOC in a fixed fixture, I'll go with springs, which are rated for a given force.
 
Solaro' have you found springs that meet the 12psi for your 280's? I've built a compression fixture and am trying to source springs with adequate specs. TIA
 
Solaro' have you found springs that meet the 12psi for your 280's? I've built a compression fixture and am trying to source springs with adequate specs. TIA
I used these. I measured their K values to be ~165#/inch. $3.29 each. Easy to get.

NOTE: That was for an 8 cell pack. You might need something different if you use more cells in a single compression fixture.

https://www.oreillyauto.com/detail/c/melling/melling-valve-spring/mel0/vs360?q=Melling+VS-360&pos=0
 
Hey, I am currently awaiting X32 eve 280ah cells from Docan. I have gone down the rabbit hole of discussions as regard compression and went from a no compression stance to to prepping for a compression setup!

I was unsure whether to start a new thread or jump long train discussion post.

I have two questions that will likely not have absolute answers due to the nature of compression; however may help me decide.

Should I place my cells in their end point series configuration and purchase extended bus bars so as to connect them in parallel for the purpose of top balancing?

Ive read that if I top balance and then change the config there may be bulging. I read one or two posts that reducing to a certain SOC post top balance may relieve the bulge so as to remove the cells and change the cell orientation but ive couldn’t find the best SOC.

Compressing them once and for all and then adapting bus bars between series and parallel seemed safer

My second common question is tightness/torque/level of compression. I don’t have the tools/mathematical equations or scientific knowledge to calculate the compression accurately so just plan to do as others and go just beyond finger tight. I plan to place some Plastazote (closed cell foam) in-between each cell. Is there a ideal SOC level that I should tighten/compress the cells? Or am I overthinking it?

Thanks

Not using springs in compression fixture. Just using yellow pine wood 1 inch x 10 inch cut to length and four 1/4 inch course threaded rods with 1/4 inch nuts & washers on the 8s Lifepo4 battery banks.

This is Info I used and torqued a little less at 5 Inch Pounds with a torque wrench at about 3.2 to 3.3 volts charge in each cell.

The spec from EVE was 300 KG force which rounds off to 660lbs. Battery face is approx 6.85"x 7.874" = 53.94 sq inches
660lbs/53.94sqin=12.23 lbs per sq inch
Divide 660 by 4 bolts that's 165 lbs Axial (clamping) force per bolt.
Using 4 course 1/4 in threaded rods that should equate to roughly 8 INCH pounds torque per bolt. Realistically, that's a snug twist of the wrist on a regular nut driver for the average build mechanic.
Thanks for the overview and calculations. I will try and adapt your process with 16s (split in half so larger surface area) and a 6 bolt/thread setup.
 
For your questions:
1) the rule would be to never have cells at a high state of charge uncompressed, and whatever you do beyond that is fine. I just used an active balancer to balance. Took a few days but worked great.

2) I put a scale in my compression setup to figure or how tight it actually needed to be, then replicated with the cells. Remember it's a reasonably wide range to get the desired effect. Someone above rated it as a "snug twist", which is close to my memory.
The scale is a great idea! Simple, but hadn’t considered as an option.
 
I used these. I measured their K values to be ~165#/inch. $3.29 each. Easy to get.

NOTE: That was for an 8 cell pack. You might need something different if you use more cells in a single compression fixture.

https://www.oreillyauto.com/detail/c/melling/melling-valve-spring/mel0/vs360?q=Melling+VS-360&pos=0
Thanks, I wound up buying 4 of these. I'm only compressing 4 cells and I think they should suit fine. I kind of like that they're only 3/4 diamater and 3/8 ID. https://www.grainger.com/product/44...gucid=EMT:10339122:Item:CSM-323&emcid=NA:Item
 
After a lot of searching for a Canadian provider I found these:-
https://victoryspring.ca/shop/compression/9-1208-21/

They are 2" long with a 3/8 ID for the rod. Based on a split 16s compression with X6 bolts I will be looking for 110lbs force per bolt which will be achieved at just under 0.50" spring deflection. I think my calculations are correct!
 
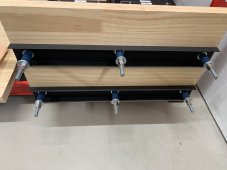
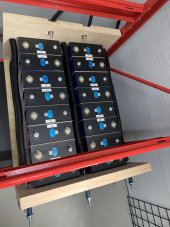
Compression is all set (0.50=167lbs) But I found that two of the springs on the left have shifted twice in their deflection in 24hours (less deflection maybe 1/8”).

I’m guessing either the cells have shifted or the compression material could be bending/bowing.

I put straight rule up and can’t see any bending, it just seems odd that the two left springs (upper and lower) are the only ones that changed…

Do I keep retightening to make the two springs the same as the rest or just let it be?

Thanks
 

Attachments

  • B6EEE95D-243D-474C-9CC9-7B2990603E83.jpeg
    B6EEE95D-243D-474C-9CC9-7B2990603E83.jpeg
    153.5 KB · Views: 23
  • 12384711-B3EE-461D-9490-B32BEF637332.jpeg
    12384711-B3EE-461D-9490-B32BEF637332.jpeg
    162.9 KB · Views: 23
I didn't make my final adjustments until after my cells were completely balanced and my bank was at a full charge. After that, the material I put between the cells compressed the tiny bit so I did have one readjustment to make.

It also seems to me that in your current configuration, 167 lb per spring seems a little light. I think the target is around 660 lb per battery face, and you have two battery faces. Seems to me that you should be around 1,300 pounds total.
 
100 Proof seems to have a good point. The 167 pounds per spring would be for the area of one 280 ah cell. You have 2 so the spring rate would need to be twice the area divided by the 6 springs you have. Also, you mentioned the material between the cells. What material are you using and is it compressible? If so it might have settled some.
 
Hey, yes correct my springs are a little light. I purchased enough for 4 packs and then realized my calcs were for a single row. They weren’t cheap so I decided to just live with some compression is better than none.

I have porin like foam in between (2mm I think)

My springs do have enough room for a little more deflection (180lbs) however not enough for specs 220 per spring…
If you want to add a couple more springs, these are cheap and easy to get. https://www.oreillyauto.com/detail/c/melling/melling-valve-spring/mel0/vs360?q=Melling+VS-360&pos=0

I measured their K values at 165 lb per inch. Alternatively, I would go ahead and crank yours up to 180 lb if you want to stay with six springs. Make sure you do so when your bank is fully charged and completely balanced. That will be when they are in the most expanded case.

Enjoy your new battery bank! I know mine has worked out swimmingly for me.
I bit the bullet and ordered some more at the correct values. No point in doing everything right and then cutting corners at the end!

I am based in Canada so a bit more difficult to source.

These should do the job of 220lbs per spring


With the correct spring I will compress whilst at 30-40soc
 
I figure that if set four six or eight batteries on a scale then zero the scale, and add 660 lbs to the top of the stack of batteries the scale will read 660 lbs. So the weight will exert the pressure of 660lbs on each battery cell face, when the batteries are removed from the scale and placed in their normal position. Also, remember that once the cells begin to expand, if the cells are tightly packed with out a soft low Modulus of hardness material between the cells, then the cells will apply opposing pressure against themselves. Increasing the pressure even further against the supports. So if using springs they will not restrict the force of the expanding cells as well as without them.
 
With the correct spring I will compress whilst at 30-40soc
Your pack will "grow" about 3mm at full charge from that level. Make sure your springs can accommodate the growth without exceeding their Maximum Safe Travel, or even getting bound up. Make sure your overall fixture compression pressure is still within specs then as well.

I adjusted mine at a full SOC so my pack is at the target compression spec when it is needed most and backs off a bit when it is less important. That way I am guaranteed my springs will never exceed their Maximum Safe Travel specification. At the minimum expansion, my compression pressure only drops off about 15% with the springs I chose.
 
Last edited:
Back
Top