diy solar

diy solar

Doubling bus bars when building battery packs

Alfalfameister

New Member
Joined
Feb 21, 2020
Messages
50
Since the bus bar that normally comes with these Alibaba cells are lacking in impressiveness and thickness or width (hmmm... where did I hear that before? Oh, nevermind), most people ask for double bus bars from the sellers, or make their own from either copper pipe or whatever...

Question about doubling the busbars (Amy of Xuba/Luyuan kindly sent me quite a few extra when I asked), if I make a 2P4S (or 8S or 16S, but 2P), do you need to double the busbars between the parallel cells?

The screws (yes, I know you can buy longer screws) can accommodate up to 3 busbars stacked on top of each other, but 4, probably not.

Is it okay to use a single busbar between the parallel cells, and just double the busbars in the series (+ to - of the next cell)?
 
Between parallel packs depends on your BMSs. If you use buss bars then you might as well do 2P and save the expense of the second BMS.
I am not sure i completely understand your question enough to answer it correctly. The simple answer is if your loads warrant it everything should be doubled.
I use studs to get deepest holding power and then it doesn't matter how many buss bars or washers I use. Much simpler than different screw lengths or washers to guess on depth.
 
  • Like
Reactions: Zil
I meant making like a 2P16S single pack, the bus bars that connect between each 3.2v cell. In the "2P" part (two 280Ah cells in parallel to make a 560Ah 3.2v cell), do you need to double the busbars there?

Was thinking that I think I have to double the connection between the series part (+ to -) but not sure if its imperative to also double the one to parallel the cells.
 
probably not as important on the buddy pairs you are parallelling. For sure on the series connections. Do you have a way measure temperature conveniently? It all depends on the Amps.
 
Most of the time, the draw will only be in the 20A range. When water kettle goes on, it's about 50+A for about 5 min at most. If someone takes a shower with the water heater (we have individual water heaters per shower), maybe 150A also for only about 5-10 min.

(Deye (aka Sol-Ark) inverter capable of 190A per specs)

But those are short events. Likely most of the time, in the sub 30A range.

Didn't really have a basis except maybe some ampacity charts on "the Internetz" and just basing it on people mentioning the free busbars that normally come with the purchase *look* inadequate (they're 3mm x 15mm)
 
Let's step back a sec here. Dubling the 2mm thick busbars (as supplied) is not a bad idea and hence why Amy doubles them up now because this is very common to do. IF you are doubling, then double them everywhere and stay CONSISTENT ! This is REALLY IMPORTANT because resistance, impedance and everything counts for the entire systems performance & health.

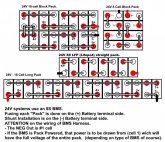
For my 280AH cells (2, 8S-24V block packs), I used the following cuts: 2x 4.250", 12x 3.750. ) COPPER C110 FLAT BAR ASTM-B133 0.125" x 0.750"
The 4.250" bars were for the cross over which have to be longer. See 24V layout drawing below.

A word on the "Grade-A Commodity Cells". These cells meet Manufacturers Grade-A Spec and have passed Production Testing to qualify as such and fit within the general Grade-A Spec. These are NOT fully Matched for Voltage & Impedance/Resistance through a long validation cycle (that adds $$$ to the cost). This is where the whole manually Bottom/Top Balancing comes in and validating the cells, which is still not the same thing. IF you buy Fully Matched & Batched cells, they will have near identical IR (internal resistance) throughout the full voltage range when idle & when under load. ONLY fully Matched & Batched cells shoudl be set in parallel within a pack ! This is to ensure that all cells are even throughout their cycle, an imbalance can result in premature failure and deterioration. Please see the references provided. With these EVE-280's like any "commodity cell", unless you are certain the Voltage & IR is consistent throughtout a whole cycle from 2.50-3.65V for all the cells paralleling them is unwise. Therefore I only recomend build Simple Series Packs with a BMS per pack and with each cell being monitored and managed.

Some BMS' are capable of Passive Balancing which burns off Hi Volts from cells to match the lowest cell voltage in the pack.. Very slow & tedious on cells larger than 100AH. Other BMS' have Active Balancing that transfer voltge from Hi Cells to Lo Cells. Good ones are $$$ and rare.

REFS:
BU-803a: Cell Matching and Balancing – Battery University
Pre-Balancing Cells | Orion Li-Ion Battery Management System


24-Volt-Pack Design.jpg
 
^^^ What he said. If you double just the series connections then the weak link is the parallel connections, and vice-versa. Double up all the connections.
 
Okay, i guess I'll have to look for longer screws (to accept the quadruple busbars on the series part of the cells).

While Steve_S does says that, he also quickly adds he wouldn't do that (2P16S) and would rather have the redundancy of 16S2P with two BMSs.

In another thread (can't recall which), another forum member (Solar Rat, I think) says it's okay to do 2P for brand new Grade A cells (not matched and batched as Steve_S would prefer IF he were to do 2P).

I like the redundancy of the 16S2P approach with two BMSs, but I also like the simplicity of the 2P16S. While "matched and batched" would be OPTIMAL, I think brand new Grade A cells (vs used and aged cells) are ACCEPTABLE for "2P-ing".

But all this doubling of busbars... I'll just wait a few days before assembling then and use a 3.175mm x 25mm copper bar (with the tedious job of cutting them (they come in 1m lengths) and drilling holes).

Seller of the copper bars also has 4.75mm x 38mm, but at more than double the price of the 3.175mm x 25mm bar.

I'll also look for stud bolts instead.
 
A LOT of us have bought unmatched & batched cells and learned that they do vary quite a bit. This is my own and others experience summed up for you. When you have cells at 200+mv apart and differing IR's you will have premature cutoffs on both the Hi & Lo sides. Addiionally some of the references I provided address this to some extent because different chemistries also behave differently as well. Being that I am Rural, Remote and 100% off-grid, redundancy & security are key esentials, so it is always a the forefront of good design practices.
 
I started out thinking 2p4s for my RV trailer. Enough wisdom was hammered into my brain that I switched to 4s2p. I'm very glad that I did. Trying the wrangle a 2p4s battery at ~90 lbs would have been challenging. The finer granularity of balancing with two BMS instead of one convinced me that 4s2p was the way to go.
 
I measured the current on the parallel versus series links in a pack I am building this week. The series links carry most of the current. The parallel bars mostly carry rebalance current. The pack is a 4p4s topology.

The rebalance current, within the time resolution I could measure with my equipment, did not exceed 20% of the series current over the half hour or so that I observed. It mostly stayed low, but it would fluctuate as the various parallel cells moved around, and there could be a cell somewhere in a module that is "slower" to balance and thus has a higher catch-up current for short periods.

I think you could safely run smaller links between the paralleled cells, but it's relatively easy to switch to the grub screw approach and gain extra height, or even make a custom bar, and not worry about it.
 
I measured the current on the parallel versus series links in a pack I am building this week. The series links carry most of the current. The parallel bars mostly carry rebalance current.

Ahhh...excellent... I'm all for "just overbuild it and not think about it anymore" (ie, "just double it up everywhere") but that is great info that shows its the series bar that carries most of the current.
 
Yeah McMaster sells them as “grub screws” here, so I just adopted their term.
 
Okay, i guess I'll have to look for longer screws (to accept the quadruple busbars on the series part of the cells).

While Steve_S does says that, he also quickly adds he wouldn't do that (2P16S) and would rather have the redundancy of 16S2P with two BMSs.

In another thread (can't recall which), another forum member (Solar Rat, I think) says it's okay to do 2P for brand new Grade A cells (not matched and batched as Steve_S would prefer IF he were to do 2P).

I like the redundancy of the 16S2P approach with two BMSs, but I also like the simplicity of the 2P16S. While "matched and batched" would be OPTIMAL, I think brand new Grade A cells (vs used and aged cells) are ACCEPTABLE for "2P-ing".

But all this doubling of busbars... I'll just wait a few days before assembling then and use a 3.175mm x 25mm copper bar (with the tedious job of cutting them (they come in 1m lengths) and drilling holes).

Seller of the copper bars also has 4.75mm x 38mm, but at more than double the price of the 3.175mm x 25mm bar.

I'll also look for stud bolts instead.
Use M6x20mm set screws. Perfect for double or even triple busbars.
 
Let's step back a sec here. Dubling the 2mm thick busbars (as supplied) is not a bad idea and hence why Amy doubles them up now because this is very common to do. IF you are doubling, then double them everywhere and stay CONSISTENT ! This is REALLY IMPORTANT because resistance, impedance and everything counts for the entire systems performance & health.

For my 280AH cells (2, 8S-24V block packs), I used the following cuts: 2x 4.250", 12x 3.750. ) COPPER C110 FLAT BAR ASTM-B133 0.125" x 0.750"
The 4.250" bars were for the cross over which have to be longer. See 24V layout drawing below.

A word on the "Grade-A Commodity Cells". These cells meet Manufacturers Grade-A Spec and have passed Production Testing to qualify as such and fit within the general Grade-A Spec. These are NOT fully Matched for Voltage & Impedance/Resistance through a long validation cycle (that adds $$$ to the cost). This is where the whole manually Bottom/Top Balancing comes in and validating the cells, which is still not the same thing. IF you buy Fully Matched & Batched cells, they will have near identical IR (internal resistance) throughout the full voltage range when idle & when under load. ONLY fully Matched & Batched cells shoudl be set in parallel within a pack ! This is to ensure that all cells are even throughout their cycle, an imbalance can result in premature failure and deterioration. Please see the references provided. With these EVE-280's like any "commodity cell", unless you are certain the Voltage & IR is consistent throughtout a whole cycle from 2.50-3.65V for all the cells paralleling them is unwise. Therefore I only recomend build Simple Series Packs with a BMS per pack and with each cell being monitored and managed.

Some BMS' are capable of Passive Balancing which burns off Hi Volts from cells to match the lowest cell voltage in the pack.. Very slow & tedious on cells larger than 100AH. Other BMS' have Active Balancing that transfer voltge from Hi Cells to Lo Cells. Good ones are $$$ and rare.

REFS:
BU-803a: Cell Matching and Balancing – Battery University
Pre-Balancing Cells | Orion Li-Ion Battery Management System


View attachment 23169
I am working on the 24V 16 cell block pack at the moment. how thick busbars would be required for the 280Ah Lishen cells. obviously, the single supplied busbar is not enough. probably have to buy copper busbar flat stock to drill out Or? any ideas? the tables I see are somewhat confusing but it evidently depends on the amperage required. any suggestions? the 280Ah in parallel will be 560Ah cells then 8 in series. I ordered longer studs 6mm x 25mm Stainless steel. now I need to refigure the busbar interconnection sizes. Thanks in advance. I have 32 280Ah Lishen cells but will use 16 in each pack.
 
4mm (1/4") thick x 15mm wide (1/2")will happily carry 250A without a blink.

Just be CERTAIN, you install the studs, goto bottom, back out 1-1/2 turn. HOLD the screw with the Allen key while tightening the nut down. Serrated washers hold very well in comparison to split ring washers. Loctite only on nut thread, no gobs. NoAlox/OxGuard can be used but just a very little bit on the contact surface of the cell and NEVER on the threads (its' a grease) it will skew the torque, much easier to strip the soft aluminium that way. NO FUN FACTOR THERE.

Chamfer holes drilled through busbars. Keep holes as close/tight as possible (1/4" or 5/16). Leave no burrs or ridges, they'll mess with resistance.

ALWAYS clean Cell Tops & Bus bars to remove machining oils (from tapping threads) & waxes which are applied to protect from corrosion while stored. A light "scuff" with a scotchbrite pad works well, then wipe down with a DAMP cloth & DAWN Dishsoap (it's a terrific grease & oil cutter, use it auto restoration work too), then Rubbing Alcohol before applying noalox if you are going to use that.

Hope it helps, sorry it is how I wrote it but I'm over my wakie wakie time & must take a nap now.
 
I spoke to the cleaning method in another thread. Based on how the welding community cleans aluminum the process is:
1. Degrease/clean the surface
2. Lightly abrade the surface to remove the oxide layer. Abrade in one direction.
3. Final clean with a cleaner of your choice that leaves no residue. I tend to use Acetone and if not that, then denatured alcohol.

Do not use compressed air. Air is what promotes the oxidation. I'm not sure I would even blow it off with my breath, but that might be a bit extreme.
 
Back
Top