Hi guys,
I'm new to this forum and wasted a week trying to setup the EG4-18KPV inverter + LifePower4 batteries and I'm creating this thread so that others can save themselves some time.
Synopsis: EG4-18KPV-12LV INVERTER WILL NOT WORK WITH EG4 LIFEPOWER4 BATTERIES OUT OF THE BOX (unless you use a hub, which I do not have). You HAVE TO UPGRADE FIRMWARE ON EACH BATTERY. If you are seeing that RED BATTERY icon like I attached to this thread (see image) then you're having the same problem I had and it can be resolved by following my tips.
I recently received the EG4-18KPV-12LV (model) inverter and EG4 LifePower4 batteries from Signature Solar. Even though I thought I had known everything about this inverter from watching a ton of youtube clips and reading the manual multiple times, it turned out that I knew nothing.
My Hardware:
* EG4-18KPV-12LV
* 6x EG4 LifePower4 batteries
* Rack (not delivered, they say maybe it will ship at end of Aug).
My problem was that I was always seeing a "red battery" symbol upon booting up the inverter. In the "alerts" section of the LCD it indicated "Bat com failure" so I knew the inverter was not communicating with the battery. See attached image to determine if this is the problem you're having.
First lesson....
If this inverter is not communicating with the battery in the default configuration (which is a lithium battery) it will NOT work as expected so having it know about your batteries is critical unless you disable battery usage completely in settings. A quick fix for me was to switch it to "Lead Acid" battery type but of course that's not a long term solution since all my batteries were EG4 LifePower4.
Real Solution:
#1. This happens because the inverter is not communicating with the EG4 LifePower4 batteries. My batteries are BRAND NEW from SignatureSolar but the firmware on the batteries needs to be updated to communicate with this inverter. I had no idea since this is not mentioned anywhere in the manual, site or videos. Remember, if this inverter can't communicate with the batteries in the default configuration nothing works.
#1.5... Upgrading firmware requires that the battery has no loads and has 0000 for all the dip switches. So disconnect it from the inverter's power or shut down the inverter (at battery breaker) so nothing is pulling power from the battery. You can only work on ONE battery at a time to upgrade its firmware.
#2. To update firmware on the batteries you need a special cable. I had a regular battery communication cable I purchased from signature solar and while it worked perfectly for reading battery info, trying to "Get boot info" in the "BMS_Test" program always threw "Get boot information failed!" error. This is BECAUSE THERE IS A DIFFERENT CABLE FOR UPGRADING FIRMWARE! You can waste a lot of time with this problem. The cable you want to update the firmware on the LIFEPOWER4 BATTERIES is this one. https://signaturesolar.com/eg4-usb-read-write-cable/ .. The windows drives are here: https://eg4electronics.com/wp-content/uploads/2022/08/USB-Cable-Driver.zip ... You can make this cable yourself or buy it from amazon. If you need help with that part let me know via direct message.
#3. The firmware upgrade is pretty well documented but critical. Make sure you follow the Video/Guide included in the zip file exactly. I was able to do this remotely via a macbook laptop running a virtualized windows instance so I know it's definitely possible if you're on location (as long as you have internet). The firmware is here: https://eg4electronics.com/wp-content/uploads/2023/07/Lifepower4-V3.26-1.zip .... Once you unzip that file you'll want to navigate to the "V3.26.binc files" directory. There you'll find the 2 firmware files but you ONLY INSTALL ONE. Only one of them is for your batteries. In my case it was "YS00_SW031A_HW0207_Update.binc". You want to match that 0207 with 0205 file to whichever battery type you have and that is shown when you click on "Get Boot Info". I have LifePower4 batteries and they're pretty new (I think, I got them last week) so my firmware was 0207 and that's why I used the "YS00_SW031A_HW0207_Update.binc" file.
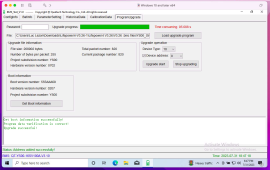
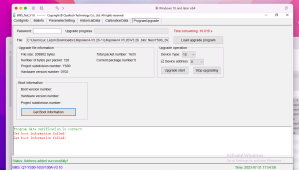
#4. Assuming you were able to connect with your LAPTOP using the special READ/WRITE cable to ONE battery and your battery DIP SWITCHES for the battery you're plugged into are all set down (off) AND you selected "Device Address:" 0 in the "ProgramUpdate" tab on the "BMS_Test" program, click on "Get boot information" to get your firmware info. This is the part that wasn't working for me because I was using a bad cable. Once it works and shows you boot info you're golden.
5. Click on "Upgrade start" if you got a success message. It will upgrade the firmware JUST FOR ONE BATTERY.
If the firmware upgrade worked (it will show success as per my screenshot). After that reboot the battery, PLUG JUST THAT BATTERY INTO THE INVERTER USING THE CABLE THAT CAME WITH THE INVERTER, and make sure that the battery side of the cable is plugged into the battery and inverter into the inverter (its the gray cable that's labeled on both sides). Restart both the inverter and the battery by using the breakers.
ONLY TEST on one battery at a time. This process has to be repeated to update firmware on all LifePower4 batteries otherwise THEY WILL NOT WORK WITH THIS INVERTER (unless you buy the hub).
One week of banging my head and this was resolved in 30 minutes with a firmware upgrade on the batteries. Hope this saves you guys some time.
Thank you to EG4_Ty on this forum for pointing me in the right direction!
Luc
I'm new to this forum and wasted a week trying to setup the EG4-18KPV inverter + LifePower4 batteries and I'm creating this thread so that others can save themselves some time.
Synopsis: EG4-18KPV-12LV INVERTER WILL NOT WORK WITH EG4 LIFEPOWER4 BATTERIES OUT OF THE BOX (unless you use a hub, which I do not have). You HAVE TO UPGRADE FIRMWARE ON EACH BATTERY. If you are seeing that RED BATTERY icon like I attached to this thread (see image) then you're having the same problem I had and it can be resolved by following my tips.
I recently received the EG4-18KPV-12LV (model) inverter and EG4 LifePower4 batteries from Signature Solar. Even though I thought I had known everything about this inverter from watching a ton of youtube clips and reading the manual multiple times, it turned out that I knew nothing.
My Hardware:
* EG4-18KPV-12LV
* 6x EG4 LifePower4 batteries
* Rack (not delivered, they say maybe it will ship at end of Aug).
My problem was that I was always seeing a "red battery" symbol upon booting up the inverter. In the "alerts" section of the LCD it indicated "Bat com failure" so I knew the inverter was not communicating with the battery. See attached image to determine if this is the problem you're having.
First lesson....
If this inverter is not communicating with the battery in the default configuration (which is a lithium battery) it will NOT work as expected so having it know about your batteries is critical unless you disable battery usage completely in settings. A quick fix for me was to switch it to "Lead Acid" battery type but of course that's not a long term solution since all my batteries were EG4 LifePower4.
Real Solution:
#1. This happens because the inverter is not communicating with the EG4 LifePower4 batteries. My batteries are BRAND NEW from SignatureSolar but the firmware on the batteries needs to be updated to communicate with this inverter. I had no idea since this is not mentioned anywhere in the manual, site or videos. Remember, if this inverter can't communicate with the batteries in the default configuration nothing works.
#1.5... Upgrading firmware requires that the battery has no loads and has 0000 for all the dip switches. So disconnect it from the inverter's power or shut down the inverter (at battery breaker) so nothing is pulling power from the battery. You can only work on ONE battery at a time to upgrade its firmware.
#2. To update firmware on the batteries you need a special cable. I had a regular battery communication cable I purchased from signature solar and while it worked perfectly for reading battery info, trying to "Get boot info" in the "BMS_Test" program always threw "Get boot information failed!" error. This is BECAUSE THERE IS A DIFFERENT CABLE FOR UPGRADING FIRMWARE! You can waste a lot of time with this problem. The cable you want to update the firmware on the LIFEPOWER4 BATTERIES is this one. https://signaturesolar.com/eg4-usb-read-write-cable/ .. The windows drives are here: https://eg4electronics.com/wp-content/uploads/2022/08/USB-Cable-Driver.zip ... You can make this cable yourself or buy it from amazon. If you need help with that part let me know via direct message.
#3. The firmware upgrade is pretty well documented but critical. Make sure you follow the Video/Guide included in the zip file exactly. I was able to do this remotely via a macbook laptop running a virtualized windows instance so I know it's definitely possible if you're on location (as long as you have internet). The firmware is here: https://eg4electronics.com/wp-content/uploads/2023/07/Lifepower4-V3.26-1.zip .... Once you unzip that file you'll want to navigate to the "V3.26.binc files" directory. There you'll find the 2 firmware files but you ONLY INSTALL ONE. Only one of them is for your batteries. In my case it was "YS00_SW031A_HW0207_Update.binc". You want to match that 0207 with 0205 file to whichever battery type you have and that is shown when you click on "Get Boot Info". I have LifePower4 batteries and they're pretty new (I think, I got them last week) so my firmware was 0207 and that's why I used the "YS00_SW031A_HW0207_Update.binc" file.
#4. Assuming you were able to connect with your LAPTOP using the special READ/WRITE cable to ONE battery and your battery DIP SWITCHES for the battery you're plugged into are all set down (off) AND you selected "Device Address:" 0 in the "ProgramUpdate" tab on the "BMS_Test" program, click on "Get boot information" to get your firmware info. This is the part that wasn't working for me because I was using a bad cable. Once it works and shows you boot info you're golden.
5. Click on "Upgrade start" if you got a success message. It will upgrade the firmware JUST FOR ONE BATTERY.
If the firmware upgrade worked (it will show success as per my screenshot). After that reboot the battery, PLUG JUST THAT BATTERY INTO THE INVERTER USING THE CABLE THAT CAME WITH THE INVERTER, and make sure that the battery side of the cable is plugged into the battery and inverter into the inverter (its the gray cable that's labeled on both sides). Restart both the inverter and the battery by using the breakers.
ONLY TEST on one battery at a time. This process has to be repeated to update firmware on all LifePower4 batteries otherwise THEY WILL NOT WORK WITH THIS INVERTER (unless you buy the hub).
One week of banging my head and this was resolved in 30 minutes with a firmware upgrade on the batteries. Hope this saves you guys some time.
Thank you to EG4_Ty on this forum for pointing me in the right direction!
Luc
Attachments

Last edited: