diy solar

diy solar

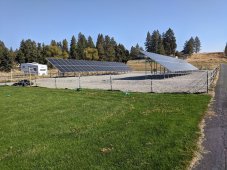
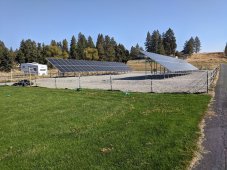
Finally, the start of my 25kw Ground Mount grid-tie system

@MarkSolar Would you use T-Posts to hold up the snow fence or something else? I've not really had to deal with fencing much. With the price of that, it may be worth it to just throw it up for a bit and then tear it down.
I'd use the tall verticals on the high side of the ground mount to attach the snow fence. For the front use some kind of post, you might see if the inspector will go for a step in plastic post. We use those for temporary snow fences and electric fences, they're pretty cheap and easy to put up and take down. Steel Tposts are a lot of work to pound in and remove.
I'd try to resist the idea of a fence, it seems unecessary to protect wiring that's already jacketed and uses connectors that can't be disassembled without a special tool. They don't make you build a fence around your subpanel and all you need to get killed there is a screwdriver.
 
Thanks! I'll need to do some more thinking. Aside from the final inspections and FENCE, this thing is DONE.

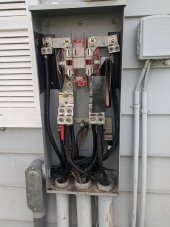
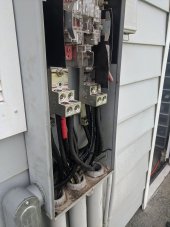
We just did this today. What's not in the pics is some mastic tape that goes over the outer most part of the lugs to prevent possibility of touching the lid. There is also some on the ground/neutral studs where they are close to the 4xLUGS. Getting this done felt good.

IMG_20221007_094910.jpg

IMG_20221007_094914.jpg


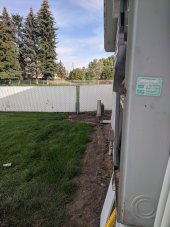
IMG_20221007_094922.jpg
 
@MarkSolar Thanks for the suggestion. I'm just trying to decide on what to do. I'm more or less thinking of either doing 1/4 metal pvc coated "mesh" on the bottom side of the panels or using the "snow fence" or chicken wire with either the posts you suggested or T-Posts like @Hedges suggested. I'd like to just rip the fence down in a couple weeks after I'm live, but I'll see what my electrician friend thinks about that since he has a lot of experience with inspectors. I'm hoping I can settle on something either tonight and get going this weekend or by the end of the weekend.

I'll give a call to the utility company and see if I can get their inspector out here now that I'm basically done.
 
We just did this today. What's not in the pics is some mastic tape that goes over the outer most part of the lugs to prevent possibility of touching the lid.

I had a similar concern with some fuse holders having cooling fins. I inserted a piece of FR4 edgewise as a bumper, held in place with roll pins pressed through holes.

Maybe that rubber tape is good enough (so long as nothing continuously presses on a corner) but I'd like a hard insulator.
Maybe taped on pieces of FR4 with holes for Allen wrench. Or, sheet of it taped to lid.
 
I ended up going with 5.5' 1.33 T-Posts. They were about $5.29 each and I bought 45. Ended up using 42. I think I'm going to use "polytape" around the fencing and do 3 tiers. I think it'll give as decent of a look as possible and actually be quite easy, cheap, and fast. I installed the T posts tonight. It was dark, so I suppose we will see how well they turned out in the morning. haha

The clips will be $60 and 1/2" polytape is $60 for 1320' or $120 for 1" in the same length. A couple hundred more dollars. I'm not sure which size I will go with. I'll probably get hands on tomorrow at N40 and choose then.
 
@MarkSolar Thanks. haha. I'm sure they would try. It's sorta locked in there since I don't currently have any "gates". You just have to climb through it. I didn't care about gates when doing it. I just wanted to get this thing done and moving forward/finished.

The inspector just left a message and said they will be out thursday.

edit: I was hoping the utility company would come out and do their inspection since this is pretty much just to check guarding. They won't until the inspector has closed the permit. gah. yet another week of waiting. Hopefully by the end of next week we can go live.
 
Last edited:
Inspection passed / closed out!!!!!!!! woot. He wasn't necessarily thrilled about the fence and wanted to see something on the back side of the panels, but he said he wouldn't "beat me up over it". Fantastic! I've already emailed the utility company to get them going on having their inspector out here. Hopefully they can get out here immediately so I can get my prod meter and then get to setting up the inverter settings.
 
The switch has been flipped and generation has officially begun!!!!!!!!!!!!!!!!!

I am trying to get the solarweb thing setup and it asks for the datalogger ID, however from what I'm seeing it says to go into wifi access point and find it there, however when I do that on the master unit it says "Wifi Access Point Is not available". It is connected to the network via RJ45. I just tried disconnecting it to see if that would bring me to wifi access point option to get the data logger ID. That was unsuccessful. Some more reading and googling, but if anyone see something obvious, please shout.
 
Each inverter does put out pretty much identical numbers for power output, which is what was expected. That was good to see!
 
I am trying to get the solarweb thing setup and it asks for the datalogger ID, however from what I'm seeing it says to go into wifi access point and find it there, however when I do that on the master unit it says "Wifi Access Point Is not available". It is connected to the network via RJ45. I just tried disconnecting it to see if that would bring me to wifi access point option to get the data logger ID. That was unsuccessful. Some more reading and googling, but if anyone see something obvious, please shout.
I'm a bit fuzzy but I recall during the Fronius setup that I chose the option to not turn on wifi. I was then able to connect to the IP that my router gave the fronius with a web browser and do the rest of the config. I don't remember details but the config went smooth after that. Did you choose the "don't turn on wifi" option when you were in the menu on the Fronius screen?
 
There is a little DIP switch on the datalogger that you can use to switch between the two. hopefully I can locate this thing on the network now.
 
LOL.

I was able to get into the fronius setup wizard by connecting my laptop directly and flipping the dip to "B" then back to A after changing some stuff, but then struggling from there to get the info to stick. I think it is because I have to disconnect the laptop and plug the inverter back into the actual network. I ran out of time right now, but will get back to it later today. Putting out about 10.5kw per inverter at the moment. I'm checking every so often to see what the peak will be. I'm kinda thinking being so late in the year that I may not reach full production of the panels during the day.
 
Since I don't have the application setup yet, I did check a 24 hour period on the prod meter and I produced roughly 210 kwh for the last 24 hours. Granted it was nice and sunny. The highest production I saw out of the panels today was 10.7kw on each inverter with a voltage floating right around 600v.

I know these can go to 1000v, but I also want to make sure it isn't somehow clipping / limiting based on some randomn setting wanting to keep it at 600v or less.
 
The switch has been flipped and generation has officially begun!!!!!!!!!!!!!!!!!
???

Excellent news. I've been waiting to hear if it had commenced operation.

Great work - what an epic.

As to getting connected with Solarweb, can't say I can help you there.

My installer made sure that was all set up and that was years ago. As you discovered you need to choose whether you are running via ethernet cable or wifi with the dip switch.

And yes there is a local wifi which connects you to a setup wizard and the system settings. You may need passwords for that, not sure what the defaults are.
 
Back
Top