diy solar

diy solar

Heavy-Duty Cabinet for large power bank

spoole100

New Member
Joined
Mar 29, 2021
Messages
3
I was thinking about building a ~60KWh battery bank and need a cabinet that is at most 18" deep to fit in the interior side wall of my garage. Using 4 banks of 16 x 280AH LiFePO4 cells the pack would be roughly 200lbs per shelf and 800lbs total. The only reasonably priced thing that I have found that would hold that much weight is this:

Global Industrial Storage Cabinet Ventilated

or

Global Industrial Storage Cabinet Closed

The shelves hold 300lbs each and it is available in ventilated doors and closed doors. I am thinking the ventilated doors would be better to allow the heat to dissipate. Does anyone have any other suggestions for me to look at? Am I going about this wrong?
 
Could work. But I'd be very afraid of stacking that much weight that high in one single cabinet. I wouldn't stack more than 2 shelves high really.

So my suggestion is to split your 4 banks into dual 2-bank low cabinets. I presume you're doing a 16s (48V) setup in 16s4p configuration. You might need to get 2 separate BMS but they're cheap.

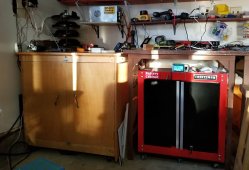
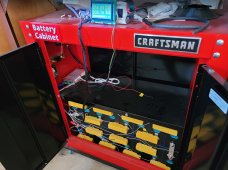
Example, I have a 15kWh array in one bank of the same 16s280Ah LFP batteries all contained in 1 shelf of one of those low Craftsman cabinets you can get from Lowe's:


I might get another bank of 16s for total 30kWh total later for a 16s2p setup. I would stack the second bank on the top shelf and total weight will be ~400lbs. Still light and low enough that my 6 Harbor Freight wheels I attached underneath it can still move the cabinet if needed.

I highly recommend sturdy wheels for most DIY battery cabinets. Because don't underestimate the ability to shift the cabinet a bit for maintenance, cleaning, repositioning, safety and what not. If you stack 4 banks of 16x 280Ah in one cabinet, it will be ~800lbs and impossible to safely move because its so high and heavy. Even if you had to just shift your 800lbs cabinet just a measly 1/2-inch, you're looking at disassembling most of the batteries just to re-position the cabinet just that little bit.

I don't want to alarm you but consider a rare but not impossible situation if the batteries start smoking and popping uncontrollably. With wheels, you can at least quickly push the cabinet out of your garage. But if its all in one tall immovable 800lbs cabinet, then may have to just let it burn while still within in the garage and possibly your home too for attached garages. In the event of smoking & popping, I'd still rather push the cabinet(s) out of the garage first before applying the Class-C fire extinguisher.
 
I've got 132 kWh or 2000 lbs of diy batteries (10 ea) on a diy 30" x 72", top and bottom shelves, workbench that i built an airplane on. Just engineer it properly, use good screws and glue, cover it in quarter inch cement board and ceramic fiber insulation around your batteries and done. 3.5 months off-grid and loving it.
 
Could work. But I'd be very afraid of stacking that much weight that high in one single cabinet. I wouldn't stack more than 2 shelves high really.

So my suggestion is to split your 4 banks into dual 2-bank low cabinets. I presume you're doing a 16s (48V) setup in 16s4p configuration. You might need to get 2 separate BMS but they're cheap.

Example, I have a 15kWh array in one bank of the same 16s280Ah LFP batteries all contained in 1 shelf of one of those low Craftsman cabinets you can get from Lowe's:


I might get another bank of 16s for total 30kWh total later for a 16s2p setup. I would stack the second bank on the top shelf and total weight will be ~400lbs. Still light and low enough that my 6 Harbor Freight wheels I attached underneath it can still move the cabinet if needed.

I highly recommend sturdy wheels for most DIY battery cabinets. Because don't underestimate the ability to shift the cabinet a bit for maintenance, cleaning, repositioning, safety and what not. If you stack 4 banks of 16x 280Ah in one cabinet, it will be ~800lbs and impossible to safely move because its so high and heavy. Even if you had to just shift your 800lbs cabinet just a measly 1/2-inch, you're looking at disassembling most of the batteries just to re-position the cabinet just that little bit.

I don't want to alarm you but consider a rare but not impossible situation if the batteries start smoking and popping uncontrollably. With wheels, you can at least quickly push the cabinet out of your garage. But if its all in one tall immovable 800lbs cabinet, then may have to just let it burn while still within in the garage and possibly your home too for attached garages. In the event of smoking & popping, I'd still rather push the cabinet(s) out of the garage first before applying the Class-C fire extinguisher.
Thank you for the reply -

Yes 16s4p configuration. Haven't thought about rolling cabinet in case of fire, but LFP batteries are not prone to fire at least.

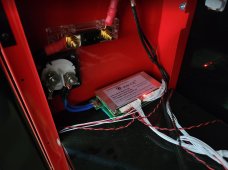
Do you have the BMS inside that Craftsman cabinet? Do you worry about heat at all?

That Craftsman cabinet that you posted is a wall-mount cabinet, which I wouldn't be opposed to. Plus it's red like "Hey, dangerous stuff in here".
 
I've got 132 kWh or 2000 lbs of diy batteries (10 ea) on a diy 30" x 72", top and bottom shelves, workbench that i built an airplane on. Just engineer it properly, use good screws and glue, cover it in quarter inch cement board and ceramic fiber insulation around your batteries and done. 3.5 months off-grid and loving it.
132KWh. Wow. Is your setup open or closed?
 
That battery weighs as much as a vehicle. Do you have photos of this monster? What is its array configuration? Is it in its own detached building?
 
Thank you for the reply -

Yes 16s4p configuration. Haven't thought about rolling cabinet in case of fire, but LFP batteries are not prone to fire at least.

Do you have the BMS inside that Craftsman cabinet? Do you worry about heat at all?

That Craftsman cabinet that you posted is a wall-mount cabinet, which I wouldn't be opposed to. Plus it's red like "Hey, dangerous stuff in here".
Sure. I have a 300A ANT BMS with LCD display & Bluetooth. It has been a good feature-rich BMS and uses MOSFETs for soft start. It can cut out either charge & discharge flows separately if any of the user configurable cutoffs are reached (cell imbalance, HVC, LVC, overcurrent, etc.).

No heat issues at all. Also I don't stress it enough. Max power I put it into it is about 47A during peak solar which is only 16% of its 1C 295A charge rate. During discharge I can do about 45A which is only 8% of its 590A 2C discharge rate. So plenty of headroom left so I could stack more DC chargers and discharge inverters to get more power which I eventually will do.

These LFPs we have are rated at 2C sustained output so your large 60kWh battery will peak at 120kW. You'll hit amp limits well before that at only 48VDC nominal so you won't have any heat issues either.

If anything, you might want to insulate the cabinet if you live in area that can get close to freezing in the garage and have BMS thermal cutoff.

Yes, the red color is gorgeous and hints at it containing something that needs to have caution around it.
 

Attachments

  • home_battery.jpg
    home_battery.jpg
    226 KB · Views: 56
  • home_batt3.jpg
    home_batt3.jpg
    305.2 KB · Views: 55
  • home_batt2.jpg
    home_batt2.jpg
    230.6 KB · Views: 55
Sure. I have a 300A ANT BMS with LCD display & Bluetooth. It has been a good feature-rich BMS and uses MOSFETs for soft start. It can cut out either charge & discharge flows separately if any of the user configurable cutoffs are reached (cell imbalance, HVC, LVC, overcurrent, etc.).

No heat issues at all. Also I don't stress it enough. Max power I put it into it is about 47A during peak solar which is only 16% of its 1C 295A charge rate. During discharge I can do about 45A which is only 8% of its 590A 2C discharge rate. So plenty of headroom left so I could stack more DC chargers and discharge inverters to get more power which I eventually will do.

These LFPs we have are rated at 2C sustained output so your large 60kWh battery will peak at 120kW. You'll hit amp limits well before that at only 48VDC nominal so you won't have any heat issues either.

If anything, you might want to insulate the cabinet if you live in area that can get close to freezing in the garage and have BMS thermal cutoff.

Yes, the red color is gorgeous and hints at it containing something that needs to have caution around it.

Where do you get those yellow bus bar protectors?
 
Sure. I have a 300A ANT BMS with LCD display & Bluetooth. It has been a good feature-rich BMS and uses MOSFETs for soft start. It can cut out either charge & discharge flows separately if any of the user configurable cutoffs are reached (cell imbalance, HVC, LVC, overcurrent, etc.).

No heat issues at all. Also I don't stress it enough. Max power I put it into it is about 47A during peak solar which is only 16% of its 1C 295A charge rate. During discharge I can do about 45A which is only 8% of its 590A 2C discharge rate. So plenty of headroom left so I could stack more DC chargers and discharge inverters to get more power which I eventually will do.

These LFPs we have are rated at 2C sustained output so your large 60kWh battery will peak at 120kW. You'll hit amp limits well before that at only 48VDC nominal so you won't have any heat issues either.

If anything, you might want to insulate the cabinet if you live in area that can get close to freezing in the garage and have BMS thermal cutoff.

Yes, the red color is gorgeous and hints at it containing something that needs to have caution around it.
Saw your YouTube videos and they gave me some good ideas. Going with something similar in black cause red clashes with SMA yellow lol.
 
Where do you get those yellow bus bar protectors?
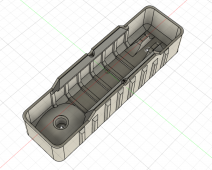
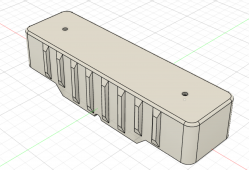
Sure, they're custom 3D printed. I can give you the AutoCAD Fusion360 file if you want. If you have different sized battery cell, you will need to resize the spacing. There is also a small 1.125mm hole to be able to test the terminals with a volt meter probe without ever needing to remove the bus bar protectors.

Highly recommended to have these protectors on especially during building! Install one bus bar then add in the protector right afterwards. I was installing a bus bar on an upper row and it fell and shorted on a lower row. Instant welding and scared the cr*p out of me.
 

Attachments

  • busbar_protector_b.png
    busbar_protector_b.png
    972.7 KB · Views: 6
  • busbar_protector_a.png
    busbar_protector_a.png
    742.2 KB · Views: 6
Last edited:
Sure, they're custom 3D printed. I can give you the AutoCAD Fusion360 file if you want. If you have different sized battery cell, you will need to resize the spacing. There is also a small 1.125mm hole to be able to test the terminals with a volt meter probe without ever needing to remove the bus bar protectors.

Highly recommended to have these protectors on especially during building! Install one bus bar then add in the protector right afterwards. I was installing a bus bar on an upper row and it fell and shorted on a lower row. Instant welding and scared the cr*p out of me.
Yes I would like the file please (Autocad or .stl if you have).

I will likely be using EVE 304's, should fit, right?
 
Yes I would like the file please (Autocad or .stl if you have).

I will likely be using EVE 304's, should fit, right?
Attached is the 7z compressed STL file. Looks like you can use it as-is since the EVE 304 and EVE 280 are the same size only the EVE 304 is just a bit longer in length.

Note there is a "socket" to attach the protector to one of the terminal bolts and the other end is a "slot". This design allows some degree of battery spacing tolerance. Also there are ridges the clamp onto the bus bar itself.
 

Attachments

  • Bus Bar Guard 001.7z
    31.7 KB · Views: 6
Attached is the 7z compressed STL file. Looks like you can use it as-is since the EVE 304 and EVE 280 are the same size only the EVE 304 is just a bit longer in length.

Note there is a "socket" to attach the protector to one of the terminal bolts and the other end is a "slot". This design allows some degree of battery spacing tolerance. Also there are ridges the clamp onto the bus bar itself.
Thank youuuuuu! ?
 
Back
Top