Zwy
Solar Wizard
First photo is general view of components. Positive and negative busbars. 200a breaker goes to inverter, ANL fuse to fuse panel and 40a breaker on far left is for the buck converter. As this is a 24v system, I was able to use lighter cable as it was quite tight with tight bends in various places. I would never have been able to make the bends if I went with a 12v system. 
Second photo is the Daly BMS and the 8 cell 24v battery.

Third photo is the shunt on the negative cable from battery, and ANL fuse on the positive cable. The small white wires are for the heater blanket under the battery which I have not installed the thermostat yet.

4th photo shows PV cables and battery cables running thru the rear wall and to the Growatt All In One. Running PV cable was accomplished by removing refrigerator and down thru that cavity (refrigerator is above this cabinet) from the refrigerator vent. This cabinet was insulated on sides and back to ensure in cold weather the battery temp was maintained.

5th photo shows main battery switch, after the ANL fuse and the inverter precharge button. The 50 ohm resistor is mounted inside above the door opening and pulls it's power from the fuse panel shown in first photo.

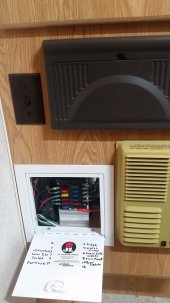
6th photo is shunt display and screen for BMS. These were installed when refrigerator was out. The red led switch is for switching on the Growatt inverter remotely. The white switch was a factory installed switch for outside lighting.

On the opposite wall is the 12v fuse panel shown in photo 7.

I found a nice access door on Amazon the just fit between the furnace and the wall in the left. The brown switch above the fuse panel is to switch off the factory AC to DC converter. I left the converter in place and use it only for running the power jacks. The 12v fuse panel required a buck converter and cable run from the 40a breaker shown in photo 1. This required running down the back wall, under the floor and thru the floor joists, then up under the false floor for the shower and thru a wall to the original power center. It was quite the effort.
Photo 8 shows the breaker for the fuse panel and corner of the buck converter. I just bent a busbar to from the buck converter 12v output to the breaker input.

Photo 9 shows the box attached to the rear of the camper.

This photo was taken while I was installing it. Photo 10 is a closeup of the bottom of the box.

RV detachable cord port on the left, ventilation fan in the middle. On the right is a switch to turn off the PV array. The Growatt has the annoying beep when the PV array doesn't put out sufficient wattage and will keep cycling on/off the charge controller/All in One which will drain the battery. I used a pvc LB to make the corner for the cables and wires that were shown in photo 4. I actually used the plate for an electrical mast reversed and screwed a pvc fitting into it with pipe dope to make the connection to the LB. The square box was used to cover the hole where an outlet was from the factory that stuck thru the wall in the way of the battery. It was the only way I could find a way to cover the hole and install a 120v outlet right above it. The rear 120v outlet is handy for charging our ebikes.
I will continue the photos in the next part of this thread.
Second photo is the Daly BMS and the 8 cell 24v battery.
Third photo is the shunt on the negative cable from battery, and ANL fuse on the positive cable. The small white wires are for the heater blanket under the battery which I have not installed the thermostat yet.
4th photo shows PV cables and battery cables running thru the rear wall and to the Growatt All In One. Running PV cable was accomplished by removing refrigerator and down thru that cavity (refrigerator is above this cabinet) from the refrigerator vent. This cabinet was insulated on sides and back to ensure in cold weather the battery temp was maintained.
5th photo shows main battery switch, after the ANL fuse and the inverter precharge button. The 50 ohm resistor is mounted inside above the door opening and pulls it's power from the fuse panel shown in first photo.
6th photo is shunt display and screen for BMS. These were installed when refrigerator was out. The red led switch is for switching on the Growatt inverter remotely. The white switch was a factory installed switch for outside lighting.
On the opposite wall is the 12v fuse panel shown in photo 7.
I found a nice access door on Amazon the just fit between the furnace and the wall in the left. The brown switch above the fuse panel is to switch off the factory AC to DC converter. I left the converter in place and use it only for running the power jacks. The 12v fuse panel required a buck converter and cable run from the 40a breaker shown in photo 1. This required running down the back wall, under the floor and thru the floor joists, then up under the false floor for the shower and thru a wall to the original power center. It was quite the effort.
Photo 8 shows the breaker for the fuse panel and corner of the buck converter. I just bent a busbar to from the buck converter 12v output to the breaker input.
Photo 9 shows the box attached to the rear of the camper.
This photo was taken while I was installing it. Photo 10 is a closeup of the bottom of the box.
RV detachable cord port on the left, ventilation fan in the middle. On the right is a switch to turn off the PV array. The Growatt has the annoying beep when the PV array doesn't put out sufficient wattage and will keep cycling on/off the charge controller/All in One which will drain the battery. I used a pvc LB to make the corner for the cables and wires that were shown in photo 4. I actually used the plate for an electrical mast reversed and screwed a pvc fitting into it with pipe dope to make the connection to the LB. The square box was used to cover the hole where an outlet was from the factory that stuck thru the wall in the way of the battery. It was the only way I could find a way to cover the hole and install a 120v outlet right above it. The rear 120v outlet is handy for charging our ebikes.
I will continue the photos in the next part of this thread.
Last edited: