diy solar

diy solar

Node Red example for Schnieder XW Pro/insight

Status
Not open for further replies.

n2aws

Solar Addict
Joined
Oct 24, 2022
Messages
681
Lately, there seems to be a lot of interest on the forums about using node red to manage some of the Schnieder ecosystem.

Schneider hardware is amazing. However, the firmware seems to be lacking in some functionality that newer inverters have.

The example below, will be for implementing multiple time of use windows. I'm writing this up, as it's actually one of the ways in whcih I'm using nodered. I'll start by explaining my use-case, and some assumptions. Then we'll get into the nodered.

Use-case:
My utility offers "time of use" rates that you can opt into. It's not required, but if you have battery storage, it can reduce your bill a decent amount.
  • Nov. 1 - March 31: Monday through Friday between 6 a.m. to 10 a.m., and 6 p.m. to 10 p.m. excluding Thanksgiving Day, Christmas Day and New Year’s Day
  • April 1 – Oct. 31: Monday through Friday during the hours from noon to 9 p.m., excluding Memorial Day, Independence Day and Labor Day
the Schnieder firmware can handle the summertime perfectly fine. It's a single window with 1 start/stop time.
The issue is, during the winter (starting Nov 1) there are 2 smaller windows per day. This is where the Schnieder firmware is lacking, and where I use nodered to automate this process for me.


Assumptions:
- I only have a single inverter. It is device ID "10" on the modbus. The examples will reflect that.
Unfortunately, I have no experience with multiple inverters, or making this work in a collection of inverters. (If someone wants to send me a second XW Pro, I'll update the posts! But, you won't be getting the inverter back! lol)
- In my environment, I have all the other settings how I want them. So, for this example, we're *only* going to be changing the grid support voltage. During "peak" periods, I set it to 51v. During offpeak, I set it to 65v (which enables enhanced grid support mode. This will prioritize charging the batteries from solar.. and will only go back to supporting loads or backfeeding the grid once the Schnieder SCC's get to "absorb" and "float" stages. You may need to expand on this example if you have multiple settings you want to change.


Installation:

For setting up and installing node-red, I'll leave that up to you. There are tons of guides online, so I don't need to re-invent the wheel here.
After nodered is installed, You'll need to install a couple addons/plugins

Open the hamburger menu in the top right, and select "Manage Palette"
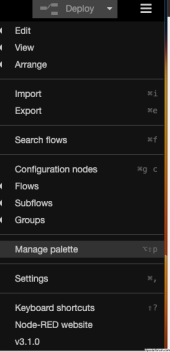
Screenshot 2023-11-02 at 10.15.17 AM.png

From there, click on install, and search for these 2 plugins and install them:
node-red-contrib-modbus
node-red-contrib-bigtimer
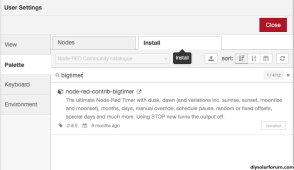
Screenshot 2023-11-02 at 10.17.49 AM.png


I've actually decided to break this up into a few posts, since it's already getting large. I'll start by just making a few replies as "placeholders", and then edit them to update it so we don't have a bunch of responses in between each instructional piece.
 
Last edited:
Once that is done. We'll setup the "Winter" times, in Bigtimer.

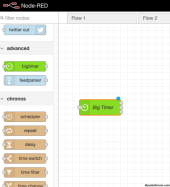
On the left hand side, scroll down to "Advanced" and drag the green "bigtimer" to the right side that looks like graph paper:
Screenshot 2023-11-02 at 10.21.05 AM.png


Now double click on the "Bigtimer" that you just added, and you'll open up the configuration screen for it.
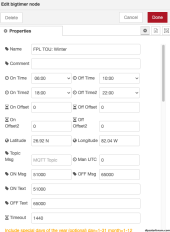
Change the name, to something reasonable. In my case "FPL TOU: Winter" makes sense. The name doesn't matter, and is just for you to see and quickly understand what the purpose is for this "object"

In the On and Off times, set the values that make sense. In my case, 6am, and 10am. then for the On time2, I chose 6pm and off time2 is 10pm.
Screenshot 2023-11-02 at 10.31.15 AM.png


You'll notice i have "ON Msg" set to 51000, and OFF Msg set to 65000. These will become important later. But for now, Just know that those relate to my "Assumptions" above, regarding my grid voltage settings of 51v and 65v. We'll dive into this a bit later on.


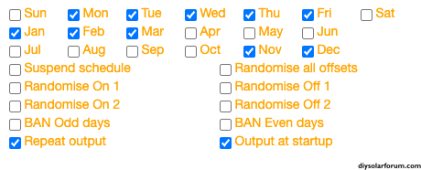
Now scroll down to the bottom of the config. This section is why I chose bigtimer over some of the other options. It allows you to set the schedule of when it's active. In my case, I want it for monday-friday, from Nov 1, through March 31. which looks like this:
Screenshot 2023-11-02 at 10.33.12 AM.png


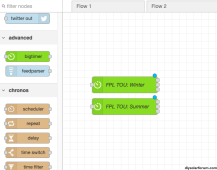
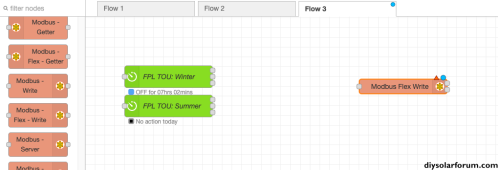
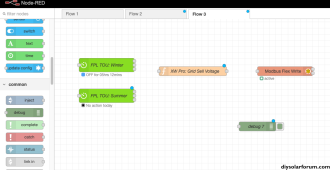
Now that the "Winter" TOU is done, repeat the process for summer (grab another bigtimer and drag it over, congigure it with a name, start/stop times, and days/months to have it active). When it's done, your palette should look something like this:
Screenshot 2023-11-02 at 10.47.05 AM.png
 
Last edited:
Next up (before we continue with nodered) lets enable modbus over TCP on the insight device, and configure nodered to talk to it.

Open up the insight UI (I use insight local)
Click on setup > Network > Modbus TCP Settings, and enable it:
Screenshot 2023-11-02 at 10.54.24 AM.png


That is all that is needed to enable this. Be aware, there are no credentials or security around modbus over TCP. So, please make sure your insight is on a private network, that isn't publically accessible from the internet. Securing your network is outside the scope of this guide, though.


Next, we'll configure nodered to use modbus over TCP with the insight device.
In nodered, scroll down the object until you get to modbus, then drag "modbus flex write" over onto your palette. It'll look something like this:
Note: The actual placement of the objects doesn't affect anything. I just generally try to put things together in a "logic flow" order, to help me remember what it's doing when I come back and look at it a few months from now.

Screenshot 2023-11-02 at 10.59.01 AM.png

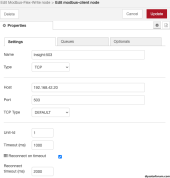
Double click on the new object, and under "server" select "Add new modbus-client.
Under settings, give it a name.
For host, give it the IP address of your insight device
for port, use 503.

Screenshot 2023-11-02 at 11.03.34 AM.png

I would also suggest clicking on "Optionals" and putting a checkmark next to "show logs" and "Show warnings"

Congratulations. Nodered can now talk to the insight and control it. But, *HOW* do we control it? Thats next!
 
Last edited:
Now it's time for the meat of this whole thing. A couple notes first:

  • I will *not* be going into a deep dive of the programming/code. I will provide some high level info.
    • I'm doing this because there is a ton of info on the net, and I think we lose most of the audience when we get super-technical into code or similar. This example is NOT to showcase the full functionality of nodered (though at the end of this whole thing, I'll offer a few ideas of other functions you can do)
  • I will not be providing a ton of examples. The goal for this thread is to show the kinds of things that can be done. Take it, and go play! Implement whatever features you think are missing!
  • I'll be using the modbus maps found in this thread, specifically the "Conext XW" map.
    • In this map, the Schneider developers started with ID 1, and not 0. So, this causes us to have to "subtract 1" from the documented address. nodered uses the standard "start at 0" but Schneider did not.
    • In this map, you'll find this entry: Screenshot 2023-11-02 at 11.48.18 AM.png
      • This means the "modbus register" is 377 (subtract one, for 376)
      • it's a 32 bit unsigned integer (We won't dive into this, but just makes the code a little more complex than if it were a 16bit)
      • the value has a "scale" of 0.001, which is why we're writing the voltage as 65000, instead of 65. (this allows the ability to do something like 51500 for 51.5)

And with that, lets begin:

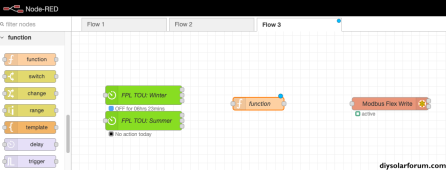
Log into nodered, and on the left scroll down to function, and then drag the function object to your palette. It'll look something like this:
Screenshot 2023-11-02 at 11.37.22 AM.png


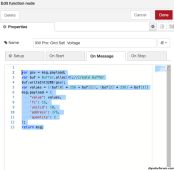
Double click on it, give it a name and add the following code:
var gsv = msg.payload;
var buf = Buffer.alloc(4);//create buffer
buf.writeInt32BE(gsv);
var values = [(buf[0] * 256 + buf[1]), (buf[2] * 256) + buf[3]]
msg.payload = {
"value": values,
'fc': 16,
'unitid': 10,
'address': 376,
'quantity': 2
};
return msg;
Screenshot 2023-11-02 at 11.44.15 AM.png

As mentioned in the notes.. since this is a 32bit value, the code is more complicated. I'll give a uint16 code example at the end of this guide, but you'll see that 16bit is dead simple. 32bit just requires us to "compute" the value across multiple modbus register addresses. hence all the "buf" and "buffer" stuff. - Don't get caught up in this detail.. it's only important if you are *writing* to 32bit values. reading from them is simple.

"value" is the number we're being sent from the bigtimer output. (it'll be 51000 or 65000 depending on the time of day with the example above)
"fc" is a "modbus thing" and essentially tells nodered to write the value to multiple addresses (because it's a 32bit value)
"unitid" is the modbus address for the XW Pro inverter. In my case, that is device ID 10.
"address" is the register address we found from the modbus map. it was 377 in the PDF, but we needed to subtract 1 as explained above. so, 376.
"quantity" is how many addresses we need to read/write, starting from address. Again, 32bit complicated this. for 16 bit, you'd specify 1 here.

I have a meeting in a moment, so I'll return to this guide shortly. We have the foundations in place. Now we just need to "wire it up"
 
Last edited:
Finally, plumbing it all up.

So, this is where the magic happens. We take the various "bits" we've configured, and wire them all up to produce a result.

Before we proceed, Please take a moment to log into insight, and get a configuration backup of the insight device, and any inverters/SCC's you've got attached. This way, if something goes wrong, you can restore to your current settings. Beware! I'm not responsible if you skip this step, made a mistake, and change something that you don't know how to revert!


With that out of the way


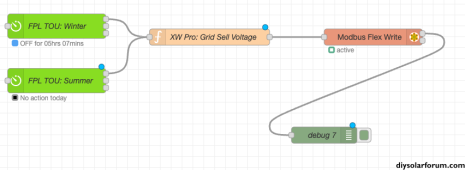
Start by scrolling on the right hand side to the "common" section, and drag a debug opbject to your palette like this:
Screenshot 2023-11-02 at 12.48.18 PM.png


This is kinda hard to describe in text.. but you'll notice each object has little grey dots or circles on the right and left. drag your mouse from the "output" of one object, and drag it to the input of the next object like you see here:
Screenshot 2023-11-02 at 12.53.48 PM.png

Once done, you'll want to hit "deploy" at the top right.

Note: everytime you make a change, you'll want to hit "Deploy". the UI allows you to "stage" a bunch of changes at once, but not have them go live while you are making those changes. To make all of the changes live, you *must* deploy them.

Now, for the next few months, every day at 6am, and 6pm.. the bigtimer object will send a "payload" of 51000 (as set in the "ON Msg" to the "function" object. It'll take that value that it got from bigtimer, and send it over to the modbus flex write object which will send that to the insight and get a response.

Likewise, at 10am, and 10pm.. bigtimer will send a payload of "65000" (As set in the OFF Msg) which then gets sent to the modbus flex writer.

In both cases, the resulting response is sent to a "debug" object that allows you to view the results of the flow.

With that, the example is done!

In the next post, I'll give a few ideas of other things you might want to try. I'll leave it as an exercise for you to implement, as I don't actually have a need for them.
 
Last edited:
So, we've barely scratched the surface of what node-red can do. Some additional ideas (off of the top of my head)

1) Maybe enable charging from the grid during the offpeak times. Additionally, you could use the "Modbus Flex Reader" to read the current battery SOC, and only enable grid charging if the battery is below X percentage SOC. You could also stop grid charging above X percentage, to make sure you have room for solar to continue charging the batteries.

2) Read the excess available PV after batteries are fully charged. write that value to an MQTT topic. Using an OpenEVSE compatible EV charger, configure it to read the MQTT topic, and automatically vary the charging rate to consume the excess PV, without drawing from the grid.

3) Load shedding: While the XW Pro has logic to enable/disable outputs based on battery state of charge.. you could move some of your "nice to have" loads out of your critical loads panel into another subpanel with a contactor between them. When the batteries are low AND there is a lack of PV, open the contact to stop the "nice to have" loads. (This logic would allow the "nice to have" loads to remain available if the batteries are low BUT there is enough PV coming in to charge the batteries.). you could pair this idea with some logic like:
- If batteries are below 40%, disconnect the "nice to have" loads, regardless of how much PV is available.
- If batteries are between 40 and 60%, and incoming PV is above X watts, enable the nice to haves. but if PV is below that amount, leave the nice to haves off.
- if batteries are above 60%, leave the nice to haves on, regardless of incoming PV power..


And finally, a cool idea I'd like to eventually implement. (I'm in the lightning strike capital of the country)
Wire in a 60a contactor between the main panel, and AC1. Let the XW control the contacter in "manual" mode.
Use nodred to read a weather API, and if lightening is expected/predicted/present.. open the contactor forcing a disconnect from the grid. Protecting your critical loads from nearby strikes (direct hits are another story!) If no lightning has been detected for some period of time, reconnect the grid

(To be fair, I just made these up without really thinking them through. I'm not claiming they are good ideas, or even feasible. Just helping you understand some of the things that nodered can do. The takeaway is, It can collect data from a TON of sources, and allow you to apply logic based on that data to achieve an end result. With that ability.. the sky is the limit on what you can do even with the somewhat limited schnieder firmware.)
 
Last edited:
And last but not least. As promised, here is a code example for reading 32 bit. Notice there is no need to manipulate the buffer? Reading 16 or 32bit is the same code, other than the address. This code would work with the "Modbus Flex Reader" object.

msg.payload = {
'fc': 3,
'unitid': 10,
'address': 376,
'quantity': 2
}
return msg


And to write a 16bit address is also easier than writing 32bit. (this one would be used with bigtimer and modbus flex write to enable/disable grid support) Notice the dstinct lack of buf/buffer lines? No data manipulation needed for a 16bit write.
var value = msg.payload;
msg.payload = {
'value': value,
'fc': 6,
'unitid': 10,
'address': 435,
'quantity': 1,
};
return msg;
 
Last edited:
This was requested:


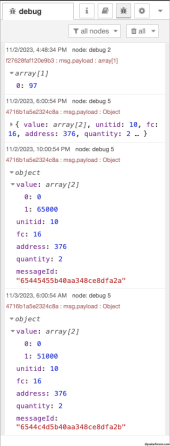
Here is a screenshot of the debug window from data fed to the debug object.
I've expanded the last 2 events. As you can see:

at 10:00pm, It set the GSV to 65v
at 6:00am, It set the GSV to 51v

Screenshot 2023-11-03 at 8.22.27 AM.png
 
Last edited:
Placeholder for continuity. (this may be excessive, but I'm not sure how many posts I'll need! it's a lot of info when we get into actually integrating with modbus)
 
This is great.
Are there other inverters which have a Modbus or Modbus TCP interface?
Another idea; If you're system has a problem it can email you via Node Red.
Also, if you get a smart light bulb that has a built in esp8266 you can link it to your MQTT broker and have Node Red flash the light if there is a problem. Some of the newer Automation Direct Click PLCs have built in MQTT functions. Also, ESP8266's can be easily made interactive with MQTT and they are only about $5 each and have analog and digital I/O.

There are several. I know some solaredge inverters, SMA devices, and the Tigo Cloud connect device do.
Also, some batteries can be queried over modbus too. But most of them will need the USB RS-485 adapter.

I monitor my EF4 lifepower4 batteries over modbus (via the insight device, so I can use TCP)

I doubt they all use the same modbus maps/register addresses. There is no uniform standard that I'm aware of (unless sunspec mandates one.. the Schnieder is not sunspec compliant) so, you'll likely need to find your own modbus map from your inverter manufacturer.


As for the other ideas.. exactly. Once you start playing with (and understanding) NodeRed and modbus, the onlt real limits you have is the time you have to add more cool stuff. lol
 
Last edited:
Very thorough! You've got a couple broken screenshots in post #2

Just as a couple more examples:
I have it set up to max out grid sell when the virtual power plant has an event (Ohmconnect.com) they pay at least $1.50/kWh and it's worth the automation.

I've also got it watching cell voltages (with input from the BMS) to control charging.
Separately, Node-Red adjusts the current availability to the EVSE.

Another idea; If you're system has a problem it can email you via Node Red.
I really should set up this functionality...
 
Very thorough! You've got a couple broken screenshots in post #2

Just as a couple more examples:
I have it set up to max out grid sell when the virtual power plant has an event (Ohmconnect.com) they pay at least $1.50/kWh and it's worth the automation.

I've also got it watching cell voltages (with input from the BMS) to control charging.
Separately, Node-Red adjusts the current availability to the EVSE.


I really should set up this functionality...

Are you guys in Texas? I've heard of the utility buying power for crazy rates like $1.50/kwhr there. At that rate I could fire up my Natural gas powered generator and sell back to the utility and be way ahead! But they don't pay folks in Indiana for that kind of thing. Our grid seems to be rock solid compared to other parts of the country - at least right now!
 
I'm in California

We're on net metering with the power company, but any excess at the end of the true up cycle is paid out at something like $0.01/kWh
Ohmconnnect is a VPP you can join, but for most members they aren't putting power onto the grid, they are just paid to reduce energy usage during events, these are typically an hour long on hot summer evenings.
I haven't read the Ohmconnect agreement in a while, but my net metering agreement says I can't sell them back their own power and I'm pretty sure anything from a generator is blocked by the agreement I signed.

They seem to be most (or only) active in California, Texas, and New York.
 
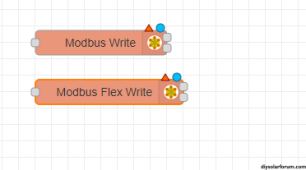
I'm not sure that you need the complication of a Function Block and Java.
I'm just sending the payload directly to Modbus Write, not Modbus Flex Write.

1699732611103.png

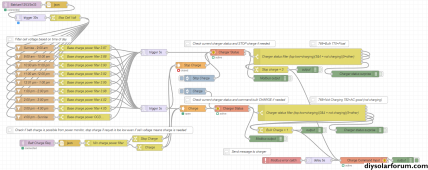
Here's part of an example for what can be done to charge from AC coupled solar.
Most of my solar is AC coupled, which the XW does support, but is missing control to allow charging the battery from this AC coupled solar. It looks like Schneider is working up to adding this basic functionality with recent firmware releases. But, I've been doing it since 2021.

All you need to do is take your grid load and try and drive this to 0 (or whatever your threshold is, I programmed my default to pushing 100 watts to the grid) You could also look at both legs and drive 240v output until both legs are as low as possible without either pushing to the grid, whatever you want. The programming with Node-Red is simple.
That said, I set up the math before I got comfortable with Node-Red and I do the math in the python programming for the energy monitor I use.
The energy monitor spits out the desired AC charge, in watts, via MQTT.
In Node-Red, I just convert that number and spit it straight to the XW/insight.
Schneider tech support said a message every 1-2 seconds was the expected frequency, so the python script spits out an MQTT message every 1.5 seconds.
Plus I've got a couple manual inputs, if I want to send manual commands, and a debug node, if I want to verify the messages are present.

1699740770738.png

That gets charge wattage into the XW, however you need to start the charge.
I am not using this currently, but it worked great when I did. Again some manual controls and a debug node incase I want to check the messages are present.
The modbus error catch node is pretty handy. If you leave the modbus alone for an extended period, it seems like the XW needs a wake up before it will receive the message. On the first send, the XW wakes up, but doesn't react. The error catch node send the same message again a few seconds later and the XW responds. This may just be that I am doing something wrong, but it has worked for me

1699741794857.png

Here is what I am currently using for starting/stopping charging, its more involved, but does allow the XW to stop charging in the middle of the day and support loads, if needed. Probably over kill. Also, it allows me to harvest more power from my DC solar with stepped cell voltage thresholds to stop AC charging when the battery is full enough for the DC to finish the charge cycle. I'm not even going to try and explain this and I'm sure there would be an easier/cleaner way to do it.
1699742086859.png

Does anyone know how to get Watt-Node data over Modbus from the Insight? I tried a bit and didn't see anything.
 
Last edited:
Status
Not open for further replies.
Back
Top