diy solar

diy solar

Roast my first build for off grid cabin

Electric box is pretty much done! Not 100% sure about grounding (I grounded SCC, common negative and AC panel). Not too impressed with my 20w heating pads, so added 3rd + gonna get a heat sink for them.
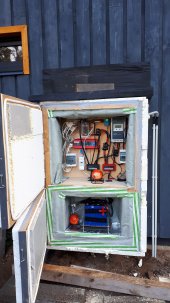
1.jpg

My 2x300w panels bring in around 480w when sunny, 150w when cloudy / tree shade covering and 2w when raining.
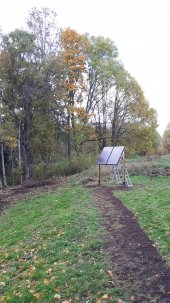
2.jpg

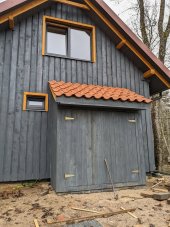
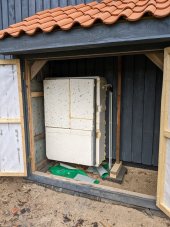
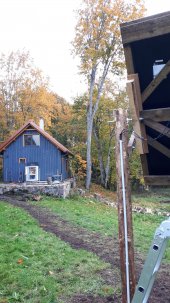
With cabin (which is also DIY project since last Summer with close to 0 experience). Electric box looks super ugly now, but gonna build a shed over it (hopefully this week).
3.jpg
 
Very nice setup. Quick question.
In the first and second picture bottom left is a crimp tool. Which one is that? Do you have a link to it?
Looks like a nice one.
Thanks
 
Project still underway, but I figured I share some pics in case there is some fatal error and you guys might save the cabin.

Gonna be small system, 12 volt DIY China special LiFePo4 (200ah), 2x300w panels.

Worst part is that we get cold winters here and electric "box" is attached to outside wall of cabin. I've insulated it quite a bit + there will be small shed protecting it (worried about condensation). I plan to wire up 2x20w silicone heating pads to batteries chamber that will activate if it gets too close to freezing and only if it's daylight hours (using time switch) on order not to waste energy heating it up at night.


View attachment 112827

View attachment 112828

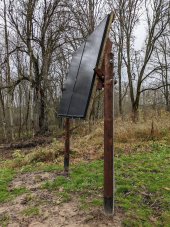
Built an adjustable ground stand with leftover wood (still needs paint job)

View attachment 112830

View attachment 112831

Added easlily adjustable fixator on both side for 3 positions (summer, winter, spring / fall)

View attachment 112832

Gonna try to finish it up in a week or so. Almost everything is aliexpress, and cost for everything is around 1300 USD.

Roast away!

How much power are you pulling from the inverter? Mine looks very much the same, same size, color, only with different branding, although rated at 2200w (and probably only 1000w continuous). Only using to run a 200-220w aircooler and testing 12v batteries. Overall I'm happy with it, although the positive and negative terminals could use some separation.
 
nice looking work ?

Thanks a lot!

Very nice setup. Quick question.
In the first and second picture bottom left is a crimp tool. Which one is that? Do you have a link to it?
Looks like a nice one.
Thanks

Thanks!
Sure, here's the link (crimping isn't that great with it, but wire stripping and cutting is sweet): https://www.aliexpress.com/item/32919605118
For bigger lugs I used this hammer crimp: https://www.aliexpress.com/item/1005001908000233

How much power are you pulling from the inverter? Mine looks very much the same, same size, color, only with different branding, although rated at 2200w (and probably only 1000w continuous). Only using to run a 200-220w aircooler and testing 12v batteries. Overall I'm happy with it, although the positive and negative terminals could use some separation.

I haven't fully tested it as cabin itself isn't finished yet. Although I was using 900w sander with no problems. Tried 2200w vacuum cleaner, but inverter started beeping and turned off. I'll let you know once I find the cut off point. And I agree about terminal seperation, lugs come super close to one another. I even put some tape inbetween for extra protection.
 
I haven't fully tested it as cabin itself isn't finished yet. Although I was using 900w sander with no problems. Tried 2200w vacuum cleaner, but inverter started beeping and turned off. I'll let you know once I find the cut off point. And I agree about terminal seperation, lugs come super close to one another. I even put some tape inbetween for extra protection.

Also once one of the terminals got loose inside, had to open the case to tighten it while being very careful doing it.
 
Not too impressed with my 20w heating pads, so added 3rd + gonna get a heat sink for them.
It looks like you've put a lot of thought into your build.

One suggestion I would give is that it is only your batteries that need to be warmed. Warming the entire compartment is not as efficient as putting the heading pads in contact with the bottom of the cells so that the heat can conduct into them. Then you need to have your temperature sensing also in direct contact with the cells to prevent over heating. The construction of the cells internally has a wrap of metal foil and graphite, like a jelly roll. If you heat the bottom of the cells, the heat will conduct directly up through the foil and heat the battery evenly. If you heat it from the side, the heat must conduct across the layers and it doesn't heat as well.

The other concern I have is how you will regulate the temperature in the compartment with the inverter. I'm not sure what efficiency the inverter has, but they can put off quite a bit of heat when under a large load. If cold is the primary issue, it might have been more advantageous to put the electronics on the bottom and the batteries on top to take advantage of some of the waste heat to keep the battery compartment warm.

I like the solar panel mount!

Is it okay to put cells in direct contact to heating pads? I've seen people putting metal (aluminium?) plate inbetween. And thanks, I will move my heating pads!

I placed battery on the bottom for 1) easier access to inverter and other components and 2) a bit shorter wire run as it's 12v system. Gonna have to monitor If components overheat. If it happens, easy solution is adding another temperature sensor / switch and a fan. I doubt there will be a need as inverter rarely gonna be used, and never constantly.
 
Would the brake lamp be enough for heating? I have a thermostat there (3$), and silicone pads are also just 3$ each, so can't get anything much cheaper than that.. Reliability is what could be improved. I haven't tested my heating system yet, quite curious if it actually gonna work.
A common 1157 12v brake light bulb has two filaments. The low filament draws about 8W and the high one draws about 27W. Not sure how a car's brake light system switches between the low and high filament (when you press on the brake pedal).

In any case, I used to make a fancy probiotic brew that required 100-105F. In a typical cube-shape camping cooler with a 40W bulb, when stored in a 60F room, it would get way too hot, up to 120F+. My first method was to keep the lid cracked just enough to keep it at about 100F. I later wired up the lightbulb to a thermostat so I could store the cooler outside and let the light come on and off automatically to keep the right temp. It was pretty amazing how warm a single 40W bulb could make it in there!

My point being - it doesn't take all that much wattage of an incandescent bulb to heat up an insulated small space. I doubt that a single 1157 bulb set to the high filament would be enough, but it might. You don't need it 100F in there! You can program a thermostat to say come on at 38F and off at 45F. Also, two or three bulbs would heat it up more quickly and should one bulb burn out while you're away from the cabin, the other two will work as backup.
 
Your work looks fine. Your wiring layout could use some tidying but I'm not one to talk.

My criticism has nothing to do with your workmanship but component choice and I'll just tell you to junk those breakers now.

They are absolute garbage. Just use fuses instead.
 
Your work looks fine. Your wiring layout could use some tidying but I'm not one to talk.

My criticism has nothing to do with your workmanship but component choice and I'll just tell you to junk those breakers now.

They are absolute garbage. Just use fuses instead.

Yeah not the first time I hear bad things about those breakers. Fuses + isolation switches seems the way to go. Anyone could link some fuse options on amazon/aliexpress/ebay? Price/performance is essential. As I mentioned, my whole system came around 1300$, so I'm not gonna put in 50-100$ fuses in there.
 
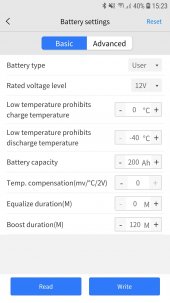
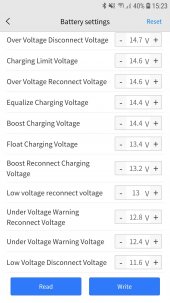
Is there anything I should change in my LiFePO4 battery settings?

1.jpg

2.jpg
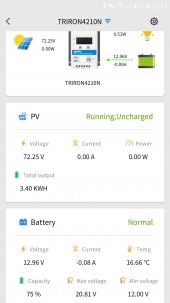
I'm not sure this is how it's supposed to happen - the moment battery is full (reaching boost charging voltage at 14.4v?), SCC stops charging and voltage drops down to around 13v, just as in this picture. Anything to be concerned about?

3.jpg
 
Yeah not the first time I hear bad things about those breakers. Fuses + isolation switches seems the way to go. Anyone could link some fuse options on amazon/aliexpress/ebay? Price/performance is essential. As I mentioned, my whole system came around 1300$, so I'm not gonna put in 50-100$ fuses in there.
The fuses is exactly where you don't want to go with low quality/cheap. I mean you can go with cheap parts everywhere else and should one of the devices (inverter, battery, etc.) start shorting out, a fuse will blow quickly to either protect your other equipment (saving $ not having to buy them again) and/or reduce the fire risk.

I mean if you spent $10k on your system components but then went cheap on poor fuses (that failed to work), then your $10k is up in flames. But since $ is a priority to you, do you really want to throw $1300 out the window if your fuses of unknown quality fail to protect your system, your property and possibly your health?

I mean a 32V 250A MEGA fuse + holder + an extra fuse is only $18 on CC, a known quality solar products retailer.

Point taken. Gonna upgrade my breakers. Sadly / fortunately I'm skipping winter and heading to Philippines in 10 days, so breakers will have to wait until I'm back (could be 6+ months). Maybe can instruct someone to do it while I'm gone.

https://www.aliexpress.com/item/4000662522492 - anyone knows if these kind of aliexpress fuses are any good?
 
A beginner question - how do I charge my battery from backup generator? I hook my LiFePO4 charger to B+ and other end of BMS? And do I need to switch off my panels while charging?
 
A beginner question - how do I charge my battery from backup generator? I hook my LiFePO4 charger to B+ and other end of BMS? And do I need to switch off my panels while charging?

Simply attach a proper charger for whatever battery type you are running to your batteries and plug it into the generator.

Nothing else needs to be changed.
 
Not much to roast here. Really nice looking setup.

One thing to suggest, if you have to run the inverter continuously, if you have the budget, is to go woth a Victron Phoenix inverter. Super low idle consumption.

You may also be able to discharge the battery before charging it. You could also, in theory, always have a thermostatically controlled heater connected to the load output of the solar charge controller. The load would be set that only when it's sunny, does the thermostat get activated. Could activate at 5C or something. Probably won't take much to heat that tiny space.

Another idea, probably not worthwhile, is if the batteries were above the inverter and all, those could help heat the batteries some.
 
Back
Top