My Seplos kit arrived last week and I've put it all together with some Xuba 280ah cells. I thought I would give some insight and some pictures as to the process and what I found.
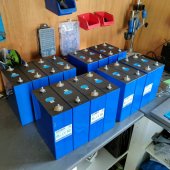
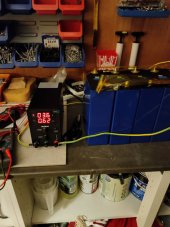
Firstly the cells came first, they were from Xuba and cost $2112 USD delivered and duty paid to the UK. These were then top balanced with a little bench power supply to 3.663V. This took AGES. Nearly two weeks end to end. The cells also came with the bus bars and nuts. They came well packaged and I don't have any complaints.
Cells unpacked and top balanced
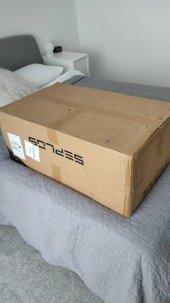
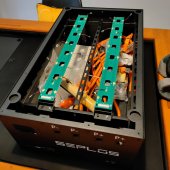
The kit arrived well packaged (on the outside. On the inside everything was just kind of thrown in there. The bags were zip tied onto a central strut and one bag had broken open. This is something I believe has been experienced by others too. From my understanding Seplos is now putting all these bits in a sealed box. That's great going forward, less so for me. That said, very few bits were actually loose.
Box arrived and opened up
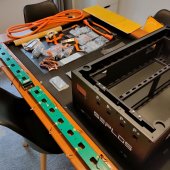
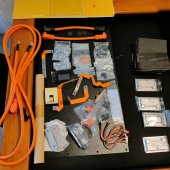
Below is the full kit unpacked. There is NO INSTRUCTION manual. You get a lot of bits in the kit. To summarise you get the BMS, BMS Fuse, flexible metal plates for the BMS so it can reach the batteries, some heat sink blu tack stuff, tonnes of screws, nuts and bolts, bus bars (aluminium), front plate + and - connectors, EVA tape for between the batteries and for under the balancer and some hard fibre board to electrically insulate the case. The case is also built like a bomb shelter. I also ordered some cables and a BMS connector cable (which didn't arrive) - more on this part later.
Everything unpacked
The build was frankly very straight forward. I didn't really need the instructions but I had to ask Seplos to send them to me. I did use a couple of YouTube videos to make sure I didn't do anything too wrong. 90% of the work is building the BMS and the final 10% is putting in the cells. All in all I would say end to end this took me about 2-3hrs. I could easily do a second one in way less time. As a note on the ease I built the bulk of this with a single screw driver and allen key. I didn't use a torque wrench until the end, when I tightened everything up.
The BMS fuse is a bit.. meh. I might add my own in line fuse in the future. If this one goes, that's it, its a one shot burn through job.
The BMS assembled.
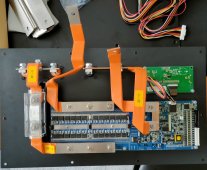
Everything assembled, waiting for the cells
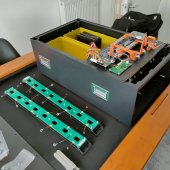
The cells were very easy to put in. Pop the EVA foam on them and slide them in. They also tighten up a huge amount and get very snug. With the cells in, the battery weighs the same as a small car. I put mine on a small dolly and did the final assembly on the floor. Lifting this thing would be a small hernia in the making. Its over 100kg.
Cells in and the front plate tightened up. The top plates for the BMS was simple to install, 4 screws.
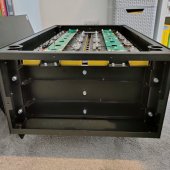
Getting the cells in and connecting them was very simple. Seplos provides a battery layout diagram which is simple and also makes perfect sense. Everything fit well. They did provide little copper washers for the top of the cells. This is a complaint. They were 3 short in the bag. Therefore some cells have them and some don't. I made sure that all cells were matched e.g. copper touching copper under the bus bars, but its an annoyance it was short. I know some people didn't bother with them at all, but I added them anyway. Nuts were torqued to 8Nm on the front plate and 5Nm on the cells. I do have a measured torque wrench so this wasn't an issue. However if you had no wrench you could probably get away with a screw driver torque wrench. I did them by hand by first and almost all of them were at 5Nm when I used the measure wrench.
BMS installed
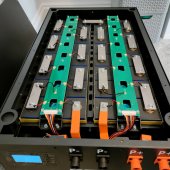
Finally I checked the cell voltages on the ribbons before I connected the BMS. Everything was fine so I added the BMS front plate, connected up and tightened what needed to be tightened. I would suggest you add the ribbons to the BMS and connect to the cells vs connect to cells and then to the BMS. The space is too tight in behind the BMS to get your hands in easily.
Last thing was to connect to the BMS on my laptop to set the cell size to 280ah (default is 200ah). I couldn't do this. I ordered the cable with the kit and Seplos forgot to put it in. Frankly this SHOULD come with it. its $25 from them (which is too much anyway). The kit was $600 plus shipping, it should be included. I tried my pylontech cable... didn't work. Tried a normal ethernet... didn't work. In the end I had to buy a USB adaptor and build my own ethernet cable with the pin out they sent me. I really shouldn't need to do this - just chuck in the cable guys.
Overall this is a very easy kit and I would build another. It cost under $3k USD delivered and tax paid for 15kwh of storage. Is there more work than a normal server rack, yes. Is it a hassle to build? No. Its at best an afternoon of work for even an unskilled person. I would give it 4/5.
Firstly the cells came first, they were from Xuba and cost $2112 USD delivered and duty paid to the UK. These were then top balanced with a little bench power supply to 3.663V. This took AGES. Nearly two weeks end to end. The cells also came with the bus bars and nuts. They came well packaged and I don't have any complaints.
Cells unpacked and top balanced


The kit arrived well packaged (on the outside. On the inside everything was just kind of thrown in there. The bags were zip tied onto a central strut and one bag had broken open. This is something I believe has been experienced by others too. From my understanding Seplos is now putting all these bits in a sealed box. That's great going forward, less so for me. That said, very few bits were actually loose.
Box arrived and opened up


Below is the full kit unpacked. There is NO INSTRUCTION manual. You get a lot of bits in the kit. To summarise you get the BMS, BMS Fuse, flexible metal plates for the BMS so it can reach the batteries, some heat sink blu tack stuff, tonnes of screws, nuts and bolts, bus bars (aluminium), front plate + and - connectors, EVA tape for between the batteries and for under the balancer and some hard fibre board to electrically insulate the case. The case is also built like a bomb shelter. I also ordered some cables and a BMS connector cable (which didn't arrive) - more on this part later.
Everything unpacked


The build was frankly very straight forward. I didn't really need the instructions but I had to ask Seplos to send them to me. I did use a couple of YouTube videos to make sure I didn't do anything too wrong. 90% of the work is building the BMS and the final 10% is putting in the cells. All in all I would say end to end this took me about 2-3hrs. I could easily do a second one in way less time. As a note on the ease I built the bulk of this with a single screw driver and allen key. I didn't use a torque wrench until the end, when I tightened everything up.
The BMS fuse is a bit.. meh. I might add my own in line fuse in the future. If this one goes, that's it, its a one shot burn through job.
The BMS assembled.

Everything assembled, waiting for the cells

The cells were very easy to put in. Pop the EVA foam on them and slide them in. They also tighten up a huge amount and get very snug. With the cells in, the battery weighs the same as a small car. I put mine on a small dolly and did the final assembly on the floor. Lifting this thing would be a small hernia in the making. Its over 100kg.
Cells in and the front plate tightened up. The top plates for the BMS was simple to install, 4 screws.

Getting the cells in and connecting them was very simple. Seplos provides a battery layout diagram which is simple and also makes perfect sense. Everything fit well. They did provide little copper washers for the top of the cells. This is a complaint. They were 3 short in the bag. Therefore some cells have them and some don't. I made sure that all cells were matched e.g. copper touching copper under the bus bars, but its an annoyance it was short. I know some people didn't bother with them at all, but I added them anyway. Nuts were torqued to 8Nm on the front plate and 5Nm on the cells. I do have a measured torque wrench so this wasn't an issue. However if you had no wrench you could probably get away with a screw driver torque wrench. I did them by hand by first and almost all of them were at 5Nm when I used the measure wrench.
BMS installed

Finally I checked the cell voltages on the ribbons before I connected the BMS. Everything was fine so I added the BMS front plate, connected up and tightened what needed to be tightened. I would suggest you add the ribbons to the BMS and connect to the cells vs connect to cells and then to the BMS. The space is too tight in behind the BMS to get your hands in easily.
Last thing was to connect to the BMS on my laptop to set the cell size to 280ah (default is 200ah). I couldn't do this. I ordered the cable with the kit and Seplos forgot to put it in. Frankly this SHOULD come with it. its $25 from them (which is too much anyway). The kit was $600 plus shipping, it should be included. I tried my pylontech cable... didn't work. Tried a normal ethernet... didn't work. In the end I had to buy a USB adaptor and build my own ethernet cable with the pin out they sent me. I really shouldn't need to do this - just chuck in the cable guys.
Overall this is a very easy kit and I would build another. It cost under $3k USD delivered and tax paid for 15kwh of storage. Is there more work than a normal server rack, yes. Is it a hassle to build? No. Its at best an afternoon of work for even an unskilled person. I would give it 4/5.
Last edited:


