But, if you already have he argon, all you need is a nitrogen regulator, and you are good to go.Yup I walked out there and realized it immediately lol
You are using an out of date browser. It may not display this or other websites correctly.
You should upgrade or use an alternative browser.
You should upgrade or use an alternative browser.
What Mini-Split did you use, and Why?
- Thread starter Lt.Dan
- Start date
Cheap 4-life
My body is 2.63 trillion volts, .07v per cell
I know sometimes the techs know better than the manuals however the manual clearly explains how to install it as I explained. My install didn’t require any flaring. They are preflared and came with coated copper gaskets to prevent leaks. The wiring was plug and play.Anybody buying a minisplit for a diy install, needs this stuff, or they can buy a diy minisplit like Mr cool that has precharged lineset... plug and play communication wiring, and requires no flaring...
Lt.Dan
Solar Wizard
I actually have multiple regulators at my shop that I could borrow for a day. Only problem is they only go up to 300psi. Is that enough? Or should I consult the label on the machine for max PSI?But, if you already have he argon, all you need is a nitrogen regulator, and you are good to go.
MrM1
I'm Here, But I'm Not All There
I tested mine with nitrogen and Gauge setup I got from "a guy". Put it up to 535psi (manufacturers spec was 500). Let it hold pressure for 12 hours. And bubble tested.
Then pull a vac for 30 min. Let it's hold. Then vaced more a 2nd time for another 30 min. Held. Released 410a. Working
Then pull a vac for 30 min. Let it's hold. Then vaced more a 2nd time for another 30 min. Held. Released 410a. Working
Pioneer tech support told me they recommend 600psi to confirm no leaks.I actually have multiple regulators at my shop that I could borrow for a day. Only problem is they only go up to 300psi. Is that enough? Or should I consult the label on the machine for max PSI?
300 should be enough for you to know if it's leaking, and enough to find the leak.
SolarScott
Solar Enthusiast
- Joined
- Sep 27, 2022
- Messages
- 475
On my second Senville mini split, I did the vacuum, gauge did not move. Then released a little of the freon. Shut off valve and did bubble test. No leak. Let the rest of the freon out and this time I did not call my AC man. Saved$125. Some people go into overkill on the testing...I actually have multiple regulators at my shop that I could borrow for a day. Only problem is they only go up to 300psi. Is that enough? Or should I consult the label on the machine for max PSI?
Cheap 4-life
My body is 2.63 trillion volts, .07v per cell
That’s basically same I did. I have read a lot of people having success doing it that way and still running good for many years.
Last edited:
42OhmsPA
What's in a title?
I did the same on my pioneer, vacuumed down for hours, let sit, realize the cheap adapter I bought leaked, vacuumed for hours and hours again let sit, no movement on gauge. Turned valve to release R410a 1/4 turn for 5 seconds closed valve. Checked everything with soapy water, no leaks. Released rest of refrigerant. Turned heat on max, was blown away how hot the air was coming out of the indoor unit, went outside checked for leaks again. Turned max cool, couldn't believe how cold air was. Went outside and finishing insulating pipes. Turned up heat, got ready for sleep, turned temp way down, slept like baby, woke up, turned up heat, went outside and put line covers on.
Wow that's a big run on of a post. Anyways, I rtfm and it's been running 24/7 ever since.
Wow that's a big run on of a post. Anyways, I rtfm and it's been running 24/7 ever since.
42OhmsPA
What's in a title?
Oh and this is the pump I used. OMT 3.5cfm Vacuum Pump, 1 Stage HVAC Vacuum Pump for R12 R22 R134a R410a Systems, Small 1/4hp 38 Micron Vacuum Pump for Air Conditioner Servicing Resin Degassing and More, Oil Included https://a.co/d/8fqsdm4
Just noticed the 30 minute duty cycle, oops.
Just noticed the 30 minute duty cycle, oops.
SolarScott
Solar Enthusiast
- Joined
- Sep 27, 2022
- Messages
- 475
My old whole house heat pump never put out heat you could feel.....it would heat the house, but it always felt like cold air was blowing from the vents. These mini splits feel like they are blowing air from the depths of Hell......I like it. They must also have a direct worm hole from the North Pole to blow air that cold.I did the same on my pioneer, vacuumed down for hours, let sit, realize the cheap adapter I bought leaked, vacuumed for hours and hours again let sit, no movement on gauge. Turned valve to release R410a 1/4 turn for 5 seconds closed valve. Checked everything with soapy water, no leaks. Released rest of refrigerant. Turned heat on max, was blown away how hot the air was coming out of the indoor unit, went outside checked for leaks again. Turned max cool, couldn't believe how cold air was. Went outside and finishing insulating pipes. Turned up heat, got ready for sleep, turned temp way down, slept like baby, woke up, turned up heat, went outside and put line covers on.
Wow that's a big run on of a post. Anyways, I rtfm and it's been running 24/7 ever since.
Lt.Dan
Solar Wizard
Got started on the install. Its already bloody hot with temps over 100*. Wish I had started 2 weeks earlier when it was 65* outside. Sigh...
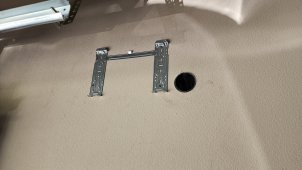
I started with mounting the bracket. I had read of a few people wishing they had mounted their bracket to a piece of plywood first, to grab studs, and I had it all set to do that, even had the bracket screwed to the plywood. I found exactly where I needed to put it, and coincidentally the only 2 studs in the entire garage were 13" apart! This let me ditch the bracket and screw directly to studs! Win-win! For now I got a pass through 3" PVC Pipe and the bracket hung.

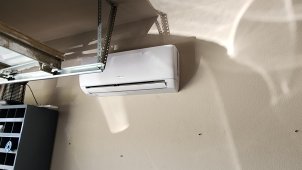
Then wired the inside unit up, and hung it on the wall.

Hopefully tomorrow the wall mount for the outdoor unit will be here, then I can hang it, start vacuuming and have A/C for the weekend!
I started with mounting the bracket. I had read of a few people wishing they had mounted their bracket to a piece of plywood first, to grab studs, and I had it all set to do that, even had the bracket screwed to the plywood. I found exactly where I needed to put it, and coincidentally the only 2 studs in the entire garage were 13" apart! This let me ditch the bracket and screw directly to studs! Win-win! For now I got a pass through 3" PVC Pipe and the bracket hung.

Then wired the inside unit up, and hung it on the wall.

Hopefully tomorrow the wall mount for the outdoor unit will be here, then I can hang it, start vacuuming and have A/C for the weekend!
Lt.Dan
Solar Wizard
Got it finished enough to test it. and it works great! Turned it on last night and was chillin in no time! I still have to put the expanding foam in the wall pass-through, and install the line-set cover, as well as proper wiring. My electrician friend is coming this weekend to add a circuit in the sub-panel, and run some 12/2 to an AC disconnect on the wall, I just wanted to make sure everything worked, so dont judge me that its plugged into an extension cord lmao.

It was able to take the garage from 99* at 7:20pm, to 80* by 10pm. Thats a 19* drop in 2hr and 40 min, and used 3.62kwh from 7:20pm to 12:Midnight. Not bad!

It was able to take the garage from 99* at 7:20pm, to 80* by 10pm. Thats a 19* drop in 2hr and 40 min, and used 3.62kwh from 7:20pm to 12:Midnight. Not bad!
MrM1
I'm Here, But I'm Not All There
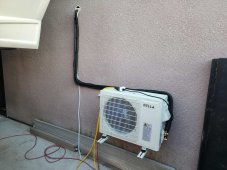
Looks like you've got the wall mount adjustment option, any chance you could move it more off the wall? Looks really close.
Lt.Dan
Solar Wizard
Yes I bought the wall mount because specs said it could be closer to the wall, if mounted up off the ground. Minimum requirement is 6" when off the ground, and I am currently at 7".Looks like you've got the wall mount adjustment option, any chance you could move it more off the wall? Looks really close.
You can see in the top left corner of that picture, is the front nose of my trailer, and when I pull the trailer in/out, I will have maybe 2" of clearance. The more clearance I have the better, so I am wanting to cut off the end of the legs on the wall mount to give me a little more wiggle room/oops clearance.
EastTexCowboy
Solar Wizard
You're gonna need a bigger garage! ?Yes I bought the wall mount because specs said it could be closer to the wall, if mounted up off the ground. Minimum requirement is 6" when off the ground, and I am currently at 7".
You can see in the top left corner of that picture, is the front nose of my trailer, and when I pull the trailer in/out, I will have maybe 2" of clearance. The more clearance I have the better, so I am wanting to cut off the end of the legs on the wall mount to give me a little more wiggle room/oops clearance.
Lt.Dan
Solar Wizard
Don't we all? ?You're gonna need a bigger garage! ?
Robbert
Solar Enthusiast
Pretty sure you will enjoy that very much! Your inverter and batteries even more. Curious how warm the inverter is after installation.Got it finished enough to test it. and it works great! Turned it on last night and was chillin in no time! I still have to put the expanding foam in the wall pass-through, and install the line-set cover, as well as proper wiring. My electrician friend is coming this weekend to add a circuit in the sub-panel, and run some 12/2 to an AC disconnect on the wall, I just wanted to make sure everything worked, so dont judge me that its plugged into an extension cord lmao.
View attachment 150260
It was able to take the garage from 99* at 7:20pm, to 80* by 10pm. Thats a 19* drop in 2hr and 40 min, and used 3.62kwh from 7:20pm to 12:Midnight. Not bad!
Cheap 4-life
My body is 2.63 trillion volts, .07v per cell
Strange that being off the ground changes the allowable distance behind the condenser. It pulls air in from the back. I’d still want at least a foot. my unit calls for 2 footYes I bought the wall mount because specs said it could be closer to the wall, if mounted up off the ground. Minimum requirement is 6" when off the ground, and I am currently at 7".
You can see in the top left corner of that picture, is the front nose of my trailer, and when I pull the trailer in/out, I will have maybe 2" of clearance. The more clearance I have the better, so I am wanting to cut off the end of the legs on the wall mount to give me a little more wiggle room/oops clearance.
Last edited:
Lt.Dan
Solar Wizard
I will keep this thread updated with results after a couple days.Pretty sure you will enjoy that very much! Your inverter and batteries even more. Curious how warm the inverter is after installation.
Not sure where I read it, but I do remember seeing it and thinking "I CAN FINALLY FIT IT ON THE SIDE OF MY HOUSE!"Strange that being off the ground changes the allowable distance behind the condenser. It pulls air in from the back. I’d still want at least a foot.my unit calls for 2 foot
Of course, now that I go looking for that spec, I can't find it. Either way, I might be able to pull it out 1", but any further and I can't get my trailer out comfortably, so it has to be, and I'll accept the consequences.
Zwy
Emperor Of Solar
This sounds like something might be wrong with the install/setup. Each zone has an electronic expansion valve (EEV) that meters the refrigerant to the coils that are in use (and prevents sending refrigerant to the ones not in use). The compressor is variable speed (and the condenser fan too) so it only should be running to meet the demand of the single head calling for heat. If the EEV is closed, how are you getting refrigerant flow in the zones not calling for heat?
Because the expansion valve most likely allows some refrigerant to pass thru to prevent refrigerant oil from collecting in the lines, thus starving the compressor of oil.
Known issue with systems I work on, the move to a "nicked" or "bleed" expansion valve solves this issue.
One other reason for a bleed txv is equalization of high/low sides to lower startup current of the compressor.
There is this article on why a single zone can be more advantageous to a multi head unit. From the writers experience, the units did circulate refrigerant thru all heads even when the zone was off. https://www.energyvanguard.com/blog/6-reasons-to-do-single-head-mini-split-heat-pumps/
But yes, not being able to heat and cool is certainly a drawback, because the reversing valve is upstream of the EEVs
Hey! We HVAC guys aren't ALL chasing the dollar!
My company focuses on quality, and customers satisfaction.
With minisplits. DURABILITY and service ease are my biggest recommendations.
I like the midea for the price and efficiency.
I like the daiken for the service and durability.
Everything else is the same until you get mitsubishi... they are the cream, but too expensive for the privilege.
Oh, I've had the most issues from pioneer.
As for leak testing...
You need nitrogen or CO2 and time...
Testing how long it'll hold vacuum is meaningless.
It needs to hold 600psi for 4 hours...
If it can't, it is leaking.
@Supervstech i was looking at a pioneer 24k but rethinking based on your response . The Mitsubishi 24k for same seer(20.5) is $1k more. Are they actually that much better?
Mitsubishi is a premium unit for sure.@Supervstech i was looking at a pioneer 24k but rethinking based on your response . The Mitsubishi 24k for same seer(20.5) is $1k more. Are they actually that much better?
They have features not available on lesser systems.
BUT the most important factor in an hvac system is the install.
So focus there.
EastTexCowboy
Solar Wizard
I agree with that, and having someone you can depend on for service if you're not installing it yourself. I don't know if I would recommend Mitsubishi for a DIY install but if you have the skills and tools then maybe. One of the negatives is that you have to be a distributor to get access to their software for diagnostics, or at least that's my understanding. On the positive side, 12 year warranty on most units.Mitsubishi is a premium unit for sure.
They have features not available on lesser systems.
BUT the most important factor in an hvac system is the install.
So focus there.
Similar threads
- Replies
- 5
- Views
- 229
- Replies
- 3
- Views
- 582
- Replies
- 42
- Views
- 5K
- Replies
- 13
- Views
- 374


