erik.calco
Solar Badger
Probably. Can use the 100W as my prototyping victim.Good, so you can make the prototypes and post pics for us later?


Probably. Can use the 100W as my prototyping victim.Good, so you can make the prototypes and post pics for us later?
What's a weather station?There SURE IS!
And the OP wanted my cobbled up BAD ideas!
That racking, 90° angle, 'U' Shaped, or full box is a deal on wheels when you DIY!
Since solar panel racks are 'Around' or 'About' This Angle or That Angle, the pre drilled holes are 'Close Enough',
We aren't launching a Mars mission here...
Just a couple days ago a guy was complaining about having to buy a $400 digital angle finder...
I use a plumb line (string) and $1 plastic protractor from the dollar store.
If you are a carpenter, my speed square has a 90° scale on it, and a hole for the string line was easy, I own drill bits...
Carpentry USED to be done with a string & weight (plumb-bob) for vertical, a string and bubble (spirit) level for horizontal, and 2, 3, 5 measurement for square (measuring stick).
While digital this and laser that works, it's not cheap or easy...
Square, 2 inches or feet (respectively) one direction, 3 inches or feet (respectively) the second direction, when 5 is the distance between the marks the corner is square...
Gravity ALWAYS pulls a plumb-bob weight straight down, no matter what the ground is doing...
A stretched string is ALWAYS a straight line...
Clear tubing with colored water in it, the two ends will ALWAYS equalize, no matter the distance, to show you horizontal level...
Gravity never fails, the batteries don't go dead, getting dropped never throws it out of adjustment, it never gets bent, or left at the shop...
Long carpenter Bubble levels are nice, but OFTEN too long, too short, won't fit, got left at the shop, etc.
A string & weight in your pocket doesn't get lost... Try putting a 4 foot long level in your pocket to plumb posts with...
You don't NEED $2,000 worth of 'Digital' to build a $100 rack.
Extruded aluminum rails, custom machined clamps, etc are 'Nice', but proprietary.
A bolt instead of a weld replaces/adjusts with hand tools, no cutting or welding machine required, a drill/bit at most to change things.
Try and find EXACTLY what you need 10 years from now when the 'Nice' has changed design and old parts are no longer available...
Build tall.
You can mow under it, it doesn't crack you in the head, and as long as it's braced, just as study as surface mount.
Want to weigh something down? Set your posts in 5 gallon buckets of concrete.
You can mix 5 gallons from bags in a tray with a garden hoe, and if you buy that 5 gallon bucket (wider hole) it will take a bulldozer to get that anchor out.
Disposable plastic concrete mixing trays are $7 at the big box stores...
(Bags of cement weight 80 to 100 pounds! I blow a tube trying to carry them around!)
A wide hole, 6 or 8 inches of concrete in the bottom, a long cross bolt through the bottom of your post to engage the concrete, and then dirt back in the hole to surface, it's an anchor that's actually stronger than pouring a skinny post hole full of concrete all the way to the surface.
I don't even use a long bolt anymore, just drill a hole and stick rebar through the hole at the bottom.
It's up to you, I don't know your situation...
In hurricane country I would build stronger,
In tornado country, if it's strong enough to stand upright in a strong storm, it's good enough.
Tornado force winds (up to 300 mph) will fold panels no matter how well your braced, while hurricanes push on panels...
Tornados exceed the strength of the glass, and there is nothing you can do about that except replacement cost insurance, it's nature and only fools think you can outsmart nature...
My panels are wired to the weather station, when winds exceed 40 MPH the panels go flat, like for noon day sun, and then you just HOPE it's not 'The Big One'.
With tall angled rack, trees or some wind break BEHIND helps a lot.
If the wind can't get under the panels, you will probably be OK.
Again, in a tornado, which comes from the West, all bets are off since you will go broke trying to build a tornado proof rack, nothing stands up to an F4 or F5 that's not a solid monolith...
What's a weather station?

") ) But the results were fantastic.
) But the results were fantastic.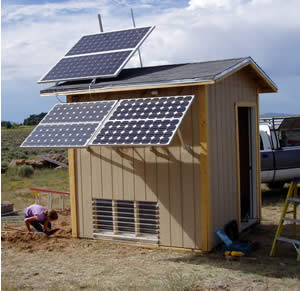
Yeah, I was looking for building blocks -- or options -- and, you gave me a TON! I do have a problem with weeds on the paver patio I built, but primarily because I need to fix my pressure washer. I need to replace the carb. If I get that going this year, I can clear out the weeds, then re-apply polymeric sand for a few years of peace before I have to repeat it.Depends on what you decide on...
Notice I don't speak in absloutles, the design has to fit YOUR situation, odd corners in property lines, codes about how far things have to be away from property lines, buildings and right of ways, etc.
Yeah, I was looking for building blocks -- or options -- and, you gave me a TON! I do have a problem with weeds on the paver patio I built, but primarily because I need to fix my pressure washer. I need to replace the carb. If I get that going this year, I can clear out the weeds, then re-apply polymeric sand for a few years of peace before I have to repeat it.
Now I know why I get these giant white soccer ball sized mushrooms. LOL None of the leaves that fall leave my back yard. I collect them and put them it in one of several locations.
I did build a dog house I never actually took outside to complete. The only problem with adding a structure like that is the rabbits will have another place to nest underneath it, and my dog already goes nuts hunting them. They are not the smartest critters.
I could create a location for firewood. I'll likely leave it open in the beginning until I get used to where I need to reach to adjust things, so I don't initially block things off. But, you're right that I'll have to plan the height to take into consideration what will be underneath it. One thing for sure is that the dog will pee on anything below 2'.
)
I have a friend that his solar panels were randomly dropping in efficiency, completely random and never when he was home...
SO...
We went out and had a look.
DOG TRACKS on the panels!
When he left for work his big lab would go lay on the panels for some reason!
When he was home the dog laid on the porch... (GOOD DOG!


you shouldn't have changed your name New Mexico Will!This funky looking thing is an aluminum extrusion. Their shape makes them very strong, yet the are very light, being solid aluminum, and will never rust. They come in many different sizes and shapes, so it's important to shop carefully. Zoro Tools has a good selection of them. I purchased two of these, each eight feet in length. Total cost shipped $99 USD. Here is a link: https://www.zoro.com/search?q=aluminum extrusion
View attachment 4069
You can see the hole drilled in from the top, through the center. You can mount these to anything you can bolt through. I've used Windy Nation pole mount parts, because I had them. Otherwise, it would be easy to make your own with U-Bolts (if using a round post like mine) and aluminum angle or bar stock.
This picture shows the "T-slot nuts" and washers/bolt, and the following pictures show how it attaches. Simply run the bolts though the holes on your panels. In my case, the holes did not line up, so I drilled new ones. I flipped the panels over ON A VERY FLAT SURFACE and placed a little piece of scrap wood under the rail, so I didn't accidentally smack the panel with the drill bit.
View attachment 4070
View attachment 4072
View attachment 4073
I hope that helps, but if not, let me know!
you shouldn't have changed your name New Mexico Will!
Did you get the bolts and t-slot nuts from Zoro, too? Can you link to the ones you have if you did? I found a bunch of t-slot nuts there, but not one matching your pict. And, I like the bolts you're using, with both hand tightening and allen wrench, which should be good for tight spots.Glad I could help! For what it's worth, I plan to add 2 more of these poles, switch to 10' extrusions, and connect them for an 1,800 watt array.