I am going to say this again over and over on this web site. If you want a steel and extremely strong ground mount that will last for many, many years then do this:
I have added some photos below.
One or 2 persons can complete this construction with all easily found tools and materials.
Plan out the array post locations to make certain the spacing for the weight applied to them will provide the correct ballast against wind damage. There are online calculators for this.
The rectangular size of your array is determined by the panels you choose, how many and if portrait or landscape mounted. Using this proceed to determine how many support posts your will need and in what configuration.
Once you know how many posts for your array (4, 6, 12, 16, etc. and say 3x2 rows or 5 x 3 rows and all 7 feet apart side to side and 10 feet front to back. go to the physical site and lay out a perimeter 4 corner string staked into the ground about 2 feet larger than the size of the array.
Using your plan, make on the ground where each post would be placed.
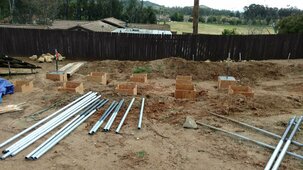
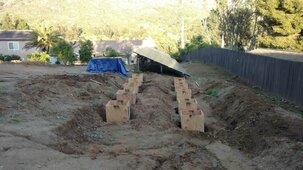
Place a sonotube or other materials or forms used on the ground for each pipe placement. If it all looks good, dig your holes, place your tubes or mounts or stakes or whatever for your terrain and proceed.
Obtain 2 inch galvanized schedule 40 pipe. This is easily obtainable everywhere. It comes usually in 20 foot lengths. Your supplier may cut it for you or delivery is always available. Call around for prices. it may be sourced from Korea, India, USA.
Now, this pipe is very easy to cut using a portable band saw that you can even get from Harbor Freight. A 20 foot length may supply you with 3 vertical posts depending on your array angle, depth in the ground and array height. But 2 at least.
For your vertical post lengths add the length in the ground to the intended panel surface height. Then subtract the depth of the panel and the rail supporting the panel and the cross rails tying the verticals together. So if panel is 1.5 inches on a 2 inch strut and a 2 inch cross pipe ties the verticals, then you would subtract 5.5 inches from the length of your vertical post. BUT JUST TO MAKE CERTAIN YOU DON'T SCREE UP, BEFORE YOU CUT THE POST TO FINAL CALCULATED HEIGHT, MAKE SURE YOU ADD AT LEAST 12 INCHES TO THE LENGTH YOU PLACE IN THE GROUND TO ALLOW FOR ACCURATE CUTTING ANGLES.
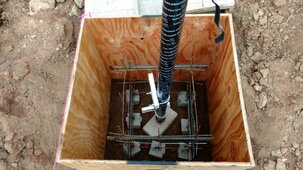
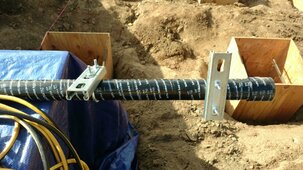
Putting the pipe in the ground is easy. Very commonly use a 12 inch Sonotube from HD or local building products supplier. Dig to your required depth. Put some coarse stone on the bottom for drainage. Before putting the vertical pipe in the ground, wrap the pipe portion that will contact with concrete in 10 ml PVC pipe tape, again available everywhere. Also, use a U-bolt and attach about a 6 inch piece of steel like strut to the pipe 6 inches from the bottom of the pipe. This will prevent the pipe from being able to torque and loosen in the concrete.
Set your 4 corner posts of the array. Plumb them and let them set for a day. Now your array rectangle has been established. Run a string around the array and set all the in between the corner verticals so they are plumb and in line with the string. Wait one day and all is set up now.
Cut the final post heights for all the verticals by determining your array angle. Use the front row for the lowest height of your panel surface which will be about 5-6 inches above where your pipe cut will be. Mark the pipe. Do his for the vertical pipe the back row. Now, before cutting the pipe, tie a string around the front to back vertical pipe where you marked them and confirm your array angle. Mark and pipes in between the front and back pipes where the string crosses. Adjust the string up or down to conform your angle and then cut off the pipes using the portable band saw and you are done. After the first side is finished, attach a string to the top of the front row pipe you just cut and run it to the pipe at the end of that row. Make it taught and use a string level. Mark you pipe and cut it. Now cut all the verticals in between the corners in that front row. Repeat this for all other rows if more than just 2.
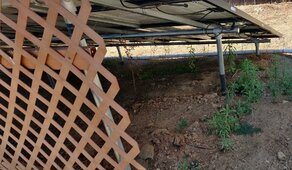
Once all vertical pipes have been cut to height front to back, you top off the pipe with Hollaender connectors that allow another 2 inch pipe to travel across all the verticals in a row. If the array is less than 20 feet, you will cut the pipe, if longer, use a Hollaender pipe connector to extend the length.
When this is done, all verticals should be tied across too.
Next, lay your panel rails on top of the crossing pipes and attach with a Ubolt with the distances between them determined by your panel's support needs. The the panel rails are to be 22 inches apart, then cut 2 pieces of 2x4 to 22 inches and use them to keep your panel rails parallel while you bolt them to the pipe.
IMPORTANT NOTE: WHEN POURING YOUR VERTICALS, YOU MAY WISH TO POUR A COUPLE OF ADDITIONAL POSTS WHERE YOUR WIRING WILL COME UP FROM THE GROUND TO BE USED AS SUPPORTS FOR HORIZONTAL STRUTS TO MOUNT COMBINER BOXES, SWITCHES, ETC. OR YOU CAN PLAN TO PLACE STRUTS HORIZONTALLY ACROSS THE VERTICALS SUPPORTING THE ARRAY FOR THIS USE TOO.
I have added some photos below.
One or 2 persons can complete this construction with all easily found tools and materials.
Plan out the array post locations to make certain the spacing for the weight applied to them will provide the correct ballast against wind damage. There are online calculators for this.
The rectangular size of your array is determined by the panels you choose, how many and if portrait or landscape mounted. Using this proceed to determine how many support posts your will need and in what configuration.
Once you know how many posts for your array (4, 6, 12, 16, etc. and say 3x2 rows or 5 x 3 rows and all 7 feet apart side to side and 10 feet front to back. go to the physical site and lay out a perimeter 4 corner string staked into the ground about 2 feet larger than the size of the array.
Using your plan, make on the ground where each post would be placed.
Place a sonotube or other materials or forms used on the ground for each pipe placement. If it all looks good, dig your holes, place your tubes or mounts or stakes or whatever for your terrain and proceed.
Obtain 2 inch galvanized schedule 40 pipe. This is easily obtainable everywhere. It comes usually in 20 foot lengths. Your supplier may cut it for you or delivery is always available. Call around for prices. it may be sourced from Korea, India, USA.
Now, this pipe is very easy to cut using a portable band saw that you can even get from Harbor Freight. A 20 foot length may supply you with 3 vertical posts depending on your array angle, depth in the ground and array height. But 2 at least.
For your vertical post lengths add the length in the ground to the intended panel surface height. Then subtract the depth of the panel and the rail supporting the panel and the cross rails tying the verticals together. So if panel is 1.5 inches on a 2 inch strut and a 2 inch cross pipe ties the verticals, then you would subtract 5.5 inches from the length of your vertical post. BUT JUST TO MAKE CERTAIN YOU DON'T SCREE UP, BEFORE YOU CUT THE POST TO FINAL CALCULATED HEIGHT, MAKE SURE YOU ADD AT LEAST 12 INCHES TO THE LENGTH YOU PLACE IN THE GROUND TO ALLOW FOR ACCURATE CUTTING ANGLES.
Putting the pipe in the ground is easy. Very commonly use a 12 inch Sonotube from HD or local building products supplier. Dig to your required depth. Put some coarse stone on the bottom for drainage. Before putting the vertical pipe in the ground, wrap the pipe portion that will contact with concrete in 10 ml PVC pipe tape, again available everywhere. Also, use a U-bolt and attach about a 6 inch piece of steel like strut to the pipe 6 inches from the bottom of the pipe. This will prevent the pipe from being able to torque and loosen in the concrete.
Set your 4 corner posts of the array. Plumb them and let them set for a day. Now your array rectangle has been established. Run a string around the array and set all the in between the corner verticals so they are plumb and in line with the string. Wait one day and all is set up now.
Cut the final post heights for all the verticals by determining your array angle. Use the front row for the lowest height of your panel surface which will be about 5-6 inches above where your pipe cut will be. Mark the pipe. Do his for the vertical pipe the back row. Now, before cutting the pipe, tie a string around the front to back vertical pipe where you marked them and confirm your array angle. Mark and pipes in between the front and back pipes where the string crosses. Adjust the string up or down to conform your angle and then cut off the pipes using the portable band saw and you are done. After the first side is finished, attach a string to the top of the front row pipe you just cut and run it to the pipe at the end of that row. Make it taught and use a string level. Mark you pipe and cut it. Now cut all the verticals in between the corners in that front row. Repeat this for all other rows if more than just 2.
Once all vertical pipes have been cut to height front to back, you top off the pipe with Hollaender connectors that allow another 2 inch pipe to travel across all the verticals in a row. If the array is less than 20 feet, you will cut the pipe, if longer, use a Hollaender pipe connector to extend the length.
When this is done, all verticals should be tied across too.
Next, lay your panel rails on top of the crossing pipes and attach with a Ubolt with the distances between them determined by your panel's support needs. The the panel rails are to be 22 inches apart, then cut 2 pieces of 2x4 to 22 inches and use them to keep your panel rails parallel while you bolt them to the pipe.
IMPORTANT NOTE: WHEN POURING YOUR VERTICALS, YOU MAY WISH TO POUR A COUPLE OF ADDITIONAL POSTS WHERE YOUR WIRING WILL COME UP FROM THE GROUND TO BE USED AS SUPPORTS FOR HORIZONTAL STRUTS TO MOUNT COMBINER BOXES, SWITCHES, ETC. OR YOU CAN PLAN TO PLACE STRUTS HORIZONTALLY ACROSS THE VERTICALS SUPPORTING THE ARRAY FOR THIS USE TOO.