diy solar

diy solar

Post your Ground Mount Setup

drps10

New Member
Joined
Jun 25, 2023
Messages
96
Location
ohio
Lets keep this thread to member builds of their ground mount either home-made, store bought or Frankenstein.

No questions or comments on the setup, just members post their mounts only with details below. I want a thread where people can scroll through everyone's post/pictures and see what their setup is and get ideas what might work for them instead of searching for days at every thread. If you have questions or comment about a build, message the member directly. I (and probably other people too) just want to scroll down and see the setups. Just hit the Like button and that is all. Please no comments or questions.

Details of your ground mount system including some detail about your setup. EX. - total KW size of ground mount built for, overall dimensions, what size ground contact posts you used (PT, Poles, I-beam...) Costs to build and maybe a picture if you did something unique (single axis, adjustable, etc..), your location (Canada vs FL will have an impact on design), what manufacture you purchased from if store bought​

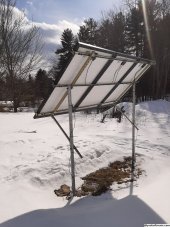
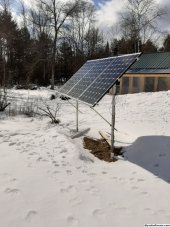
4-6 Picture of Overall ground mount completed, picture with some panels on but still being added so we can see the mounts/bracing under the panels, how it's anchored into ground (concrete, screw anchor, wires, etc..), picture behind the panels. pictures of how the vertical posts are connected to panel posts (some people use lags, u-bolts, etc..) We don't need overloaded with every single angle and every nut and bolt. This is just to give a "tease" so if someone likes your setup, we can message directly and get more information.

Thanks for playing!!
 
IMG_20230904_191059.jpg
It's still a WIP, I have 2 more rails to add then the panels can finally go on.
I'll be around a grand all in.
Pivots with 1 hand as pictured, balanced pretty darn good.
3.66kw of LG Neon's to be added, 6s2p.
More photos here https://diysolarforum.com/threads/diy-ground-mount-laminated-posts.67728/
(I'll update this later).

I considered using steel from pallet racking based on inspiration from another thread on here, I'm comfortable working with lumber but the next one will probably be steel since I like to challenge myself.
 
I have 10 of these in the yard. I adjust the tilt each month to maximize the solar. The supports are 2" galvanized pipes cemented into the ground. I use super struts from Home Depot for the cross support of the panels. Everything is bolted together with 1/2" bolts. Things have been up and running to a couple of years now.
 

Attachments

  • 20220314_151601.jpg
    20220314_151601.jpg
    800.2 KB · Views: 222
  • 20220314_151554.jpg
    20220314_151554.jpg
    832.2 KB · Views: 218
Still getting mine put together.

First rack done with 2 450watt renogy panels.

completedracksmall.jpg


--------------

Second rack with 3 255 watt panels beside the first rack and one laying propped up beside it.

Im about 100 yards from it when I took the pic so this is zoomed in on the pic of it.

2ndrack.jpg

Second rack is aimed correctly. I need to go back and turn the first rack but since I'm going to combine another rack with the first one to allow 5 450 watt panels on one rack in place of just 2 per rack I'm stopped till parts arrive.
 
IMG_6209.jpeg
Last section will be completed tomorrow. 20x22 pergola with (15) 445w bifacial panels. Built everything from scratch. Posts are 4 feet into the ground. 2x4 steel rafters with strut channel welded to the top and panels clamped to that.
 
3x Sinclair. 72 panels 370 watt Aptos. Two Sinclair mounts would have been significantly cheaper but since these were going on the side of a pond dam, I didn’t want to press my luck on maintaining level with various angles and slopes.

IMG_5657.jpeg
IMG_5659.jpeg
IMG_5651.jpeg
They look smaller than what they are from the clear angle. It’s a weird optical illusion. They stretch forever when viewed straight on through the trees.

I am glad I went with three. You can see where the closest one went a bit caty wampus and there’s a peak in the center. We had to set the panels from that peak and go to either side of it.
 
42kWpv ground mounted using 4 x 4 pt posts in quikrete, unistrut on one (won’t use again), 1/4”x3” ss hanger bolts on the rest, directly into 4x4’s, ss large area washers, ss self locking nut. Used loctite or super glue when threading bolts into wood. Strengthens wood, prevents turning out and water intrusion. Buy pt lumber several months in advance, stack with plenty of space/ventilation, so that it’s dry/lighter and can be stained/sealed before installing panels. I do not use standard deck screws. They snap off, they’re too weak for this application. By the high dollar T40 torx head bolts or 5/16 or 3/8” hex head galvanized bolts 6-8” long. My arrays are all on south facing slopes 750-800’ MSL, hard clay ground with some shell/rocks layers. If you can build a house, you can build a strong enough framework for a bunch of 40-60 lb panels. Remember, they are like an airplane wing, so in a 80 mph wind 48 panels might weigh 2,500 pounds, but they can produce 10,000-15,000 pounds of lift. Mine have weathered 80 mph so far. My big Qcells glass were flexing about 3/16” while I was holding on tight to see how much they were moving. I was wearing safety glasses, ha. I am installing vertical oak boards spaced 12” apart around sides/rear of all of my arrays to slow the air down, create turbulence, allow hot air to escape and add weight to my pine 4 x 4 framing. You can take it from there.
 
Last edited:
Mine is all Snapnrack parts.
Sourced from the local Rexelusa.com. (Gexpro.com)
https://snapnrack.com/products/200-ground-mount-system/

Currently supporting 16 REC365AA = 5840 watts.
Upgrading this Winter to 16 SILFAB 490 = 7840 watts

2021 prices:
$805 for 10 pcs of 21' x 1-1/2" schedule 40 galvanized steel pipe
$1067 for the snapnrack parts
$100 for concrete mix

22' long, 13.5' wide.

SILFAB upgrade will require adding about 7 or 8' to the length,
so it will be about 30' wide, after the planned Winter 23-24 upgrade.

Front piers are 30" deep, rears are 60" deep.

groundmountrearview.pnggroundmountfrontview.pnggroundmountpanelinstall.pnggroundmountoverview.pnggroundmountframe.png

Pier boring auger:
Screen Shot 2023-09-12 at 07.32.09.png
 
View attachment 167172
Last section will be completed tomorrow. 20x22 pergola with (15) 445w bifacial panels. Built everything from scratch. Posts are 4 feet into the ground. 2x4 steel rafters with strut channel welded to the top and panels clamped to that.

I really like this.

In my future is a "lean two" that is going to be on the side of my shop, I was thinking....hay I could make the roof out of solar panels, then store the brush cutter, finish mower and all that jazz under there.
 
Mine is all Snapnrack parts.
Sourced from the local Rexelusa.com. (Gexpro.com)
https://snapnrack.com/products/200-ground-mount-system/

Currently supporting 16 REC365AA = 5840 watts.
Upgrading this Winter to 16 SILFAB 490 = 7840 watts

2021 prices:
$805 for 10 pcs of 21' x 1-1/2" schedule 40 galvanized steel pipe
$1067 for the snapnrack parts
$100 for concrete mix

22' long, 13.5' wide.

SILFAB upgrade will require adding about 7 or 8' to the length,
so it will be about 30' wide, after the planned Winter 23-24 upgrade.

Front piers are 30" deep, rears are 60" deep.

View attachment 167186View attachment 167187View attachment 167188View attachment 167189View attachment 167190

Pier boring auger:
View attachment 167191

I hate those machines with a purple passion. I have one that will hang on the back of a tractor, just sit there down, and let the machine do all the work. Fantastic machine once you get it hung on the tractor, that is a little bit of a pain.
 
20210821_180344-jpg.61111


More info here:

 
I hate those machines with a purple passion. I have one that will hang on the back of a tractor, just sit there down, and let the machine do all the work. Fantastic machine once you get it hung on the tractor, that is a little bit of a pain.
Mine hangs off the front of the tractor (or skid steer or miniex if I owned one). Worth the cost not to have to work with an octopus. Also my octopus grew into a tree while I was gone for 20 years, so I had an excuse.
 
Professionally installed by meView attachment 167199

Looks like mine.

Currently in the process of getting them off the ground and onto the side of the shop.

Now I think I need to explain something about my setup. It is in every sense of the word DIY. My wife has helped pick up the panels from the ground to the side of the building.

Now the side, yes side, this building has a 24' side wall and there is no way in hell I am going to climb up there, not gonna happen. So side of the building it is.

Ahhh, but wait you have it on two sides here.

Yup sure do.

The front of the building with the door faces basically west.....more or less. The long side faces basically south. In the early morning I get nothing, trees and the angle of the building. I could put it on the roof and be much better off, but re read above, not gonna happen. Also in the late afternoon, roughly 4 in the summer the side starts to fall into the shade, and that front panel is in full direct sun. So this is why I did what I did.

It is a work in progress and a little farther along then in this photo. In the end we will get there.

The "T" thing hanging on the T post holding up the wires was the test mount when I had one panel. Now I am just using it to keep the wires off the ground as much as I can.

The T posts I had buckets of, I could have done the "solar mounts" out of steel, but wanted aluminum. I looked into angle aluminum and the price was actually more here locally then buying these mounts off the forest site, plus they already have the holes.

1694532582363.png
 
DIY everything to keep costs down.

63 x Bluesun 700W Bifacials in 21 sets each having 2,1/1,5kWp, total 44,1/31,5kWp front/back. The whole idea was to avoid shadows on either side with vertical installation to maximize winter production and keep snow off. This was my first take on solar and has only been working for 5 months now, so hard to tell how good or bad it is. We have over 19 hours of sun around mid summer, so plenty of production even with fixed tilt.

Used CCA treated old electric poles hammered (not dug) 2m deep with excavator and insulated to withstand ground frost, no concrete. Frames are made from 40x40x3mm marine grade aluminium and welded together (there are water drainage holes). Each frame has three panels glued to it (and to each others) and weights 150kg. Glue is UV protected heavy equipment windshield glue with primer. This way each frame is very rigid even being 4m x 2,8m in size. Ground clearance is 1m. Tilt is not totally vertical, but ~80 degree which is optimal for winter here and maybe slightly better with summer production.

My main concern is pole movement and high winds. So far it has survived 29m/s (65MPH) wind. Keeping fingers crossed...

Frontside
first panels.jpg

Backside
ready back.jpg

Set of three panels. Black windshield glue is visible.
20230206_161033.jpg

Homemade SS fasteners to allow pole movement. Mudflap rubber to reduce movement and sound.
frame fasteners.jpg
 
Back
Top