diy solar

diy solar

Ground Mount Help

Depends on what you decide on...
Notice I don't speak in absloutles, the design has to fit YOUR situation, odd corners in property lines, codes about how far things have to be away from property lines, buildings and right of ways, etc.
Yeah, I was looking for building blocks -- or options -- and, you gave me a TON! I do have a problem with weeds on the paver patio I built, but primarily because I need to fix my pressure washer. I need to replace the carb. If I get that going this year, I can clear out the weeds, then re-apply polymeric sand for a few years of peace before I have to repeat it.

Now I know why I get these giant white soccer ball sized mushrooms. LOL None of the leaves that fall leave my back yard. I collect them and put them it in one of several locations.

I did build a dog house I never actually took outside to complete. The only problem with adding a structure like that is the rabbits will have another place to nest underneath it, and my dog already goes nuts hunting them. Rabbits are not the smartest critters.

I could create a location for firewood. I'll likely leave it open in the beginning until I get used to where I need to reach to adjust things, so I don't initially block things off. But, you're right that I'll have to plan the height to take into consideration what will be underneath it. One thing for sure is that the dog will pee on anything below 2'.
 
Last edited:
Yeah, I was looking for building blocks -- or options -- and, you gave me a TON! I do have a problem with weeds on the paver patio I built, but primarily because I need to fix my pressure washer. I need to replace the carb. If I get that going this year, I can clear out the weeds, then re-apply polymeric sand for a few years of peace before I have to repeat it.

Now I know why I get these giant white soccer ball sized mushrooms. LOL None of the leaves that fall leave my back yard. I collect them and put them it in one of several locations.

I did build a dog house I never actually took outside to complete. The only problem with adding a structure like that is the rabbits will have another place to nest underneath it, and my dog already goes nuts hunting them. They are not the smartest critters.

I could create a location for firewood. I'll likely leave it open in the beginning until I get used to where I need to reach to adjust things, so I don't initially block things off. But, you're right that I'll have to plan the height to take into consideration what will be underneath it. One thing for sure is that the dog will pee on anything below 2'.

I have a friend that his solar panels were randomly dropping in efficiency, completely random and never when he was home...
SO...
We went out and had a look.

DOG TRACKS on the panels!
When he left for work his big lab would go lay on the panels for some reason!
When he was home the dog laid on the porch... (GOOD DOG! :) )

We solved the issue with an electric fence for about a month, then just left the wire up and moved the charger,
But if the dog hadn't had wet feet from dew, that would have been one heck of a 'Problem' to track down!
He already had plans to send his big all in one inverter back for service having had looked at the panels, no dog tracks then, he was SURE it was the inverter/charge controller...

Another customer had chicken roosting problems, but he knew what was causing it.

One customer installed a drip watering line at the top of his panels (which I copied),
He had mulberry trees behind the panels, and the birds would fill up on mulberries and perch on or fly over the panels, releasing a TREMENDOUS amount of 'New Car Color' on the panels.
He hated dragging out 300 feet of garden hose, so I just installed a drip water line at the top and used a long handle mop to clean panels.
(Cheap LONG handles that aren't flimsy or stupid heavy, any Pool Supply store)

You asked for ideas, there is a blue million out there.

As for fire wood,
I saw a picture of this,
A guy had posts/beams/slanted roof sections, long and skinny, up off the ground 7 feet or so.
It was cover for fire wood being seasoned.
The roof became solar panels on a single pipe that rotated to track sun.
Posts were already there for the wood stacks, a pipe & panels and he was off to the races.

I saw a picture of a roof over dog kennels that got solar panels, a producing dog house, shade for the dogs.

It's all in what you have and how you use it...
 
@erik.calco Start with the basics first, find out what angles work best for you, not only the average (used in fixed mount) but also what the optimal is in summer & winter so you know what the deal is if you want to use a tilt system.
Get a quick angle calculation here: http://www.solarelectricityhandbook.com/solar-angle-calculator.html

You mention potentially installing on a roof, so it's good to know what the roof pitch is relative to the degrees. For example 45 degrees = 12/12 pitch and that's a pretty steep roof to clamber around on.
Figure out angle to pitch here: https://www.blocklayer.com/pitchangle.aspx enter the angle an hit that button it will convert it to pitch. Note the numerous construction calculations on that site, very very handy to have. Keep in mind that if your doing a porch or pergola the correct angles may not be appropriate for the structure your thinking, therefore there will be compromises and that usually means over-paneling (cautiously to compensate) or other alternatives to get production up.

On a ground mount system, there have been some good tips here but I really feel I should point out something quite obvious which is a bugger.. Ensure your high enough and setup in a way that when you mow the grass, or weed whack that there is no way that flying debris hits the panels... Obvious yes but under-estimated as weed whackers can toss crap far, not to mention a mower.... One possible option in tough spots is to use a commercial grade landscape cloth covered with either gravel or a good mulch to reduce maintenance and pesky weeds, or plant something a low growing persistent ground cover.

Anchoring can be done in a variety of ways, planting PT posts to concrete blocks or poured posts. My own rack is built off the side of my 20' Sea Container with marine dock hinges at the top (originally planned to pivot but not practical in location) and the bottom is anchored to a 4x4 structure which used screw piles (they anchor up to 5500 lbs pull and twist in by hand using an 8' 4x4. https://pylex.com/en/products/10505-pylex-regular-black I have used these for 4x4 and the commercial 66 (for 6x6) https://pylex.com/en/products/10730-commercial-pylex-66-black All my wood work is brown Pressure Treated and so all the screws and attaching hardware is appropriately galvanised or stainless steel to prevent any corrosion and deterioration. The racking I used is made by Kinetic Solar (Rapid Rail) and is amazing stuff to work with and damned near foolproof and it provides a run for the panels wires as well... http://kineticsolar.com/racking/ Now in order to protect / isolate the Aluminium feet from the PT wood I got an old tire tube (commercial truck, so very thick) and cut 2"x2" squares and put them between the foot base & the lumber and used Stainless Steel Bolts to attach to the frame.

We have a lot of solar installations out here of every variety you can imagine (some truly creative ones too) but one thing I came across is several use a BigFoot concrete form to anchor their ground mount racks http://www.bigfootsystems.com/index.htm the most common being that form is below ground and only comes to 1' above grade which then has a heavy duty galvanised anchor for a wood structure similar to what is shown (BTW Simpson is top notch)
simpson_epb66.jpg
 
I have a friend that his solar panels were randomly dropping in efficiency, completely random and never when he was home...
SO...
We went out and had a look.

DOG TRACKS on the panels!
When he left for work his big lab would go lay on the panels for some reason!
When he was home the dog laid on the porch... (GOOD DOG! :) )

I've been testing with my 100W, taking it out on occasion and bringing back in by the end of the day. I have the 320Ws, but I don't want to carry them in and out to test. So, they are safe until I build a mount for them. I set the 100W on the ground and prop up with a chair, the arms holding it in place.

I have a solar lab (black). There is nothing he loves more than a cool sunny day, where he uses the sun to stay warm. I caught him lying in front of the panel, casting his shadow on the lower part. He is very trainable, so haven't seen him do it since. But, that did make it clear that when I build a mount, they have to be at least 2' off the ground.

The only time he's not trainable is when I'm rarely out there, usually because it is too cold for me. He prefers 30-40F lower than I do, and loves being outside. So, when the weather gets nice for me in the Spring (70s), I might have to retrain him to not piss on my patio furniture and not crap near the patio. He understands English very well. I usually just have to tell him in a calm voice, and he's good.
 
Thank you, @Steve_S . You gave me some good anchoring tips. I have considered screw in post mounting anchors, but until this thread, have only heard of them being successfully used for mail boxes, and didn't know how much they could really handle. Watching that video, I'm not sure I understood the corrections he was doing, how he decided to take it up and back down to only 6 inches.

I unfortunately have a lot of roots from very big nearby trees and plenty of clay. I could never of excavated for my patio w/o the help of my nephews. IIRC we put in something like 3 yards of gravel and 1-1.5 yards of sand. That was 8 years ago and it is still very nice today.

I am comfortable with pitch, and would not use an off-the-shelf pergola design because it is not designed for a roof. Code considers PV to be a roof, and you add wind and snow loads. Thus, if I go the Pergola route, I'll try to incorporate structural features of a Pavilion, which is designed to hold a roof. The only reason I'd go the Pergola route would be so that if I remove the PV, it will appear to be a Pergola. Otherwise, I'd lean more towards a Pavilion design.

IIRC, the overall ideal pitch where I live is near 44 degrees. But, I do want the pitch to be adjustable. So, if I build a Pergola, there would have to be an additional pitch for PV mounting, ideally adjustable 4 times a year. If I can't achieve adjustable, I'll shoot for something near 45 degrees for the panels. One of the many learnings from JH is ideally I'd be able to flatten to 0 degree pitch on high wind days. In a freezing rain scenario, I might want a steep pitch. One year, a limb took out my tonneau cover of my truck because freezing rain made all the branches of trees very heavy, then big winds came. My whole street was a disaster zone, and by Sunday, our tree lawns were piled over 8 feet high with tree debris collected from that event. It was crazy just looking down the street that day with a giant wall of tree branches on every tree lawn for refuse collection.


1576503911225.png 1576503954523.png

I have also lived through some amazing wind storms that took down a ton of trees. In one, I was on the 31s floor of a building that was swaying so badly (by design) I almost fell out of my chair. The coat hangers were smacking the doors they were on. I watched the black clouds fly by the window at a crazy speed while my girlfriend on the phone told me to get away from the windows. I did hold onto a very big heavy desk. LOL. I can't help but watch, though, being obsessed with tornados as long as I can remember. On my way home that night, there wasn't a side street without a big tree that was down. My small street had 3 big trees down. One of the bars had its front window blown in, but the patrons were already as far back away from the window as they could get, so no one was hurt.

My primary concerns are about stability of the structure. These events are common enough where you have to figure you'll get a bare minimum of 4-5 tests of your structure over 20 years.
 
Just my two cents (all I have left after buying solar components), wood warps, splits, rots and fails. Steel, aluminum and concrete last forever if done correctly. I used 2 windy nation pole mounts on a 3.5" steel pole set in concrete. Then I bought 2 eight foot long aluminum extrusions, and modified the mounts to use the extrusions. 4x100 watt panels on there, and there is no reason I should ever have to mess with it. Cost about $300.

20191127_092329.jpg


If you do use wood, I'd suggest treated wood and liberal use of Penofin. It will drastically extend the life of the wood.
 
I like that. How are you mounting the panels onto those rails? Please share picts when you do.

I'd like to focus on a mounting frame then go from there, and you look like you have that covered there.

I finally brought my inverter online yesterday, which is acting as a UPS, connected to AC for charging and AC out is going to a 10 circuit transfer switch. That frees me to focus on the mounts. I'm giving myself a due date of March. I have to focus on my software over next two months (my business), so will just casually play with ideas until then. I'm in the NE, so you don't feel like you're missing too much sun in Jan/Feb. But, my 320W panels are sitting there waiting to be used. I'll play with a 100W just to test any mount I create and learn from that. I'll try to bring 2 of the 320Ws online at a time, so I can learn before doing the next 2, adding each pair to the combiner box.

There are really only two high priorities.

1> Ensure that the wind does not bend the panel frames. Thus, I'll focus a lot on how I'll mount the frames.
2> Ensure the wind does not blow anything over. Thus, stable weight on it.

I'll try to avoid pouring concrete as I want a mobile structure for now. So, I'll build something that can move, then tie it down with earth ties and weight. If I can pop the panels out, I can move them inside for the worst wind storms, or perhaps flatten them if I can add that ability. I'll consider tilt in the design. Not likely to worry about tracking anytime soon. That could be an improvement in a future year.
 
Sure, Ill share pics when I get home. They have been mounted for a while. I was going to add a 3rd mount at the bottom but it's plenty strong enough, so I didnt.
 
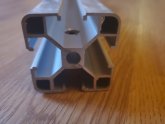
This funky looking thing is an aluminum extrusion. Their shape makes them very strong, yet the are very light, being solid aluminum, and will never rust. They come in many different sizes and shapes, so it's important to shop carefully. Zoro Tools has a good selection of them. I purchased two of these, each eight feet in length. Total cost shipped $99 USD. Here is a link: https://www.zoro.com/search?q=aluminum extrusion

20191228_093729.jpg

You can see the hole drilled in from the top, through the center. You can mount these to anything you can bolt through. I've used Windy Nation pole mount parts, because I had them. Otherwise, it would be easy to make your own with U-Bolts (if using a round post like mine) and aluminum angle or bar stock.

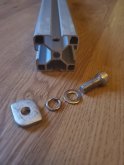
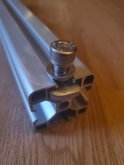
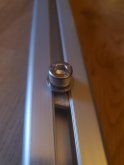
This picture shows the "T-slot nuts" and washers/bolt, and the following pictures show how it attaches. Simply run the bolts though the holes on your panels. In my case, the holes did not line up, so I drilled new ones. I flipped the panels over ON A VERY FLAT SURFACE and placed a little piece of scrap wood under the rail, so I didn't accidentally smack the panel with the drill bit.

20191228_093712.jpg

20191228_093816.jpg

20191228_093850.jpg

I hope that helps, but if not, let me know!
 
Last edited by a moderator:
This funky looking thing is an aluminum extrusion. Their shape makes them very strong, yet the are very light, being solid aluminum, and will never rust. They come in many different sizes and shapes, so it's important to shop carefully. Zoro Tools has a good selection of them. I purchased two of these, each eight feet in length. Total cost shipped $99 USD. Here is a link: https://www.zoro.com/search?q=aluminum extrusion

View attachment 4069

You can see the hole drilled in from the top, through the center. You can mount these to anything you can bolt through. I've used Windy Nation pole mount parts, because I had them. Otherwise, it would be easy to make your own with U-Bolts (if using a round post like mine) and aluminum angle or bar stock.

This picture shows the "T-slot nuts" and washers/bolt, and the following pictures show how it attaches. Simply run the bolts though the holes on your panels. In my case, the holes did not line up, so I drilled new ones. I flipped the panels over ON A VERY FLAT SURFACE and placed a little piece of scrap wood under the rail, so I didn't accidentally smack the panel with the drill bit.

View attachment 4070

View attachment 4072

View attachment 4073

I hope that helps, but if not, let me know!
you shouldn't have changed your name New Mexico Will!
 
Glad I could help! For what it's worth, I plan to add 2 more of these poles, switch to 10' extrusions, and connect them for an 1,800 watt array.
 
Glad I could help! For what it's worth, I plan to add 2 more of these poles, switch to 10' extrusions, and connect them for an 1,800 watt array.
Did you get the bolts and t-slot nuts from Zoro, too? Can you link to the ones you have if you did? I found a bunch of t-slot nuts there, but not one matching your pict. And, I like the bolts you're using, with both hand tightening and allen wrench, which should be good for tight spots.
 
Did you get the bolts and t-slot nuts from Zoro, too? Can you link to the ones you have if you did? I found a bunch of t-slot nuts there, but not one matching your pict. And, I like the bolts you're using, with both hand tightening and allen wrench, which should be good for tight spots.

Nope, I found them at my local hardware store. I took the extrusion in there so I could match it perfectly. Even my small town hardware store had a good selection of them. You could also use normal nuts, just look for "low profile" ones.
 
Here is a couple of more links showing different options from ballasted mounts and such,
Ground Mount Foundations, Low Cost Ground Mounts, & more here: http://www.ottawavalleypv.ca/resources.html in particular check out the Pictorial of Various mounting types.
WOW! That is a sweet ass single pole mount!!! You'd still have the whole yard available! Not sure neighbors would be happy.
 
WOW! That is a sweet ass single pole mount!!! You'd still have the whole yard available! Not sure neighbors would be happy.
There are many of those big tracker mounts on farms around here... one fellow in particular went in deep and has 25 of them with 20 panels per and they are high enough that the tractor & equipment can keep working the land too. The advantage of being out of Urbania ! There are also Solar & Wind powered Dairy Farms (they use massive power for the coolers, pumps etc) as well as a couple of solar powered Saw Mills (small ones but nevertheless with tracking ground mounts it works), one fellow even took the biggest WoodMizer mill he could get and converted it to electric so he would never have to deal with diesel fuel again! A lack of vision for the possibilities is the only limitation people have.
 
Here is a couple of more links showing different options from ballasted mounts and such,
Ground Mount Foundations, Low Cost Ground Mounts, & more here: http://www.ottawavalleypv.ca/resources.html in particular check out the Pictorial of Various mounting types.

That first big pic shows a wind speed indicator to get the panels flat during high winds, a remarkably good idea I did myself.

It's also using an electric jack screw to move the rack, but since the jack screw isn't mounted at an angle it's probably a single plane of motion joint on top the pole (east/west),
Reinforced hinge would be a must on that size of rack and would make a two plane of motion joint HUGE!
That jack screw has to be HUGE the way it is...

That's a BIG rack for a single post mount, I wonder how far the anchor goes down, my guess is 20 feet or more!
 
Last edited:
It's March. Time to put up my 320W panels. But, I still don't have a Bill of Materials (BOM) or know what parts to order. I've researched over and over online. It is frustrating. Lots of pictures of mount systems. I can even find parts catalogs. Plenty of sites selling mount systems, but have to call for a quote.

The market is not for DIY. Nothing connecting the dots. I look at half the parts and no clue what they are used for. Don't know the name of any of the parts. So can't figure out how to order everything I need.

I've decided I want to put poles in the ground. I can see from lots of ground mount picture the basics of what I need. I just don't know how to select and order individual parts.

This is overkill for what I need, but gives an idea of the basic construct I need to complete:

efkpiW7.png


Poles in ground with concrete. Another piece of metal at the angle I want the panels. A joist to support it back to the main pole. Rails on that. Panels on the rails. Easy, right?
 
Last edited:
I'm in the exact same boat so this is a great thread for ideas!

I'm looking to ground mount 6-8 panels, but thinking I'll make it in wood since its easier in terms of availability (and use angle brackets to attach it to the wood). I might just do the design in the above picture in wood though.

The ground where I'm going to mount is in a slope facing west (panels will be facing south though) so I initially thought of something like the image below, with smaller mounts for 2 panels to avoid having to make everything well aligned. I'll only have 1.5 days to set everything up so was planning to go with ready made concrete foundation. Possibly add a joist to support like the image you shared too. Disclaimer: I'm no expert and this is my first project.

Solar.png
 
@BigVT we're on the same page, only I haven't ruled out a metal pole yet. I'm not sure where to procure one large enough.

I, like you, like the idea of doing 2 panels at a time. Makes it simpler to get this online with first 2 panels, and in the end, I can point them in slightly different directions to better utilize the moving sun. 2 panels per pole does not seem unrealistic.

Mine are 320W each, so not small. This does seem to rule out Z brackets and require rails instead. Also means I need a really sturdy mount for wind gusts. A plus is the ability to change their angle seasonally.
 

diy solar

diy solar
Back
Top