diy solar

diy solar

12 volt to 24 volt conversion Notes

I have been looking for an excuse to get a manual rod bending tool this:

FFDE8E3D-D7F8-414F-B3FB-F5799CCF8BDF.jpeg

However, at $100 for the tool and $2 per inch for the copper, spacers seemed a better option. I don’t even know how to bend 1/4” copper. I don’t own the vice needed for that tool. Expensive education.
 
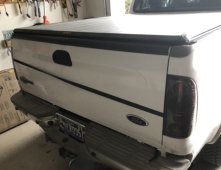
Big day is here, I have the lithium batteries loaded and secured to the truck. Anyone notice my mistake?0EACD9EC-D2BE-4918-A55B-38DF61A81570.jpeg
Locked my batteries inside the bed. Just something l’ll deal with when I get to the trailer.

I secured the battery pack to the trucks tailgate to keep it from moving which means I can’t open the tailgate and then put the tonneau cover on which I need to open the tailgate to undo.
 
Batteries can handle a little tilt.
smokin.gif
 
The tailgate thing was much easier than I thought.

I’ve got the cells placed and starting to secure everything. Again made a busbar today. I’m estimating two more days of work, which probably means three:

FC2AED62-8225-495F-AFDF-41D6DCE998AD.jpeg
 
Spent all day putting the case together. I decided with the BMS on top versus hanging off the compression rods.

Off to the paint shop with the wood. Actually means take it apart and spray paint it.

62513C0C-B01B-4059-AF9F-8A9F616544CD.jpeg

Comments are welcome. With luck will be all buttoned up tomorrow.
 
For spacers for the Overkill, I recommend a 3/4 long #10 inside diameter with a 1 1/2”inch long #10 screw. 1 1/4” is pictured.F4157DC4-41B5-4F15-8A23-E6C7EEC88FC0.jpeg
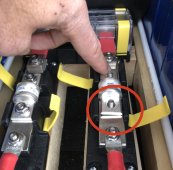
Also noticed on inspection that a brand new unused 125 amp class t fuse was warped. This is thick metal that is not bending. I had a spare and will try to get Blue Sea to swap a new one for the warped one.8CB63CCE-7822-435E-8782-B043FAFD9711.jpeg
 
Good catch on the fuse!

The latches on the fuse holder cover look like they would work a lot better than the cover I have. Any time is has to come off it's a struggle.
 
Good catch on the fuse!

The latches on the fuse holder cover look like they would work a lot better than the cover I have. Any time is has to come off it's a struggle.
I agree, I have the blue seas fuse holder and damn is it hard to get off. It sure works good though
 
I have the ignition protected for the two smaller fuses and that has the yellow latches. Those are easy to take off.
1256F41B-7D9A-4AE2-B325-6EEAF73AE4F1.jpeg
The bigger main system is not ignition protected and harder to get off.
 

Attachments

  • 67A67D08-DA55-4A45-A2D0-0900A37F1B2F.jpeg
    67A67D08-DA55-4A45-A2D0-0900A37F1B2F.jpeg
    321.8 KB · Views: 2
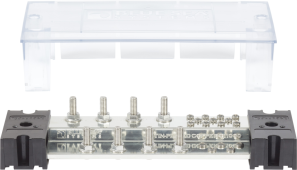
I'm in the process on installing two Blue Sea PowerBar 1000 (8 studs). It's a monster. Just barely fits where I need it to go. The cover for it is a booger to remove even without the PowerBar being installed with nothing on it. I may have to remove some of the tabs to make it easier. I'm all for keeping covers secure, but Blue Sea takes it a little too far.

1640995374809.png
 
I'm in the process on installing two Blue Sea PowerBar 1000 (8 studs). It's a monster. Just barely fits where I need it to go. The cover for it is a booger to remove even without the PowerBar being installed with nothing on it. I may have to remove some of the tabs to make it easier. I'm all for keeping covers secure, but Blue Sea takes it a little too far.

View attachment 77835
Quite the upgrade. What’s the plans for this? Adding power? Getting rid of a underpowered busbar?

We talk about taking a brass brush to these to clean them. I did that with he ones I just installed. Kind of a shame. I had a mirror finish on the bus bars that a brash brush scuffed up.
 
Quite the upgrade. What’s the plans for this? Adding power? Getting rid of a underpowered busbar?

I had only four posts on the old bus bars. There were too many lugs stacked on posts. The Multiplus gets two cables each on the positive and negative side, so that takes up more room. At least it will on the negative side. The positive side will have a fuse coming off one post and then two cables off the fuse. The new bus bars give me more room for future expansion also.
 
I’m a bluesea fan but these
That busbar seems to be made of brass and not copper. I think it’s good for most applications, but I wonder about if it’s rated for 250 amps in the same way a blue sea busbar is.

I think the one your using I looked at and decided not to use for 250 amp applications and purchased a blue sea. Brass is not as good of a conductor as copper and side by side the brass busbar is much skinnier, among other things.

 
That busbar seems to be made of brass and not copper.
I believe it’s all stainless. Again slightly more resistance but problem free. I tested with a magnet. Slightly magnetic are the flat and lock washers- which are almost not magnetic.

Looked at description, and indeed:
Nickel Plated Brass Contact Plate & Stainless Steel Connection Posts

Hmm. I don’t think I care in my application as the battery cables and inverter cables will be stacked.

As a departure from ‘norms’ I may stack the SCC output in there as well: inverter on bottom, battery in middle, SCC on top. That’s the same contact area that would have individually and no busbar losses. I really only needed a terminal stud but decided the extra connection availability would be good to include.
 
Last edited:
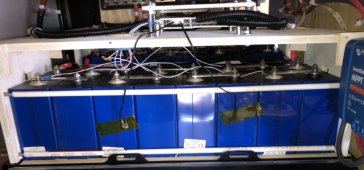
I’ve finally finished this. Took 4 months between ordering the battery and waiting for parts to arrive. Another twelve 8 hour days between finishing the 12 volt to 24 volt upgrade, testing that with the batteries in a 12 volt configuration, and building the two 8s battery packs.

7A3E2FF6-9864-4F0D-A5C5-9FF49B0AA074.jpeg
Got a lot of help from those here along the way which I’m grateful for. I think this will be it for me for a while for upgrades. Time to enjoy it.

There was also two months of putting a portable generator together which made this bigger 24 volt RV upgrade go quicker. Things like learning top balancing and tinning and making busbars made this project go days quicker.
 
Am testing my batteries to see how evenly the load goes out between them. The higher the load, the closer the margin.
=============
During a 1580 watt load, the batteries were within 2.8% of each other. Right now, I say that’s a success.

Wanted to know how even the BMS ran during a load so I Monitored how much both BMSs put out running the microwave At 1580 Watts total:

BMS 1: 780 Watts (29.27 Amps / 26.69 Volts)
BMS 2: 801 Watts (30.02 amps / 26.68 Volts)

During a smaller 265 watt load, They were within 7.9% of each other.

BMS 1: 175 Watt (6.51 Amps / 26.88 Volts)
BMS 2: 190 Watt (7.05 Amps / 26.93 Volts)
===============
This is not scientific, so although BMS 1 consistently put out slightly less, I can’t say how accurate the Overkills are in measuring volts and amps. These measurements also fluctuate slightly, so I pull a number that is close to the average. I did take great care when making these cables to make each set of wires paralleling the batteries the same length, and scrubbed and cleaned with alcohol the lugs and busbars.
 
Last edited:
Back
Top