diy solar

diy solar

300!

sunrise

New Member
Joined
Jul 16, 2020
Messages
206
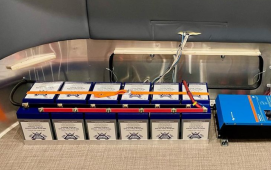
OK, just finished designing of this battery case, I named it '300', as it's 300ah and fairly spartan :)
Waiting for a couple of components to arrive before I kick off printing.
If all works well, I will put the design on github.
Wish me luck :)

Cells: EVE 304ah
BMS: JBD 200A


Untitled.jpg
 
Looks nice. THere’s been so many things over the last year and a half that a 3D printer would be handy. I went with a Battery vent hose that printing up parts would have saved days. THere’s plenty of others.

Keep in mind I know nothing about 3D printing.

Is that case stout enough to lift it? If so that‘s awesome.
A lot of consideration went into the strength of the case, it's actually supported by 4 3/8 rods. so absolute you will be able to lift it.
 
That's an elegant design, the way the different pieces are modeled looks like it will print nicely. PLA or ABS or what type of filament you going to use?
 
That's an elegant design, the way the different pieces are modeled looks like it will print nicely. PLA or ABS or what type of filament you going to use?
Thank you, I will be using PLA or PLA+
PETG or other material prints too slow.
 
Looks very nice!

Did you consider ways in which you could minimize the opportunities for a short between the battery posts, it looks like the battery posts (as well as the BMS heatsink) are all pretty exposed and close together with no separation.
 
Looks very nice!

Did you consider ways in which you could minimize the opportunities for a short between the battery posts, it looks like the battery posts (as well as the BMS heatsink) are all pretty exposed and close together with no separation.
Thanks!

I borrow the idea from

I like this design (terminals with offset) as you can run a straight copper bar to parallel multiple batteries.

You are right about the exposed BMS heatsink, it's closer to the ground terminal , and I could cover the heatsink with a louver'd cover.
 

Attachments

  • Screen Shot 2021-12-01 at 9.30.12 PM.png
    Screen Shot 2021-12-01 at 9.30.12 PM.png
    1.7 MB · Views: 74
Not sure if you wanted the heat sink removable from the top without opening ththe case, but I think the model is super clean. Might be able to add a vented top that covers the heatsinks on the same print as the top. Not sure how hot you think the heatsinks will get, but could use some close tolerance, though heat is the only prob with pla. I've left pieces I've printed in a hot car and basically had them deform a bit.
I do like abs for its thermal properties but PLA is tough stuff, strong, and hard.

Cant wait to see the prints!
 
Damm Sunrise, that is a nice looking case, I'm looking forwards to seeing how it turns out, as i've got the same cells and BMS

Can i ask what program you used to design this, i'm going to have to learn how to 3D print

I'd tempted to add an extra level above the heat sink and incorporate some fans activated by the heat port connection on the BMS as i live in a hot climate
Hi @bryn, thanks! I use Fusion 360 for the design. it's free for non-commerical use.
A couple of weeks ago temporarily put the cells and BMS together in my travel trailer, and ran 13500BTU A/C (in heat pump mode) for 30 min or so, It draws about 1400w, for about 5 minutes I also turned on a 400w dehumidifier. I didn't feel BMS even got warm when I touched it. But the environment temp was ~40F.
One of the reason I choose this BMS was passive cooling. So I won't be putting a fan as I don't think it's necessary.
 
Not sure if you wanted the heat sink removable from the top without opening ththe case, but I think the model is super clean. Might be able to add a vented top that covers the heatsinks on the same print as the top. Not sure how hot you think the heatsinks will get, but could use some close tolerance, though heat is the only prob with pla. I've left pieces I've printed in a hot car and basically had them deform a bit.
I do like abs for its thermal properties but PLA is tough stuff, strong, and hard.

Cant wait to see the prints!
Definitely would consider a vented top. I already designed a 3mm clearance between heatsink and top cover opening for this purpose.
On printing, I have never printed functional parts as big as this one, One thing I worry is the expansion/contraction causing parts not fitting each other, or the cells. I put about 0.5-1mm clearance in different places, figured if there isn't any significant contraction I could use thin toam tape to pad the clearance. I also put tongue & groove along long joint edges. We will see.

Thanks again for the advice.
 
Yes this happens, generally it's all up to each printer and their own tolerances as well. I think with mine, parts will generally shrink or be tight, good idea on adding clearance, may end up all fitting perfect. You could afterall make a seperate heat sink cover and use velcro to just slap it on. Could prob find one and scale it to your needs.
Keep us updated! Anxiously waiting the parts!
 
Hi @bryn, thanks! I use Fusion 360 for the design. it's free for non-commerical use.
A couple of weeks ago temporarily put the cells and BMS together in my travel trailer, and ran 13500BTU A/C (in heat pump mode) for 30 min or so, It draws about 1400w, for about 5 minutes I also turned on a 400w dehumidifier. I didn't feel BMS even got warm when I touched it. But the environment temp was ~40F.
One of the reason I choose this BMS was passive cooling. So I won't be putting a fan as I don't think it's necessary.
Thanks that is good to know, as i'll be running 2 x 12 volt packs in my camper, and heat is a concern with more draw.

I also choose this BMS, due to the large heatsink, the 200amp Daly BMS on my 240ah pack use to get quite warm, but ill be splitting the load with this pack, so i'm properly overthinking the heat issue.

I might have to download 360 Fusion and play around, i need something to tie the case down, such as an extended tab at the bottom

How many pounds/Kg of filament do you think will be needed?
 
What infill are you using? PLA can be strong with relatively low (20%) infill, but depending on outside wall thickness sometimes 100% infill is a small price to pay in more filament while not adding much time to the print.
 
What infill are you using? PLA can be strong with relatively low (20%) infill, but depending on outside wall thickness sometimes 100% infill is a small price to pay in more filament while not adding much time to the print.
For functional parts, I use 15-20% honeycomb almost exclusively. it offers far better strength than the default one.

For critical parts involves fasteners, I also use different infill at point of contact (in Pusaslicer), but in most case this is not necessary. I found counter sink screw holes works really great as it increase the area of contact.
 
Thanks that is good to know, as i'll be running 2 x 12 volt packs in my camper, and heat is a concern with more draw.

I also choose this BMS, due to the large heatsink, the 200amp Daly BMS on my 240ah pack use to get quite warm, but ill be splitting the load with this pack, so i'm properly overthinking the heat issue.

I might have to download 360 Fusion and play around, i need something to tie the case down, such as an extended tab at the bottom

How many pounds/Kg of filament do you think will be needed?
The mounting option is where this design truly shines, with a bit longer rod at the bottom, I could add a printed clamp at the end, even hold down 2 batteries side by side. or if I am length constrained, I can put a tab with screw hole on the side, the possibility is endless :)

My slicer says 1 roll is enough, but I also need to do a few partial prints to test rod and screw hole diameters, so I ordered 2 rolls.
 
So awesome. There was another poster on this forum that designed a 280ah printed cell holder with snap on terminal caps, but did not include a built in BMS mounting system. Not much of a designer myself, but have found many uses making simple things and editing other stl files using Sketchup.
 
I added handles to a 3/8 threaded rod on my recycled wine box 2.4kwh 24v battery build. I use the end of the threaded to hold steel handle rings to attach a rope/chain/cable to each end of the battery. For your hold down method could just use peices of angle iron/aluminum.
 
Just posting to bump this thread as i'm interested to see how it turns out
 
Just posting to bump this thread as i'm interested to see how it turns out
@bryn I was waiting for copper bar and 1 awg wire to arrive for fitting verification. I will start the printing tomorrow, and I would take a few days to complete. Definitely will post update here, no matter the result is.
 
Back
Top