Chefwhowa
New Member
- Joined
- Sep 24, 2019
- Messages
- 135
Ok I have some thicker wires I can useIf you're not getting 10A at 3.6V you need better (thicker) wire with good contacts. Generic leads that come with these supplies are undersized.


Ok I have some thicker wires I can useIf you're not getting 10A at 3.6V you need better (thicker) wire with good contacts. Generic leads that come with these supplies are undersized.
How about 2 gauge? Or is that to big?If you're not getting 10A at 3.6V you need better (thicker) wire with good contacts. Generic leads that come with these supplies are undersized.
")
Heard that! LolThere is no thing as too big.
That is a personal choice. Either way works. Just be careful of the threads on your terminals if you are changing things around.should I disconnect it and charge them up and than go back to top balance or should I just leave it alone and let do its job?
Ok I'm getting 10 amps now with the 2 gauge wire. Thanks againThere is no thing as too big.
I'm not touching them right now just the lead wires going to the cells.That is a personal choice. Either way works. Just be careful of the threads on your terminals if you are changing things around.
I'll bet the voltage at the cells went up too......Ok I'm getting 10 amps now with the 2 gauge wire. Thanks again
I'm at 3.272 right nowI'll bet the voltage at the cells went up too......
That is not as much change as I expected...... but that just confirms the SOC of the cells is still pretty low.I'm at 3.272 right now

 diysolarforum.com
Well I cant wait till it's done, they should give me alot of storage.That is not as much change as I expected...... but that just confirms the SOC of the cells is still pretty low.
BTW: 50% SOC is pretty typical for how cells are shipped.
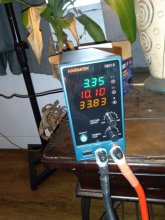
Ok another question, my charger is reading 3.61 but my batteries are reading all different numbers like 3.52, 3.35. Could that mean I could have a bad cell?3.65 is fine but not necessary. Just keep an eye on it and make sure the voltage at the battery terminals does not exceed that. Don't rely on the meter that's on the power supply...
That is kinda normal. It tells me you have a voltage drop on the power supply leads. You also have voltage drops between cells.Ok another question, my charger is reading 3.61 but my batteries are reading all different numbers like 3.52, 3.35. Could that mean I could have a bad cell?
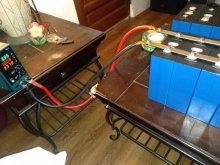
Ok this is how I have it setup, both have a bronze ring on them and I have 100 amp fuse on the positive lead. I can for the next battery to have the negative on the other end or buy a bigger charger.That is kinda normal. It tells me you have a voltage drop on the power supply leads. You also have voltage drops between cells.
You can leave it alone and the voltages will all ballance out as the cells charge and the current goes to zero.
However, the voltage drops are indication of resistance and power loss. The only problem with this is that it means it will take longer to reach full charge. My advice is to leave it alone and be patient. However, if you want to do something here are two things to do:
1) Build better power supply leads (Particularly if you have alligator clips).
2) make sure the positive power supply lead is on one end of the parallel bank of cells and the negative power supply lead is on the opposite end.
Also the wires are 2 gaugeOk this is how I have it setup, both have a bronze ring on them and I have 100 amp fuse on the positive lead. I can for the next battery to have the negative on the other end or buy a bigger charger.
Heard that and thank you! I'll do that for my next battery after this one is done. Shouldn't be much longer almost done.That looks good.... you can leave it like that and everything will work.
Here are two things I would do differently...but are not required for a successful Top Ballance:
1) Get rid of those extra bus-bars and hook the leads directly to the Cell terminals. Those extra bus bars do nothing but add resistance.
2) Move the negative connection to the cells to the opposite end of the bank of cells.
Can you also help me on where I can buy 6mm 1 inch studs for my cells?That looks good.... you can leave it like that and everything will work.
Here are two things I would do differently...but are not required for a successful Top Ballance:
1) Get rid of those extra bus-bars and hook the leads directly to the Cell terminals. Those extra bus bars do nothing but add resistance.
2) Move the negative connection to the cells to the opposite end of the bank of cells.
Thank you once again!Do a search of "6mm x 25mm stainless grub screws" (25mm is approx 1")
This is one of many results that came up when I just did the search
Note, be sure to get Flat Point or Cup point. (Don't get ones with a point on them)
So I'm going to buy new wires for my batteries and wondering getting them from a hardware store or audio store are different? I'm planning on buying 2 awg wire.Do a search of "6mm x 25mm stainless grub screws" (25mm is approx 1")
This is one of many results that came up when I just did the search
Note, be sure to get Flat Point or Cup point. (Don't get ones with a point on them)
getting them from a hardware store or audio store are different?