No.15
That's my number
- Joined
- Jun 29, 2020
- Messages
- 123
Me to, ordered 2 and took a week to send. I should get mine todayI ordered 2 of them it took them about a week but they shipped it and ill be getting them soon.


Me to, ordered 2 and took a week to send. I should get mine todayI ordered 2 of them it took them about a week but they shipped it and ill be getting them soon.
The shipper called me and told me it is delayedMe to, ordered 2 and took a week to send. I should get mine today

Mine are on the delivery truck. Anyone have recommendations for a charger for these?The shipper called me and told me it is delayed
Mine are on the delivery truck. Anyone have recommendations for a charger for these?
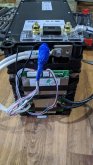
Any good dc-dc chargers I can set and forget, or is this programmable?Right now I'm using a Longwei 30v 10a switching power supply for shore charging.
DC Power Supply Variable,0-30 V / 0-10 A LW-K3010D Adjustable Switching Regulated Power Supply Digital,with Alligator Leads US Power Cord Used for Spectrophotometer and lab Equipment Repair: Amazon.com: Industrial & Scientific
DC Power Supply Variable,0-30 V / 0-10 A LW-K3010D Adjustable Switching Regulated Power Supply Digital,with Alligator Leads US Power Cord Used for Spectrophotometer and lab Equipment Repair: Amazon.com: Industrial & Scientificwww.amazon.com


I just got my 2 24v BYD packs and GOOD GOD THEY ARE HEAVY! I had to take them up the stares one at a time with 2ppl just to get them inside. I did not think 200lbs would be that much of a pain, guess il lucky did not order 6 of them.
Yea I did not pay attention the the info on the batteries that stated they are 200lbs EACH! They were delivered tome on a semi truck, I know my neighbors were thinking WTF!WOW! ? 200lbs?
Time for a fork lift?
Got mine today. v = 26.315 What's the best way to measure individual cells? Can I just us the MM at each cell or do I have to walk the battey and do math?
Looks, good from here
View attachment 18595
Packing not the best, but not real bad at this point because I see it's double boxed
View attachment 18596
Double boxed
View attachment 18597
Opened, could have been packed better IMO. The battery had plenty of room to move, the packing was not tight.
View attachment 18598
Top cover
View attachment 18599
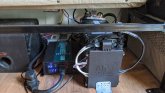
Side
View attachment 18600
Looks like some rust in the holes, not sure if it's from a cooling system or what.
View attachment 18601
Top with cover removed
View attachment 18602
View attachment 18603
I did. They are even labeled. No solder necessary. I also have the Overkill Solar 8s BMS with upgraded wires.I wonder about connecting the new balance leads to the old so the existing cover plate fits properly.
To my eyes "Top with cover removed" Look at heating on bus bars, look at plastic melted to bus from said cover. What caused that and is this why removed from service? . Again just from looking at the pic, small tolerances and swelling caused these to short out in intended use. A large detailed pic of the cell/bus bar would be nice


Butt splice connectors. Wires are labeled s0-s8. You can trace them from the bus bars too.There is some black on the some buss bar welds but the inside of the cover is clean.
Also these are supposed to be new not taken out of service. ?
Haven’t tested the second one yet, waiting on the BMS.
These pics are from #2
@Rmeadomavic
You say your leads were labeled and no soldering needed. How did you connect to the battery balance leads? I have 2 and neither had labeled balance wires?
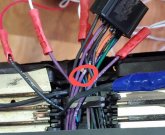
You have any pictures on what’s under the blue tape bundle?
View attachment 19322View attachment 19323
Different battery, same process.(not my video)Butt splice connectors. Wires are labeled s0-s8. You can trace them from the bus bars too.
.