diy solar

diy solar

Cinergi's 28 kWh / 4 kW Solar / 10 kW inverter RV build

Curious what your calculations were for using that spring.
 
Curious what your calculations were for using that spring.

"Rate (lb/inch): 380"
"Load at Solid Height(lb): 182.4"

Measuring displacement probably gives more accurate force than torque wrench. Especially if you calibrate the spring first.
 
Cell face is 53.8 square inches. 4 springs at max compression would be 729.6 pounds or 13.56 PSI. Recommended fixture is 661 pounds or 12.29 PSI. Safe range is 6-17 PSI (from other compression threads here). So I could squash the springs to max while at 100% SoC and achieve what I need. I'll back off the bolt a little as I don't ever want the spring to max out, so say 700 pounds.
According to the spec sheet, each cell can change about 0.5mm from 30% to 100% SoC which is 0.1575 inches for 8 cells. The spring rate is 380 per inch, so at 30% SoC I should be at whatever my value was at 100% SoC minus (380 * .1575 * 4) or 239 pounds. That's 700 - 239 = 461 or 8.57 PSI.
 
Wow, my wire arrived early so I now have all the lugs and wire that I need to get started. I have the neoprene here as well - although that's not useful until I start building the fixture.
This is 64 wires and 128 lugs in the manual hydraulic crimper. That's gonna take a while... :eek:
 
Wow, my wire arrived early so I now have all the lugs and wire that I need to get started. I have the neoprene here as well - although that's not useful until I start building the fixture.
This is 64 wires and 128 lugs in the manual hydraulic crimper. That's gonna take a while... :eek:
We're all willing you on mate....great project to follow. (y)
 
Wow, my wire arrived early so I now have all the lugs and wire that I need to get started. I have the neoprene here as well - although that's not useful until I start building the fixture.
This is 64 wires and 128 lugs in the manual hydraulic crimper. That's gonna take a while... :eek:
I've been crimping up a storm but I haven't done the big ones yet.

I want to use the crimper that you beat on with a hammer. ?️‍♂️ ?
 
I've been crimping up a storm but I haven't done the big ones yet.

I want to use the crimper that you beat on with a hammer. ?️‍♂️ ?

I have a hammer crimper, too. The hydraulic produces a much better crimp. But it's a lot slower (and the tool is a lot more expensive).
 
Springs are due to arrive on Monday. Depending on how lazy I am (or whether I get crimp-cramp), I hope to have my battery back up and running (sans a fixture for now) this weekend. That will be the first 2p configuration I've done. It will be interesting to see what differences there are from my previous plain 16s configuration.
 
The most reliable method would be to drive the springs solid, and then back off a full turn at 100% SOC. That doesn't even require a torque wrench, and is much more repeatable than relying on nut torque.

Incidentally I also decided on a similar spring.
 
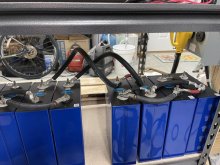
Dry wiring fit of 4 cell per pack config. Dual 1 gauge serial and 4 gauge parallel.

DB4D070C-4926-4D65-9970-6667422B0097.jpeg
 
cinergi, going off topic briefly, when you were configuring your victron quattro's, and input the low voltage discharge cut off, did your system give a default minimum 2v as the DC input reset value? I only ask, as i was doing a multiplus and it is a bit of a pain. If you run the discharge down till you get kicked off, you are having to almost charge the battery pack back to full before you can discharge again. Either that or you have to set the discharge value that low, that at high discharge amps, the delta on the cells risk the BMS booting you off. Just wondered if you had any tips?
 
cinergi, going off topic briefly, when you were configuring your victron quattro's, and input the low voltage discharge cut off, did your system give a default minimum 2v as the DC input reset value? I only ask, as i was doing a multiplus and it is a bit of a pain. If you run the discharge down till you get kicked off, you a having to almost charge the battery pack back to full before you can discharge again. Either that or you have to set the discharge value that low, that at high discharge amps, the delta on the cells risk the BMS booting you off. Just wondered if you had any tips?

yes. This was fixed in a later version of firmware. I’m surprised how old the firmware I had was.
 
yes. This was fixed in a later version of firmware. I’m surprised how old the firmware I had was.
Mine says im on the newest firmware, with no updates available....it is a right bugger not being able to decrease this value down to 1V, which might prove reasonable for the flat curve of lifepo4
When you said yours got fixed, i take it you can lower that value now....what options do you get?
 
I don’t remember what my minimum offset is. It’s easier at 48v since 1v difference at 12 is the same as 4 at 48.
 
Back
Top