diy solar

diy solar

Hello?My 12v setup

Dadoftheturkeykids

New Member
Joined
Jan 11, 2024
Messages
91
Location
U.s.
Hi all, this is my first post. I started my solar project last year in hopes to slowly break away from my reliance on the grid. They have ripped me off one too many times, and have never made right with me on their own errors. I just had to cough up money to pay for insanely high charges that came out of nowhere, either through their own shoddy line work that they mysteriously have no record of employing a crew to do in my backyard, or merging an account (outstanding balance) with the same address and name on the account I pay every month. I am sick of being tied to their schemes, but before now I had believed it would be the only way to restore my power is if I payed their inaccurate and insanely high balance.

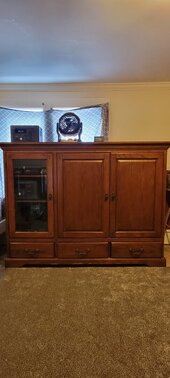
So here is my current battery setup
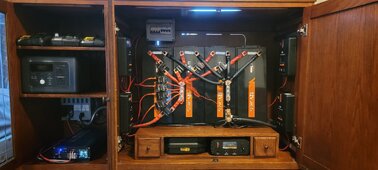
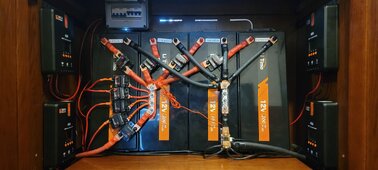
4- 12v 200ah plus wired in parallel
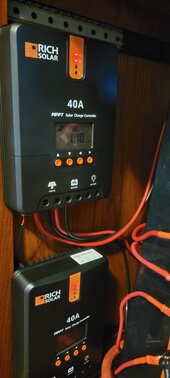
4- 40amp mppt charge controllers
1- 12v 3000 watt inverter
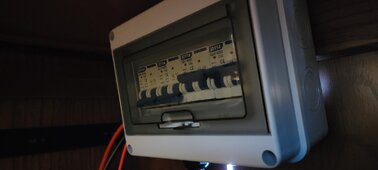
1- 6 circuit manual transfer switch
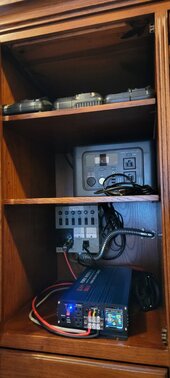
2- 614wh portable power stations

I use the power stations for the kids entertainment purposes (charging devices, and gaming and such) charged up by
2-100 watt panels in parallel.

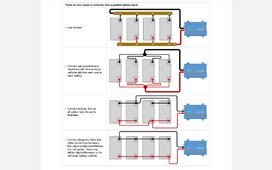
I tried to wire my battery up in 2s2p and bought a 24v inverter, but I had really bad unstable output with that inverter, so back to 12v I went.
I have 4-100 watt panels in parallel going to one charge controller and 6-100 watt panels going to another charge controller. My other 2 are not being used yet.
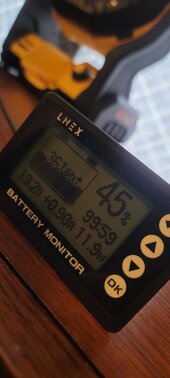
With this setup I can run my fridge and kitchen appliances, along with my entertainment center in the living room pretty steadily and stay around 65% capacity, until I get 4-5 days with no sun. Currently my panels are covered in snow on my roof.
Those were the initial panels I had bought with my new hobby, but I just scored
8-545watt bifacial panels that I will be replacing all 12-100 watt panels with when the weather permits me to work up there on the roof. I will most likely sell those panels and portable power stations because I am really digging the transfer switch... I know I am a rookie in this solar game, and aware that I may not have everything correct, buy I am learning as I go. Constructive criticism appreciated, but also I am kinda stuck in some of my ways as I had already invested a bit into my current system.

I am adding this to the forum not only to contribute to the forum, but also for my own means of being able to ask questions in the future pertaining to my system.

Yall really are a great community here and I've learned a ton from everybody's perspective. Thanks for looking and thanks for the feedback!

I will have questions in the near future ?
But photo drop for now?
 

Attachments

  • 20240122_111704.jpg
    20240122_111704.jpg
    99.7 KB · Views: 92
  • 20240122_110045.jpg
    20240122_110045.jpg
    246.3 KB · Views: 94
  • 20240121_135322.jpg
    20240121_135322.jpg
    86.2 KB · Views: 91
  • 20240122_112359.jpg
    20240122_112359.jpg
    70 KB · Views: 76
  • 20240122_110654.jpg
    20240122_110654.jpg
    65.5 KB · Views: 86
  • 20240122_111048.jpg
    20240122_111048.jpg
    230.6 KB · Views: 87
  • 20240121_135419.jpg
    20240121_135419.jpg
    152.7 KB · Views: 93
Welcome to the Forum!

Please when asking questions provide as much information as possible and do not assume earlier posts you have made will be recalled about your setup. Unless you directly ask for criticism of a setup or component, or a major safety issue exists, I am not one to criticize much. If your arrangement satisfies your needs its good by me.
 
I am adding this to the forum
Suggestions for improvements and possible safety issues.

The low cost breakers you have fitted are known to be unreliable, overheat and introduce unwanted volt drops. Where over current protection is needed at a lithium battery, fuses, MRBF for 12 volts and class T at higher voltages, are considered best safe practice.

The arrangement shown for parallel conection of the batteries is not ideal due to different cable lengths and possible different volt drops in the breakers.

A negative buss bar to replace the mutiple connections to the shunt would be best practice.

Confirming with LiTime that vertical mounted batteries are permitted would be useful.

Since this equipment is within your living space safety is important.
 

Attachments

  • Screenshot_20240104-231107_Drive.jpg
    Screenshot_20240104-231107_Drive.jpg
    121.3 KB · Views: 21
What mikefitz says above -

Replace the cheap breakers between the batteries and buss bars with MRBF fuses that mount right on the posts.
Make cables equal length.
Add a buss bar after the shunt so you can use a post per lug or at most only stack 2 lugs on a post.
Instead of a breaker from the load end of the red buss bar replace it with a class T fuse that is 120% of what you expect... meaning use a 300 amp fuse.

Others may disagree on some of this, but it is in your living area so play it safe.

Note on fuses and mounts - they are not all created equal. Stick to something like Blue Sea systems for the fuse holder - they are bullet proof and the made right. And there are many fake class T fuses and MRBF fuses on amazon. Stick to either Blue sea (relabeled quality fuses), BUSS, or Littelfuse brands to avoid the bad ones. Real MRBF fuses will cost about $15ish on amazon. Class T fuses run about $40ish.

Buss bars - are you using quality buss bars? or are you using the cheap $20 a pair buss bars? I ask because the cheap ones are not made from pure copper then plated, they are brass or other metals that don't conduct as well which means voltage drops and heat. Really good buss bars that are solid copper and plated run $30 to $40 each. LiTime has some that have covers with 4 posts that are good, I have a set and filed off a corner to see what it is made of. The other thing about the cheap buss bars is the bolts are set in the plastic with just screws to hold down the bars. This means there isn't any good way to keep the bolts from spinning and the plastic used won't stand up to hot spots if there is a connection issue, they will melt and catch fire.

I can't see for sure but I assume the cables from the buss bars to the inverter are also 4/0 like the ones from the batteries to the buss bars.

Get rid of the caps LiTime included with the batteries - in the manual they say don't leave them installed on active equipment, they are only used to prevent a short on the posts before install. Use something like these over all the cable ends.


In an ideal world there will be NO exposed metal that has power on it. You have kids so protect them from themselves, I would either add a key lock to the doors or put a sheet of plexiglass accross any exposed bits or the whole front so they can't touch anything without unscrewing stuff. If they are like me when I was young use security screws and hide the screwdriver.

Also, I don't see a main battery cutoff switch - Should be either before or after the shunt on the negative side. Don't cheap out here either - the $15 ones are tempting but use something like this that you can trust.


And one last thing - ventilation - inverters and other things really put out heat - you need to at minimum cut some holes or slots at the top on the back to let it out with natural heat convective (i.e. hot air rises) ... ideally I'd put a temperature controlled fan in both sides blowing out near the top and cut a couple of vent holes at the bottom front of each compartment and then holes at the bottom back of the drawer compartments. i.e. make sure the air can draft across the hot equipment.

And last but not least put a battery powered smoke detector in each compartment to alert you if there is a fire. Use ionizing ones that will also detect smoke as well as flames. The more time you have to know something is wrong the better the more time you have to either extinguish it or call 911.


plan for the worst, hope for the best.

and Welcome
 
Last edited:
Welcome to the Forum!

Please when asking questions provide as much information as possible and do not assume earlier posts you have made will be recalled about your setup. Unless you directly ask for criticism of a setup or component, or a major safety issue exists, I am not one to criticize much. If your arrangement satisfies your needs its good by me.
Thanks for the warm welcome!
 
Suggestions for improvements and possible safety issues.

The low cost breakers you have fitted are known to be unreliable, overheat and introduce unwanted volt drops. Where over current protection is needed at a lithium battery, fuses, MRBF for 12 volts and class T at higher voltages, are considered best safe practice.

The arrangement shown for parallel conection of the batteries is not ideal due to different cable lengths and possible different volt drops in the breakers.

A negative buss bar to replace the mutiple connections to the shunt would be best practice.

Confirming with LiTime that vertical mounted batteries are permitted would be useful.

Since this equipment is within your living space safety is important.
Thank you for the insight! I was completely unaware of the existence of MRBF fuses. I like the clean tidiness of them connecting directly to the battery posts :)

Thank you for the diagram, I believe my setup mostly looks like #2 on the diagram. I think my cables are pretty close to the same length if I add the negative and positive lengths coming from each battery.

As for li-time, I've had a hard time getting any kind of input from them on a couple questions now. They never respond.
So, I had contacted Ampere-time on the orientation of their seemingly identical
12v 200ah plus battery. They had informed me I could orient them in any way but forbidden to place front side or top side to be placed faced down.

Thanks for your input! ?
 
Thank you for the diagram, I believe my setup mostly looks like #2 on the diagram. I think my cables are pretty close to the same length if I add the negative and positive lengths coming from each battery.

That is what I thought, and was going to ask.

More important for lead-acid. And maybe for lithium if drawing more current than single battery can supply. With 3kW inverter, I don't thing it needs to be very closely balanced to keep all under their maximum, so decent matching of total length should be good enough.

They had informed me I could orient them in any way but forbidden to place front side or top side to be placed faced down.

I think I know what "top" is, less sure which is "front".
 
When they say "front" they mean the long face to you when the battery posts are to the left. If you watch a teardown video the cells in there are on the side and the "front" is with the posts on the cells and the cell vent. Wouldn't do to have pressure on the posts or have the electrolyte sitting on the top. Best is upright if you can find a way

When I've asked questions on amazon to them I get a response overnight. If I email the service@litime.com address it takes a couple of days to get back to me.
 
Last edited:
What mikefitz says above -

Replace the cheap breakers between the batteries and buss bars with MRBF fuses that mount right on the posts.
Make cables equal length.
Add a buss bar after the shunt so you can use a post per lug or at most only stack 2 lugs on a post.
Instead of a breaker from the load end of the red buss bar replace it with a class T fuse that is 120% of what you expect... meaning use a 300 amp fuse.

Others may disagree on some of this, but it is in your living area so play it safe.

Note on fuses and mounts - they are not all created equal. Stick to something like Blue Sea systems for the fuse holder - they are bullet proof and the made right. And there are many fake class T fuses and MRBF fuses on amazon. Stick to either Blue sea (relabeled quality fuses), BUSS, or Littelfuse brands to avoid the bad ones. Real MRBF fuses will cost about $15ish on amazon. Class T fuses run about $40ish.

Buss bars - are you using quality buss bars? or are you using the cheap $20 a pair buss bars? I ask because the cheap ones are not made from pure copper then plated, they are brass or other metals that don't conduct as well which means voltage drops and heat. Really good buss bars that are solid copper and plated run $30 to $40 each. LiTime has some that have covers with 4 posts that are good, I have a set and filed off a corner to see what it is made of. The other thing about the cheap buss bars is the bolts are set in the plastic with just screws to hold down the bars. This means there isn't any good way to keep the bolts from spinning and the plastic used won't stand up to hot spots if there is a connection issue, they will melt and catch fire.

I can't see for sure but I assume the cables from the buss bars to the inverter are also 4/0 like the ones from the batteries to the buss bars.

Get rid of the caps LiTime included with the batteries - in the manual they say don't leave them installed on active equipment, they are only used to prevent a short on the posts before install. Use something like these over all the cable ends.


In an ideal world there will be NO exposed metal that has power on it. You have kids so protect them from themselves, I would either add a key lock to the doors or put a sheet of plexiglass accross any exposed bits or the whole front so they can't touch anything without unscrewing stuff. If they are like me when I was young use security screws and hide the screwdriver.

Also, I don't see a main battery cutoff switch - Should be either before or after the shunt on the negative side. Don't cheap out here either - the $15 ones are tempting but use something like this that you can trust.


And one last thing - ventilation - inverters and other things really put out heat - you need to at minimum cut some holes or slots at the top on the back to let it out with natural heat convective (i.e. hot air rises) ... ideally I'd put a temperature controlled fan in both sides blowing out near the top and cut a couple of vent holes at the bottom front of each compartment and then holes at the bottom back of the drawer compartments. i.e. make sure the air can draft across the hot equipment.

And last but not least put a battery powered smoke detector in each compartment to alert you if there is a fire. Use ionizing ones that will also detect smoke as well as flames. The more time you have to know something is wrong the better the more time you have to either extinguish it or call 911.


plan for the worst, hope for the best.

and Welcome
Thank you for your kind advice, and links!
And the warm welcome :)
As for kid safety, this cabinet is located in my bedroom, which has a lock and key. High voltage warnings on my door, and a high shrieking alarm if my door is opened. I do have 4 fire extinguishers located around my house, and 1 nearby in my room. I will get some smoke detectors as you have suggested. Thanks for that.

I definitely like the idea of MRBF fuses, I tried to keep my cable lengths the same per battery of combing the length of positive and negative wiring.
i.e.1 long 1short or 2mediums. Will just a couple inches make a difference?
I will only ever draw 50amps from each battery if my math is correct of only drawing 200amps max from my inverter, I have yet to run a load over 2000watts@120v. Which is how I based my 200amp breaker to the load line.
Yes all of my battery connections are with 4/0 copper welding wire along with the cables to the inverter.

As for ventilation that is a thought of mine too, if you look to the right of my inverter I have a DC fan that runs at 6watts, it's not installed yet but I intend on cutting a hole out the back and installing it near the inverter there and plugging it in to the usb port on the inverter while running it. But also, I leave that side of the cabinet open while in operation.

The bus bars I used are these.

Since then I have acquired some nice copper bus bars that came out of a 600amp main shutoff breaker.. they are 1 1/2" wide and almost 1/2" thick! And over 2 feet long and already predrilled. I obviously will cut them to the desired length.
You mentioned using a bus bar for my input to the shunt as well. Is there any problem with stacking the lugs as I did? Wouldn't there be less resistance stacked as opposed to having more conductor to travel through?

I used that 200amp breaker as a main cutoff, which I probably will replace with a class T as per your suggestion. I will also install a main cutoff switch on the negative side, I was always confused on where that should be installed. Thank you for clarifying :)

Thanks guys for the positive input, I was scared at first to post here thinking I would possibly be ridiculed

:)
 
3000W / 12V / 90% efficient x 1.25 margin for nuisance trips x 1.12 ripple factor = 389A

I would recommend 400A fuse. If that inverter is capable of delivering 3kW for extended time.
For 2kW continuous, I would say 250A would be OK.
 
Thank you for the insight! I was completely unaware of the existence of MRBF fuses. I like the clean tidiness of them connecting directly to the battery posts :)

Thank you for the diagram, I believe my setup mostly looks like #2 on the diagram. I think my cables are pretty close to the same length if I add the negative and positive lengths coming from each battery.

As for li-time, I've had a hard time getting any kind of input from them on a couple questions now. They never respond.
So, I had contacted Ampere-time on the orientation of their seemingly identical
12v 200ah plus battery. They had informed me I could orient them in any way but forbidden to place front side or top side to be placed faced down.

Thanks for your input! ?
DO NOT MOUNT THE FUSES ON THE BATTERY POSTS!
connect them to the buss bars.
 
Back
Top