Dadoftheturkeykids
New Member
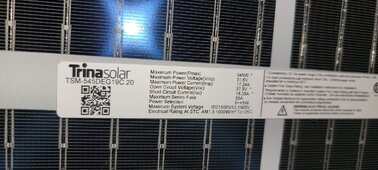
Thanks for pointing that outKeep in mind, 2400W of output is 2880W of battery draw.
")
It was a 24v 4kw. This oneWhat was the inverter you had on 24v, and what kind of problems did you have with it?
Same company I got my 12v 3kw inverter from that performs very well. But the 24v scared me, I felt like it was going to start a fire.
It made all my lights flicker with a light load, and also made a loud alarming clicking sound In harmony with the flickering, my shunt monitor was fluctuating from
45watts-500watts rapidly in microseconds. It did this with just my lights thar should be drawing only 20watts, I added my fridge circuit to that, which still did the similar thing while only supposed to pulling 160ish watts. When I added my furnace circuit making the total draw 750-800 watts it kind of evened out the fluctuations and the ticking noise become more quiet. But I could still see my lights flicker very very fast like a strobe effect.. I didn't trust it, so I pulled it out of my system and went back to my steady but low voltage system of 12v