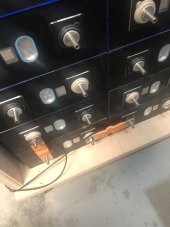
I don't know if I would say the balance lead wire length is irrelevant, but it is certainly not critical. If the wires were only used for voltage sensing, it would not matter at all, but since the BMS can pull AMPS of balance current, there will be drop in the lead wires. But then the JK BMS actually measures the resistance of the balance wires. So when it pulls or pushes balance current, it calculates the wire voltage drop to still have an accurate cell voltage reading. Actually a very clever system.