


You are using an out of date browser. It may not display this or other websites correctly.
You should upgrade or use an alternative browser.
You should upgrade or use an alternative browser.
My 12v 280ah build thread
- Thread starter Sipma02
- Start date
Sipma02
New Member
- Joined
- May 27, 2020
- Messages
- 141
NOt an argument but why are you afraid t just parallel the batteries first and go 2p4s? I know it seems more redundant but I do not think it really gives that much more safety and creates more moving parts. Sorry I only got the tail end of this thread.
Missed this, sorry! I appreciate the input. I'm honestly not opposed to running it 2p4s if we get more cells in the future. I'll have to decide when and if we add 4 more cells. Probably mostly depends on the cashflow situation
")
Sipma02
New Member
- Joined
- May 27, 2020
- Messages
- 141
Finally got around to making some progress on this. Ordered and received a BMS8T, which is pretty cool. Seems like a nice unit, but I havent connected or used it yet.
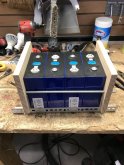
I did get a sort of battery box made. This is something I whipped up in an evening, but I think it will be a good solution for my mounting requirements. My only concern is using wood, because wood could catch fire in the event of a spark/short circuit. I'm not super worried about it, but I may replace with CNC cut ABS or HDPE eventually.


I'll most likely have another piece of wood on top to mount the BMS.
I doubled up the bus bars for 3 reasons. 1) I've read that the stock bus bars won't carry enough current? I'm going to max out around 130-150 amps. 2) They came with so why not? 3) the screws that were provided were too long, so I doubled them up so I'd be able to fully tighten them down

I may get some small washers for the top, but maybe the balance leads for the Chargery can function as a washer.
I did get a sort of battery box made. This is something I whipped up in an evening, but I think it will be a good solution for my mounting requirements. My only concern is using wood, because wood could catch fire in the event of a spark/short circuit. I'm not super worried about it, but I may replace with CNC cut ABS or HDPE eventually.
I'll most likely have another piece of wood on top to mount the BMS.
I doubled up the bus bars for 3 reasons. 1) I've read that the stock bus bars won't carry enough current? I'm going to max out around 130-150 amps. 2) They came with so why not? 3) the screws that were provided were too long, so I doubled them up so I'd be able to fully tighten them down
I may get some small washers for the top, but maybe the balance leads for the Chargery can function as a washer.
Attachments
Make sure you put some insulation between the metal and the battery case. That blue plastic film is very thin. I would also consider swapping to studs with nuts. Loctite the studs in with low strength stuff. Its difficult to get good thread engagement with the screws.
Sipma02
New Member
- Joined
- May 27, 2020
- Messages
- 141
Make sure you put some insulation between the metal and the battery case. That blue plastic film is very thin. I would also consider swapping to studs with nuts. Loctite the studs in with low strength stuff. Its difficult to get good thread engagement with the screws.
Good call. I picked up some clear plastic tubing this morning on the way to work for the sections of all-thread. Not entirely sure what to do for the lower section with angle iron, but I'll figure something out.
MrNatural22
?SW sunshine =⚡️⚡️lit up thru the darkness✌️
Good call. I picked up some clear plastic tubing this morning on the way to work for the sections of all-thread. Not entirely sure what to do for the lower section with angle iron, but I'll figure something out.
You could buy a bicycle inner tube and cut strips to place in between the angle iron and the cells and also between the wood and the cells. ?
Sipma02
New Member
- Joined
- May 27, 2020
- Messages
- 141
Welp, decided to go a bit of a different direction with the mounting of the batteries. I decided to use 1/2 polypropylene plastic instead of wood, and to use a much smaller piece to clamp it. Still same basic idea with the clamping though. Currently, my largest victory is getting a heating plate made and working properly! I used a piece of polished stainless steel:

I stuck qty 4 heating pads on the metal. Each are 7 watts, so over a 24 hour period is only 55 watt hours. Ideally, this should never turn on. We'll be full-time living in our van and have a small diesel heater keeping it warm 24/7. So really, this heating system is only active in case of an unforeseen emergency. I wanted something with as low of a power draw as possible, but still able to add more if I needed. As you can see, there is plenty of space to add additional heating pads if these 4 aren't enough. My main concern is whether or not the heat will conduct up to the top of the battery. They are pretty dense, so I can image they would.
I'm using a W1209 thermometer to trigger them on and off. Then, I'm using a repeat cycle timer to modulate the temp. I can set it to be on for 10 sec, of for 5, on for 10, off for 5, etc, and change whatever increments I want or need. My goal is to test the system on a cold day to figure out what intervals I need to set the repeat cycle timer to, then never adjust it again.

The temp probe is in a cup of ice. It is set to trigger on at 40ºF, ±2º. And actually, that ± is also adjustable with the W1209 thermometer under the hysteresis settings.
As is, the plate is about 80ºF-90ºF in open air on a 50% duty cycle (10 sec on, 10 sec off), roughly 60ºF ambient. I'm sure when it is 20ºF ambient and tucked under the (cold) batteries, I will need to adjust the duty cycle accordingly.
I stuck qty 4 heating pads on the metal. Each are 7 watts, so over a 24 hour period is only 55 watt hours. Ideally, this should never turn on. We'll be full-time living in our van and have a small diesel heater keeping it warm 24/7. So really, this heating system is only active in case of an unforeseen emergency. I wanted something with as low of a power draw as possible, but still able to add more if I needed. As you can see, there is plenty of space to add additional heating pads if these 4 aren't enough. My main concern is whether or not the heat will conduct up to the top of the battery. They are pretty dense, so I can image they would.
I'm using a W1209 thermometer to trigger them on and off. Then, I'm using a repeat cycle timer to modulate the temp. I can set it to be on for 10 sec, of for 5, on for 10, off for 5, etc, and change whatever increments I want or need. My goal is to test the system on a cold day to figure out what intervals I need to set the repeat cycle timer to, then never adjust it again.
The temp probe is in a cup of ice. It is set to trigger on at 40ºF, ±2º. And actually, that ± is also adjustable with the W1209 thermometer under the hysteresis settings.
As is, the plate is about 80ºF-90ºF in open air on a 50% duty cycle (10 sec on, 10 sec off), roughly 60ºF ambient. I'm sure when it is 20ºF ambient and tucked under the (cold) batteries, I will need to adjust the duty cycle accordingly.
Last edited:
Sillyputty
Solar Enthusiast
- Joined
- Jul 21, 2020
- Messages
- 188
Nice. If it cycles on via temperature - will it also cycle off and eliminate the need for using a timed duty cycle to manage it? I realize that it does have a relay, but wouldn't that relay have to have/consume power in either scenario?
Also, you noted that the 280AH battery would provide about 3 days of standalone power. What are your loads during this time? (If you have an energy audit posted somewhere, I've missed it.)
Also, you noted that the 280AH battery would provide about 3 days of standalone power. What are your loads during this time? (If you have an energy audit posted somewhere, I've missed it.)
Last edited:
Sipma02
New Member
- Joined
- May 27, 2020
- Messages
- 141
@Sillyputty; Good call. That could conceivably work, but I'm worried about the plate getting too hot and melting the cell's casing, while not giving enough time for the rest of the cell to warm. I'm looking for a slow, even heat.
I don't have an energy audit posted. I should do that! We have standard stuff; fridge, some LED lighting, charging mobile devices, fan, diesel heater fan (when cold outside).
I don't have an energy audit posted. I should do that! We have standard stuff; fridge, some LED lighting, charging mobile devices, fan, diesel heater fan (when cold outside).
Sillyputty
Solar Enthusiast
- Joined
- Jul 21, 2020
- Messages
- 188
Thanks - I just installed a diesel heater in the camp trailer that the 280AH batteries will go into, and I'm very happy with it so far. I have had to extend the exhaust to get it out from beneath the trailer, but leftover aluminum pipe seems to be doing the trick.@Sillyputty; Good call. That could conceivably work, but I'm worried about the plate getting too hot and melting the cell's casing, while not giving enough time for the rest of the cell to warm. I'm looking for a slow, even heat.
I don't have an energy audit posted. I should do that! We have standard stuff; fridge, some LED lighting, charging mobile devices, fan, diesel heater fan (when cold outside).
Related: I don't know how 'slippery' they are as I haven't received them yet, but becasue I drive on a lot a very bumpy, washboarded roads, I've been concerned about the cells themselves (despite being compressed a bit in a fixture) sliding where they meet together. I think I've found a possible solution, which is placing ~ .8 mm thick high temperature silicone sheeting/mats between each cell and on the cell ends to prevent that. The source of the silicone? Cookie sheet pads. They are very tough and grippy, and seem strong enough - plus they'll protoct the aluminum cells themselves from puncture or wear-through.
Of course I may be just a tad paranoid; either way I'll let you know.
Sipma02
New Member
- Joined
- May 27, 2020
- Messages
- 141
Thanks - I just installed a diesel heater in the camp trailer that the 280AH batteries will go into, and I'm very happy with it so far. I have had to extend the exhaust to get it out from beneath the trailer, but leftover aluminum pipe seems to be doing the trick.
Related: I don't know how 'slippery' they are as I haven't received them yet, but becasue I drive on a lot a very bumpy, washboarded roads, I've been concerned about the cells themselves (despite being compressed a bit in a fixture) sliding where they meet together. I think I've found a possible solution, which is placing ~ .8 mm thick high temperature silicone sheeting/mats between each cell and on the cell ends to prevent that. The source of the silicone? Cookie sheet pads. They are very tough and grippy, and seem strong enough - plus they'll protoct the aluminum cells themselves from puncture or wear-through.
Of course I may be just a tad paranoid; either way I'll let you know.
The cells are pretty "slippery". But based on my experiences clamping the cells, I think you're a bit paranoid
That said, better to be safe than sorry! I don't see why it would hurt? I'll be curious to see what you end up doing!Sillyputty
Solar Enthusiast
- Joined
- Jul 21, 2020
- Messages
- 188
The cells are pretty "slippery". But based on my experiences clamping the cells, I think you're a bit paranoid
Most likely - but then again...

If you continue to be concerned about cells slipping, I would use the thinnest double sided tape you can find. So far, mine haven't budged in the compression frame and I've been down some rough dirt roads.
Sipma02
New Member
- Joined
- May 27, 2020
- Messages
- 141
Fairly stoked about this test. I positioned 2 thermometers on the battery—one on top of the cells, one on bottom (right next to the heating pad). It was about 29º overnight, and roughly 33º at the time of test (morning). I turned the plate on and left it for about 20 mins. Checked it, not much change, obviously the plate temp was higher (around 55ºF) but the top thermometer was still around 30º. Then after about 45 mins, the temp slowly began rising! These were my readings after 45 mins: (left thermometer is the bottom of the plate, right is the top)

So it clearly "works". It's about 15ºF higher than ambient. Unfortunately, that is at a 100% duty cycle. So that's as much heat as they can put out. That said, that is at the top—theoretically the coldest part of the battery (since the heating plate in underneath it).
I watched temps for the rest of the day, and they gradually rose. But generally tapered off at around 15º-20ºF above ambient. I put 1/2" pink foam insulation surrounding the batteries on 3 sides. At the end of the day (maybe 8-10 hours later) ambient around 38ºF, I recorded these temps:

So fairly consistent. I wish the heating plate would warm the batteries a bit more than 15º above ambient. Like I said, I don't think the inside of our van will ever get below 60º or so, and ideally this won't ever need to turn on.
One thing I'm not totally sure of is if the 15º above ambient will be consistent? Does that mean that at 20ºF ambient, it will get the cells to 35º? Or will it be less of a temperature raise the colder it gets? I assume that will be the case. I'll have to wait for a colder day to test that. Also to note: I was measuring battery temp at the top of the cells—theoretically the coldest part. So probably, the mid part of the cell is warmer.
Torn whether I should add 2-4 more heating pads to the heating plate...
So it clearly "works". It's about 15ºF higher than ambient. Unfortunately, that is at a 100% duty cycle. So that's as much heat as they can put out. That said, that is at the top—theoretically the coldest part of the battery (since the heating plate in underneath it).
I watched temps for the rest of the day, and they gradually rose. But generally tapered off at around 15º-20ºF above ambient. I put 1/2" pink foam insulation surrounding the batteries on 3 sides. At the end of the day (maybe 8-10 hours later) ambient around 38ºF, I recorded these temps:
So fairly consistent. I wish the heating plate would warm the batteries a bit more than 15º above ambient. Like I said, I don't think the inside of our van will ever get below 60º or so, and ideally this won't ever need to turn on.
One thing I'm not totally sure of is if the 15º above ambient will be consistent? Does that mean that at 20ºF ambient, it will get the cells to 35º? Or will it be less of a temperature raise the colder it gets? I assume that will be the case. I'll have to wait for a colder day to test that. Also to note: I was measuring battery temp at the top of the cells—theoretically the coldest part. So probably, the mid part of the cell is warmer.
Torn whether I should add 2-4 more heating pads to the heating plate...
Looks like a good test with very promising results!
I see insulation on one end of the battery, but not on the exposed long side. That would help a bit, but not a huge change. The threaded rod is a limiting factor. I have the same problem on mine and I chose to insulate outside the rods instead of making a groove in the insulation to account for the rods. That would have been possible before I installed the batteries in the RV. Now, it would just be a PITA, for not much gain.
Since the temperature sensor is sitting on top of the battery, how much of the measurement is coming from the air and how much from the battery? It's a bit of a rhetorical question so I'm looking for a guess. I'm thinking I may put a small section of insulation over the temp sensor to isolate it from the ambient air.
Are your heating pads on a thermostat? If so, what range do you plan to use?
Sipma02
New Member
- Joined
- May 27, 2020
- Messages
- 141
I see insulation on one end of the battery, but not on the exposed long side. That would help a bit, but not a huge change. The threaded rod is a limiting factor. I have the same problem on mine and I chose to insulate outside the rods instead of making a groove in the insulation to account for the rods. That would have been possible before I installed the batteries in the RV. Now, it would just be a PITA, for not much gain.
Thanks! And agreed, not much gain. I may try to add some insulation on the exposed long side that you pointed out, for the final install (once I have top balanced and BMS is hooked up)
Since the temperature sensor is sitting on top of the battery, how much of the measurement is coming from the air and how much from the battery? It's a bit of a rhetorical question so I'm looking for a guess. I'm thinking I may put a small section of insulation over the temp sensor to isolate it from the ambient air.
Are your heating pads on a thermostat? If so, what range do you plan to use?
Honestly a great question. My guess would be the accuracy was within about 10%, aka, I think pretty accurate. Next time I'll see if I can scrounge up a IR thermometer to double check. I used gorilla tape to affix the sensor probe to the top of the battery—it was quite firmly attached. That said, the front seat was off, and there was no cover on anything. I'm thinking that with the seat on, plastic cover on, and a bit of insulation (good suggestion, thanks!) will net me the most accurate reading for the temp probe.
Yep, they're on a W1209 thermostat. Super cheap, $10 for qty 2 on Amazon. Unfortunately only measures in degrees Celsius, but I've been meaning to learn international standards anyway
I currently have it set to turn on and off at 40ºF. I figure if the temp is falling (figure 5º every hour? Just guessing here) and the heating plate takes 45 or so mins to get the batteries warm, that will give some leeway to make sure they are above 35º (the temp that LFP shouldn't get below if you want to charge them). Obviously there is a bit of pseudo-science here and I'd be happy for anyone to make suggestions...My BMS outputs only ° C so I can sympathize there. I printed out a ° F to ° C chart that will be posted on the wall inside the closet. That way I don't have to figure it out or run an app on my phone.
None of my components (Victron BMV-712, Victron 100/50 solar charge controller and Overkill Solar 4s BMS) store historical temperature readings. That greatly limits my ability to "see" how things are working. I suspect that when the warming pad controller sees 35° F and turns on the power, the temperature at the top of the battery can keep falling, which is undesirable. Going below 32° F is not good. This is what is leading me to use my own controller instead of the one provided by Ultra Heat.
Your results are critical in my plan to adjust the on/off range. 45 minutes to see a change at the top of the battery is significant. There's a trade off between finding a safe range and power consumption.
A controller that uses some smarts to look at the temperature "curve" and see that while the temperature is still above the activation point, but it's falling fast, would be helpful. The controller on my smoker has those kinds of smarts, so that functionality is out there.
Sipma02
New Member
- Joined
- May 27, 2020
- Messages
- 141
Yes, the 45 mins is significant. But realistically, the temp of the battery isn't ever going to fall that fast because of how dense it is. It's an absolute unit! What conditions will your cells be exposed to?
Your smoker's controller is interesting. I wonder if the thermostat could be modified to run a heating pad. Why not? Can you find a "replacement" thermostat for it that we could operate on?
Your smoker's controller is interesting. I wonder if the thermostat could be modified to run a heating pad. Why not? Can you find a "replacement" thermostat for it that we could operate on?
Similar threads
- Replies
- 25
- Views
- 1K
- Replies
- 1
- Views
- 206
- Replies
- 45
- Views
- 2K
- Replies
- 14
- Views
- 977