diy solar

diy solar

Ryobi Zero-Turn Mower SLA to LiFePo4 Conversion - (Updated - Build Complete With Pics!)

On the off chance that it helps...

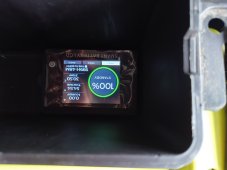
Before building a custom battery I ran my mower (RM480e) from this battery without any inrush problems.


Interestingly, as it has a clear case, I could see that it had the same 100A JBD bms inside that overkill solar rebadge as their own.

I'm in Australia, and this is an Australian brand, so I'm offering this as possible useful information rather than a solution
(unless you're in Australia of course). Perhaps there are other battery manufacturers using JBD bms's?

I'll just add, it's not a perfect drop in solution as the centre bolt can't be used, so it requires a tray and a strap.
 
I am on my 2nd set of factory lead acid batteries on my 48" zero turn and am curious if I just put the 4 lithium phosphate batteries in would it charge OK with the existing system? I found 2 or 3 different manfactures that are the exact same physical size.

If not could I just put a 4 way (like a boat charger) lithium phosphate charger on it that is wired directly to each battery?

Thanks in advance, you guys are very knowledgeable.
BLUF: Using your old charger is possible, but NOT RECOMMENDED.

Many lead acid chargers "can" charge LiFePo4 batteries, but LiFePo4 has optimal charge Voltages that SLA or AGM do not. LiFePo4 also does not require any internal cell equalization.

E.g. 12V LiFePo4 batteries have an optimal charge rate of ~14-14.6V throughout most of the charge.

There's also the matter that LiFePo4 batteries have different charge algorithms (2-stage; charge, supply) vs SLA/AGM (3-stage; bulk, absorption, float)

So while a basic charger could charge the LiFePo4 batteries, you run the risk of cell degradation. Possibly quickly degrading them due to the charger going into the "equalization" stage for an extended period of time which ramps Voltages up to >15V.

Source: https://glider-battery.eu/post4-1/
 
Last edited:
Well my battery finally arrived.

Will have an update on if it works without a pre-charge once it's charged up and installed.

20230711_154932.JPG
 
BLUF: Using your old charger is possible, but NOT RECOMMENDED.

Many lead acid chargers "can" charge LiFePo4 batteries, but LiFePo4 has optimal charge Voltages that SLA or AGM do not. LiFePo4 also does not require any internal cell equalization.

E.g. 12V LiFePo4 batteries have an optimal charge rate of ~14-14.6V throughout most of the charge.

There's also the matter that LiFePo4 batteries have different charge algorithms (2-stage; charge, supply) vs SLA/AGM (3-stage; bulk, absorption, float)

So while a basic charger could charge the LiFePo4 batteries, you run the risk of cell degradation. Possibly quickly degrading them due to the charger going into the "equalization" stage for an extended period of time which ramps Voltages up to >15V.

Source: https://glider-battery.eu/post4-1/
Thank you. I will pull the trigger on this upgrade if this charger (see link for NOCO Genius 2x4 below) works? It does state it is for Lithium Phosphate batteries. Your thoughts?

 
Thank you. I will pull the trigger on this upgrade if this charger (see link for NOCO Genius 2x4 below) works? It does state it is for Lithium Phosphate batteries. Your thoughts?

It looks like it should work in the lithium mode.

Make sure if you are transferring over to LiFePo4 to read through the other posts in this forum, as there may be other concerns to consider and prepare for, like the inrush current, which is the issue I encountered.
 
So, installed the Vatrer 48V battery today and am happy to report, It works without a need for any pre-charge circuit!

4 provisions need to be made:

1. The charger lockout circuit will need to be bypassed (see past posts on how to do that), the battery comes with a new charger.

2. A new anchor will need made for the new charger port (unless you want to connect direct, see pics for my solution, I gutted the old triangular port and ran the cable through it where the end doesn't fit)

3. Mounting the battery; the battery has bolt down points that align well to the mower's tray, but you will need to drill or rivet that solution...otherwise use whatever means necessary, as the H brace bar will no longer work.

4. The battery comes with a State of charge monitor, I solutioned mounting it in the available storage tray and routing the wire through the available hole there, however it also comes with a mounting bracket.

20230712_171243.JPG20230712_171248.JPG20230712_171255.JPG
20230712_171139.JPG
 

Attachments

  • 20230712_171139.JPG
    20230712_171139.JPG
    121.8 KB · Views: 18
Very nice! Am I correct in saying it mounted right on the original tray, or did you have to modify it at all?

Congrats and job well done!

Edit: nevermind, on first read-through I missed your bullet point on the mounting, my apologies.
 
Very nice! Am I correct in saying it mounted right on the original tray, or did you have to modify it at all?

Congrats and job well done!

Edit: nevermind, on first read-through I missed your bullet point on the mounting, my apologies.
Thank you, I did go with the bolt down method, in picture #3 you can see 2 of 4 bolts at the bottom of the battery (there's 2 more on the other side)

Also, if anyone wonders what the "strap" is in the charging port...it's a zip tie to make it easy to pull out of the old triangular crevice, as the new charger has a rotating locking mechanism
 
So, installed the Vatrer 48V battery today and am happy to report, It works without a need for any pre-charge circuit!

4 provisions need to be made:

1. The charger lockout circuit will need to be bypassed (see past posts on how to do that), the battery comes with a new charger.

2. A new anchor will need made for the new charger port (unless you want to connect direct, see pics for my solution, I gutted the old triangular port and ran the cable through it where the end doesn't fit)

3. Mounting the battery; the battery has bolt down points that align well to the mower's tray, but you will need to drill or rivet that solution...otherwise use whatever means necessary, as the H brace bar will no longer work.

4. The battery comes with a State of charge monitor, I solutioned mounting it in the available storage tray and routing the wire through the available hole there, however it also comes with a mounting bracket.

View attachment 157209View attachment 157210View attachment 157211
View attachment 157214

Awesome! Thanks for the reporting back @Salmon! Really great to see a true drop in work!

Did you keep the stock monitor hooked up, or just disconnect it altogether?

Also how’s the runtime compared to the 115aH stock batteries the 54” comes with?
 
Ok, I went and test drove the mower, it is all complete and pristine as far as I can tell.

The guy is selling it because his yard is quite steep, and the original batteries couldn’t handle mowing, and climbing up he slope…
Personally, I would have mowed horizontally… but selling is another option.
I drove up the slope, with freshly cut grass, the mower did struggle to go straight up the slope.
Like the left drive motor couldn’t keep up with the right…

I assume it’s due to the weakened sla battery’s voltage drop…
My yard is all basically level, so no issues there. I will play with the original sla until it can’t handle my yard, then I will tear into it this fall…
 
Awesome! Thanks for the reporting back @Salmon! Really great to see a true drop in work!

Did you keep the stock monitor hooked up, or just disconnect it altogether?

Also how’s the runtime compared to the 115aH stock batteries the 54” comes with?
I do still have the stock monitor hooked up...it doesn't really serve a purpose though, as it's not accurate, and the Vatrer came with its own that plugs right into a RS486 port on the battery.

As for the runtime, I haven't tested it thoroughly, but so far it's looking like I got a little more than the Ryobi had even in it's first season.

I got 3 acres to mow, and on the stock batteries in the first season, I'd end with 10-20% (which I reduced doing as it's bad for the batteries), this new one has ended with 20-30%

Of course the stock batteries going from season 2-3 started going under 20% before half the yard was done.
 
Something Ive been wondering on my cub electric mower is the noise the gearbox makes when you get up some speed. I think its from the gear design. How noisy is the ryobi's gearbox?
 
Good Morning. The battery installation went smoothly yesterday, and I can report that the mower (a Ryobi 480ex) works perfectly. The batteries used were https://a.co/d/hHRK7FE, which are now selling for around $275 each. I purchased a charger https://a.co/d/0QVMtUu along with a charge plug https://a.co/d/bvRRWt2 that would fit the Ryobi without modification of the mower. Personally, I like the safety circuit that prevents operation with the charger plugged in, being the forgetful human that I am. It just took a bit of soldering to change from the charger's stock plug. The retrofit went fine, and the only issue was the blue thread lock Ryobi uses on its housing screws. It made disassembly of the housing difficult, and there was some damage to the plastic where the screws didn't want to let go of the threaded female insert. The only other issue was that the height of this replacement battery is slightly more (~.125") than the original, and it >just fit< inside the enclosure. The plastic at the top is bulging just a bit, and I had to forego the washer on the center threaded rod on the battery rack. If I were to do it over, I would have removed the plastic guides that are under the battery rack to gain a little more clearance. Other than that, it's up and running. I haven't tested the run time yet. I'll do that later this week. For now, I may leave the stock battery meter in place, realizing the readings will be misleading. I have purchased a replacement https://www.amazon.com/dp/B07FGFFHC6?psc=1&ref=ppx_yo2ov_dt_b_product_details in case I decide to change it.

Julie
 
Something Ive been wondering on my cub electric mower is the noise the gearbox makes when you get up some speed. I think its from the gear design. How noisy is the ryobi's gearbox?
I have only driven a small amount, but I went up and down the hill at the sellers house and it was silent with the blades off.
The blades spinning of ourselves sounded like a hurricane.
 
I have only driven a small amount, but I went up and down the hill at the sellers house and it was silent with the blades off.
The blades spinning of ourselves sounded like a hurricane.
Be REALLY careful on slopes if you have the LCA batteries, the motors will just drop out when the voltage gets low and it WILL roll backwards with no warning.
I learned that lesson the hard way. . .
 
@Julie EVD Thanks so much for your update! I've gone ahead and picked up 4 myself, and will heed your advice regarding the plastic guides. Super stoked to get back doing the whole lawn in one go!
You're very welcome. Two other other recommendations: 1) when you disassemble, there are four plastic guards that sit on top of the batteries that shield the connections. They slide back and forth; back to facilitate removal of the connections, and forth for protection of the jumpers once installed. They do slide, especially when sliding the battery rack into place. I used some black plastic Gorilla tape to hold them in place while I slid the rack in. 2) I also removed the four screws holding the charging plug, and pulled it out a bit while sliding the rack in so that the wiring harness didn't catch on the batteries.
 
So, installed the Vatrer 48V battery today and am happy to report, It works without a need for any pre-charge circuit!

4 provisions need to be made:

1. The charger lockout circuit will need to be bypassed (see past posts on how to do that), the battery comes with a new charger.

2. A new anchor will need made for the new charger port (unless you want to connect direct, see pics for my solution, I gutted the old triangular port and ran the cable through it where the end doesn't fit)

3. Mounting the battery; the battery has bolt down points that align well to the mower's tray, but you will need to drill or rivet that solution...otherwise use whatever means necessary, as the H brace bar will no longer work.

4. The battery comes with a State of charge monitor, I solutioned mounting it in the available storage tray and routing the wire through the available hole there, however it also comes with a mounting bracket.

View attachment 157209View attachment 157210View attachment 157211
View attachment 157214
Hey thanks for posting this. I'm pulling the trigger on thelis purchase soon. Been planning it for a year now, I'm only getting 20 minutes of run time.

Regarding the charger lockout bypass, I'm having an issue finding that in the thread. Could someone repost the steps or link to the post please.

Unrelated to battering power, I tested putting the crosscut blades on that they make for the 80v mower. They fit pretty well
 
Good Morning. The battery installation went smoothly yesterday, and I can report that the mower (a Ryobi 480ex) works perfectly. The batteries used were https://a.co/d/hHRK7FE, which are now selling for around $275 each. I purchased a charger https://a.co/d/0QVMtUu along with a charge plug https://a.co/d/bvRRWt2 that would fit the Ryobi without modification of the mower. Personally, I like the safety circuit that prevents operation with the charger plugged in, being the forgetful human that I am. It just took a bit of soldering to change from the charger's stock plug. The retrofit went fine, and the only issue was the blue thread lock Ryobi uses on its housing screws. It made disassembly of the housing difficult, and there was some damage to the plastic where the screws didn't want to let go of the threaded female insert. The only other issue was that the height of this replacement battery is slightly more (~.125") than the original, and it >just fit< inside the enclosure. The plastic at the top is bulging just a bit, and I had to forego the washer on the center threaded rod on the battery rack. If I were to do it over, I would have removed the plastic guides that are under the battery rack to gain a little more clearance. Other than that, it's up and running. I haven't tested the run time yet. I'll do that later this week. For now, I may leave the stock battery meter in place, realizing the readings will be misleading. I have purchased a replacement https://www.amazon.com/dp/B07FGFFHC6?psc=1&ref=ppx_yo2ov_dt_b_product_details in case I decide to change it.

Good Morning. The battery installation went smoothly yesterday, and I can report that the mower (a Ryobi 480ex) works perfectly. The batteries used were https://a.co/d/hHRK7FE, which are now selling for around $275 each. I purchased a charger https://a.co/d/0QVMtUu along with a charge plug https://a.co/d/bvRRWt2 that would fit the Ryobi without modification of the mower. Personally, I like the safety circuit that prevents operation with the charger plugged in, being the forgetful human that I am. It just took a bit of soldering to change from the charger's stock plug. The retrofit went fine, and the only issue was the blue thread lock Ryobi uses on its housing screws. It made disassembly of the housing difficult, and there was some damage to the plastic where the screws didn't want to let go of the threaded female insert. The only other issue was that the height of this replacement battery is slightly more (~.125") than the original, and it >just fit< inside the enclosure. The plastic at the top is bulging just a bit, and I had to forego the washer on the center threaded rod on the battery rack. If I were to do it over, I would have removed the plastic guides that are under the battery rack to gain a little more clearance. Other than that, it's up and running. I haven't tested the run time yet. I'll do that later this week. For now, I may leave the stock battery meter in place, realizing the readings will be misleading. I have purchased a replacement https://www.amazon.com/dp/B07FGFFHC6?psc=1&ref=ppx_yo2ov_dt_b_product_details in case I decide to change it.

Julie
You're not having any problems with inrush current with those batteries? I didn't see in thr description where it said they could handle anything over 100amps for any period of time. Just curious! Thanks.
 
Ok, I picked up the mower today.
My 1.5acres was TALL weeds and grass... totally unkempt for months in torrential rainy days...
My brother's mower has been broken, and mine hasn't run since last year...
So, I pulled the mower off the trailer, engaged thw blades, and started in on the mess.
It easily handled all the yard, and batteries were over 60% remaining...
So, this thing has been BABIED for the year he has had it!
I now gotta go pick up all the limbs and such ...
Yard has been neglected all year.
That's for tomorrow's John to handle...
 
I hauled it over to my shop and connected to my solar charging area, I'm hoping it will recharge on solar...
It's a 3kW inverter setup with a 160Ah24V battery, on 480W of solar... and 4 hours of sun left... should be enough to get it charged back up...

75Ah 48V with 60% remaining, so maybe within the realm of getting a full charge...
I will find out in the morning if the battery shut down before it filled the mower tonight...
 
Ok, this morning it was still charging, slow flashing light… I pulled the charger off, and turned on the key…

70% charge…

How long does this charger take to replenish the batteries?
Looks like it’s a 360W charger… 7.5A @ 48v… so, in 8hours I should have 2880Wh in… another 2160Wh to have a full charge… the 60% indicated could’ve been optimistic… I did mow a LOT…
Still… I was expecting a full battery.
I switched to the grid because today is very cloudy, and I don’t wanna drain my solar setup.
I will check on it in a few days.
 
80% efficient for new, premium AGM battery?


diy solar

diy solar
Back
Top