I finally got mine done, fired up with no issues! So glad I waited and didn't monkey with a bypass.
ZT480ex
Batteries:
https://www.amazon.com/dp/B09JNK13YH
Charger:
https://www.amazon.com/dp/B0BKZ2R94T
Installation notes:
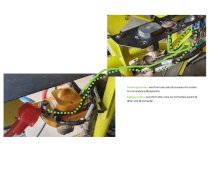
Batteries.
1. These batteries are a little tall, so do yourself a favor a remove the plastic runners that help the battery sled slide in. This will net you a few precious mm, and they aren't really necessary anymore with the weight reduction. I also cut the old plastic battery covers to fit within the interior of the top mounting bar, which also gets you a little more room, while putting the bar in direct contact with the battery top, which I liked. I used silicone tape to help prevent slippage.
2. They are also a little smaller in width and length. I used some heavy duty double sided sticky tape on the bottom of the batteries, in addition to some wedges I cut, to keep everything snuggly in place. I also added some washers to the back plate on the battery sled to shorten the length a tiny bit.
Charger.
1. Stock charger worked fine without modification, but is not ideal for this battery chemistry.
2. I chose to Dremel the plastic stoppers in the charging port so I could use standard chargers unmodified going forward, while keeping the original complete for resale.
3. You can instead remove the plastic handle from your old charger and swap it with the new one (so I've read), or purchase one aftermarket and perhaps do a little soldering instead.
General.
1. I used a drill instead of an impact driver to remove the body work and I seriously regret that choice. Probably should just do it by hand, the tabs were very fussy.
2. Pay attention to what you're doing or things will get super spicy super fast. Had a short while building the pack, no harm done though, thankfully.
3. The mower handles differently with the weight reduction! Be cautious for a bit. People have commented on the increase in speed, but the biggest surprise for me is how it doesn't slow down up steep hills anymore, it just charges up like they're nothing. I actually think with a full bagger it could be problematic.
Anyhow, I haven't installed the gauge yet, that's something I'll have to tackle down the road. For now I'll just recharge after each mow, the charger has an approximation that should work well enough.
Thanks again for all of the help everyone, especially
@Julie EVD !


support.rollsbattery.com
")