diy solar

diy solar

Sixtysix 280ah Cells from Deligreen

That burned up thing still works. lol

I'm not going in there. It's hard for me to watch videos of other people doing it.
Wow, still working - I suppose that’s a vote of confidence.
Are you still able to connect busbars to it?
 
I think there were other posts while I was typing this.
My terminal spanner is covered with heat shrink right past the end . I'm wondering if that shorted terminal is salvageable . Usually the terminal is alloy and the bolt /screw is stainless so if you can grind the bolt to get a couple of flats on it it might screw out.I use the plastic bottoms out of shopping bags over the terminals when I don't need to be under them so even a sheet of ply or clear plastic will do the job.

You will do it again . Take care also with the underside of BMS's and Balancers touching a terminal or two . You will do that too. The other consideration you may not know about is some of the prismatics carry a negative charge on the alloy case so it pays to test that.
 
Since I have 2 spares, I will probably never try to use that cell. I'll keep it in case I can't buy another cell someday.
The cell cost me $100 so I'm not going to put in a ton of effort to save it. Especially since it will never be as safe as a different cell.

I am planning to mount my BMS and shunt to a piece of plywood over the back of the cells to keep all that wiring and crap out of my way.
I'm also getting rid of the ridiculous MRBF fuse holder. That thing sticks up in the way and looks like and ugly wart.
I was holding wires out of my way and trying to avoid that thing when I had this accident.

This put a dent in my pride. ?

I keep thinking about how careful I need to be when I work with PV. Which is a good thing I guess.
 
Last edited:
yes, the arc is quite scary and does wake a person up as to safety-type things. thanks for sharing. yesterday I bought 20 2 piece sets of plastic cutting mats from the dollar store for a dollar each. so I got 40 pieces. each piece will be big enough to insulate between 2 of my 272Ah Lishen cells. I also bought a melamine coated shelf board 24" x 48" to use as a slick insulating base for the compression jig for the 2P8S 24-volt battery banks I am charging and assembling. I think the cutting board mats are a very inexpensive durable inter-cell insulator. just an idea for you. yes, I still need to insulate my tools better. I am very careful after the 1st arc I had. woo hoo the sparks and power. all DIY people need to beware of the high power --- for sure. Keep up the excellent work. I have 64 cells and I am building 4 24-volt packs of 16 cells each. the 1st 16 cell (272Ah Lishen cells) 2P8S 24-volt pack is charging the other 32 cells with 2 bench chargers one Riden 6012w and the other a Riden 6018w running 24/7 off-grid via the 24-volt inverter. sorry... I am rambling!!! :cool:
 
How is your build coming along? I remember seeing the pictures of the mountain of cells you got! Did you decide on how you were going to configure them or add any new components to the system?
 
I just turned in my permit paperwork. When it is approved I can install rooftop PV and a Solark 12K.
Then I'll have some serious current to play with.
I am pretty much settled on this cell configuration-

1611416068523.png

I'll post a picture of mine later
 
Nice. Were you going full off grid? You should definitely keep doing updates too, I’m pretty sure I’m not the only one following your build. It keeps me motivated! Much appreciate it.
 
I think I'm more annoyed with the green glow than anything else ?
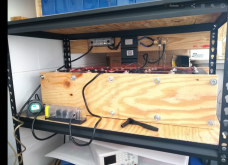
Yea it messes up the picture. I thought about turning it off.
While testing cells for weeks on end my neighbors probably wondered what that green glow was in my garage every night.

That configuration doesn't show much anyway.

I will post my cleaner serial setup today.
 
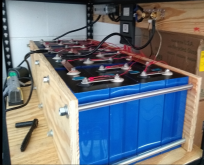
Here's some pictures of my latest setup. This is an evolving work in progress.
I moved the BMS and shunt to the back so I could get all of the balance wires out of the way.
The + distribution bar has a 100A MRBF fuse. I'm still deciding what to do about Class T fuses.
I don't like the serrated flange nuts. Especially on the balance leads. Next time they come off will be the last time.
As you can see I covered more of my ratchet and socket.

1611518481649.png1611518563805.png
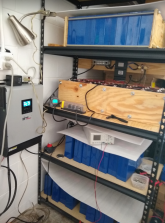
My whole setup
1611518705355.png
Starting balanced from the bottom
1611518913976.png
 
Gorgeous! Looks like you’ve still got a lot of work to do too! Do you like the MPP? I’ve been leaning towards going that way.
 
Here's some pictures of my latest setup. This is an evolving work in progress.
I moved the BMS and shunt to the back so I could get all of the balance wires out of the way.
The + distribution bar has a 100A MRBF fuse. I'm still deciding what to do about Class T fuses.
I don't like the serrated flange nuts. Especially on the balance leads. Next time they come off will be the last time.
As you can see I covered more of my ratchet and socket.

View attachment 34451View attachment 34453
My whole setup
View attachment 34454
Starting balanced from the bottom
View attachment 34455
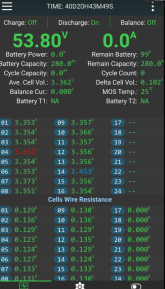
Great set-up, I like the BMS app readout! What BMS are you using?
 
Gorgeous! Looks like you’ve still got a lot of work to do too! Do you like the MPP? I’ve been leaning towards going that way.
Thanks. I really haven't gone overboard on making everything perfect. But I like neat and efficient.
I do like the MPP but to be honest, I bought it because I needed a 48V inverter. But 48V inverters cost 75% minimum of the cost of the MPP Solar 3048.
It has been great for a preview for the Solark that I expect to have in a couple weeks. And it is a handy unit to have for whatever might pop up.
I will probably find a perfect side use for it after my grid tied system is installed and inspected.
 
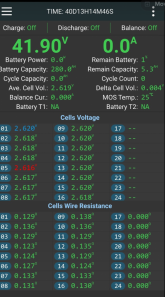
I made it to the upper voltage limit. This screenshot is from about 15 or 20 minutes after it hit the limit.
Cell 14 hit the limit but it has settled a lot already.
It is obvious that I would have to set the upper charge limit to 3.35V max if I wanted to leave the cells bottom balanced.
edit: charging was at 50A

At this point I check my restraining fixture torque and make sure the nuts are about 12-15 inch pounds. I had just snugged the nuts when at a low state of charge. I measure the corners of the fixture and adjust to torque slightly to try and keep the measurements the same. Generally the bottom has been fatter so it gets closer to 15 inch pounds.
The top will be 12 inch pounds. I adjust the torque to try and keep the two pieces of plywood parallel.
I don't know if all that helps anything but I am fairly sure it doesn't hurt anything.

The delta in this image is .102. I expect it to go down a lot by tomorrow. If I wanted to, I could turn on the balancer and it would balance it perfectly over night. But I don't think I need to do that this time.

As long as the delta is low, I will tear down the serial setup and connect parallel. If the delta is still too high, I will turn on the balancer.
I like the cell voltages to be close when I connect parallel or serial. And when I start charging/discharging, I start with low amps. Again, I don't know if it makes a difference but it can't hurt.

Next I will use my Riden power supply which does a wonderful job of top balancing without any attention.

1611548537414.png
 
Last edited:
So basically your cells at the top have around the same delta with after a bottom balance as mine do at the bottom after a top balance. Makes perfect sense to me.

I haven't taken any measurements but it's visually obvious to me my cells get fatter at the bottom too.

The Riden is a little gem for sure... :)
 
So basically your cells at the top have around the same delta with after a bottom balance as mine do at the bottom after a top balance. Makes perfect sense to me.

I haven't taken any measurements but it's visually obvious to me my cells get fatter at the bottom too.
I assume they settle from weight. I don't know what is in there but my guess is that it is similar consistency to an aluminum prism filled with clay. But it expands and contracts. It's solid as hell but you can move it around a little by restraining the thickness and going through a few discharge/charge cycles.

This seems to be the case from what I have observed so far but other than that, I'm guessing and if I'm wrong it wouldn't be the first time.
These cells are weird that's for sure.
 
Last edited:
X-rays and diagrams of prismatic cells can be found by a google search. I believe the cell contains a large jelly roll surrounded by a pouch and electrolyte. It still doesn't explain why the cell expands more at the bottom than the top. I am still waiting for someone to dissect one of the EVE's. But that will probably never happen.
 
One tip I learned 40 years ago, take off jewelry on your hands. That wedding ring is an excellent conductor. High current will melt that right on your finger. Unfortunately my glasses are for distance, but safety goggles are a great idea.
I've been thinking about how careful I have to be when moving busbars, tools and wires around and I realized the damn ring extends the connection of everything in that hand about 1". I hate when it takes me so long to think of these things.
 
I've been thinking about how careful I have to be when moving busbars, tools and wires around and I realized the damn ring extends the connection of everything in that hand about 1". I hate when it takes me so long to think of these things.
I don't wear a ring but maybe the mechanics gloves without fingertips would be useful. gloves are somewhat cumbersome, so thin and flexible insulating gloves may still help to make assembly safer. I am definitely more careful after arc-ing a few cells (272Ah Lishen) and it ruining 2 studs.
 
i totally understand. I can’t remember what it’s called but you can buy it at auto stores and it comes as a almost liquid rubber and it’s meant to recoat tool handles. You just dip the handle in it, dry then repeat for thicker coating. I thought about using that to cover my bus bars and studs becaus it would be easy to just peel off down the road too. 3D printed covers would look much better though. Printers are a little to expensive for me to buy just for that th

Here it is on Amazon but available in many big box stores:


Haven’t dropped by this thread in a while.

Looking good @ArthurEld !
 
  • Like
Reactions: Dzl

diy solar

diy solar
Back
Top