diy solar

diy solar

Solar panel mounting on RV

As a pause from my solar install and build… I screwed up today.

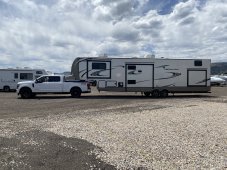
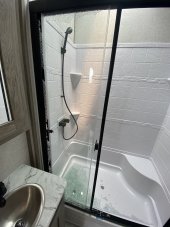
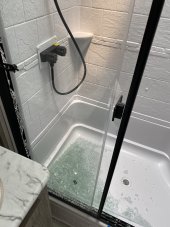
I had to take the new fifth wheel to the RV lot as I work the next three days and my HOA is going to give me a hard time soon. I hooked up and drove to the lot. After disconnecting I opened it up and double checked the TV that I had mounted earlier in the week, and something under the bathroom door caught my eye. I opened the bathroom door and found the glass shower door shattered in a million pieces. I hadn’t latched the door before moving the RV.

It’s expensive to be dumb. Anyway, now I have replace a glass door on a brand new RV.
 

Attachments

  • F02FA709-9067-444E-882D-C3F3BEBDB457.jpeg
    F02FA709-9067-444E-882D-C3F3BEBDB457.jpeg
    452.7 KB · Views: 49
  • 177FD837-A108-4519-9216-D4D95513EC67.jpeg
    177FD837-A108-4519-9216-D4D95513EC67.jpeg
    151 KB · Views: 50
  • D165FCCA-A33B-4E52-9D5F-4B3BF9CF91BE.jpeg
    D165FCCA-A33B-4E52-9D5F-4B3BF9CF91BE.jpeg
    163.7 KB · Views: 49
I have made a checklist that I have on my phone .... kinda like they do before flying an airplane.

It has saved me from doing dumb stuff several times. The checklist will evolve as you go along.
 
Have had that happen with a sliding closet door. They used a $.50 plastic clip to hold it in place.
Curious, where did you pickup the brackets you used to elevate the strut? I was going to use chopped up plastic cutting board but this is more elegant. Also, mind taking a close up shot of the bracket fully mounted and sealed? Thanks!
 
Here is the bracket:
5 Hole U Shaped Strut Connector... https://www.amazon.com/dp/B08P16Z47P?ref=ppx_pop_mob_ap_share

I added lock washers and still need to add the angled washers between the brackets and unistrut as detailed above to counteract the roof curvature.

Also, I did trim the butyl that squished out before covering with Dicor….
 

Attachments

  • CDEF1F94-51D5-4C43-BE04-252ABCCDD898.jpeg
    CDEF1F94-51D5-4C43-BE04-252ABCCDD898.jpeg
    118.6 KB · Views: 84
  • 692F02DE-1434-41B6-8EC2-E99C7B226DED.jpeg
    692F02DE-1434-41B6-8EC2-E99C7B226DED.jpeg
    156.7 KB · Views: 83
  • 1D3DD6A0-85CD-4780-8707-FAA5E0D1370A.jpeg
    1D3DD6A0-85CD-4780-8707-FAA5E0D1370A.jpeg
    107.7 KB · Views: 84
  • A3943A02-7FDF-4CC9-94FD-570F6D926952.jpeg
    A3943A02-7FDF-4CC9-94FD-570F6D926952.jpeg
    112.1 KB · Views: 82
  • 15E33441-676C-43C4-8CF4-8021D4CAD3EA.jpeg
    15E33441-676C-43C4-8CF4-8021D4CAD3EA.jpeg
    268.9 KB · Views: 81
  • CDA74AAA-115F-48B1-AF66-890DDDC8DF26.jpeg
    CDA74AAA-115F-48B1-AF66-890DDDC8DF26.jpeg
    291.5 KB · Views: 80
  • A161E3DA-1C18-4939-840B-0F33FFBA7017.jpeg
    A161E3DA-1C18-4939-840B-0F33FFBA7017.jpeg
    227.1 KB · Views: 81
Looks really good.

So just to confirm a few things:

You are using 1/4" threaded inserts?
Above that you have butyl tape
Then the U bracket
Then a 1/4 fender washer it looks
Then a 1/4 standard washer
Then a 1/4 lock washer
Stainless 1/4 bolt (what length?)

And then trim off the excess butyl squished out and bed the entire thing in Dicor?

This probably gets you 3" above the roof deck for the struts?
I’m at work, or I would lay out each piece exactly. But yes you are correct! The 1/4-20 bolts were 1.5 inches long. The plus nuts that I used were ordered from McMaster Carr and can be found here: https://www.mcmaster.com/97217A410/

I’m not a pro, and kind of just pieced it all together by buying some of everything and have some returns I need to make at Home Depot and Amazon.

Recently, I helped my brother screw some 100 watt panels using Zbrackets to the roof of his Class C motor home and I didn’t like how the screws failed to bite into substantial material. So attending YouTube University, lol, I tried this. I am very pleased and think the angled spacers that I will place between the unistruts and mounts will be great to square up the struts.
 
As for the height, it’s just barely enough for me reach my arm between the panels and the roof at an impossible angle to use a 11mm wrench to tighten the bolts that will hold the panels to nuts in the unistrut. When I do that next week, I will post pictures.
 
Today, I got off shift and picked up the fifth wheel and cleaned the broken glass from the shower. That sucked.

I installed the angle washers to level the unistrut. Then I tested 6 panels with the LV6548. I just wanted to make sure everything works before I hurt my back getting the panels to the roof.
 

Attachments

  • 98217D26-6C0C-49E0-9A9F-436933F4F9F0.jpeg
    98217D26-6C0C-49E0-9A9F-436933F4F9F0.jpeg
    108.2 KB · Views: 77
  • 70DE9CF2-7CE7-466D-96F3-AECF866BA957.jpeg
    70DE9CF2-7CE7-466D-96F3-AECF866BA957.jpeg
    193.9 KB · Views: 77
  • 5844C21F-727B-4312-A858-B2AF38E534DF.jpeg
    5844C21F-727B-4312-A858-B2AF38E534DF.jpeg
    217.8 KB · Views: 78
With no batteries yet, I just wanted to see if it would make power. I hooked up a corded drill and we had power! I then got adventurous and tried plugging in my camper to the extension cord. It had power shortly until the clouds and a storm moved in :(
 
Here is the bracket:
5 Hole U Shaped Strut Connector... https://www.amazon.com/dp/B08P16Z47P?ref=ppx_pop_mob_ap_share

I added lock washers and still need to add the angled washers between the brackets and unistrut as detailed above to counteract the roof curvature.

Also, I did trim the butyl that squished out before covering with Dicor….
what was the reasoning for this brackets?

I'm researching mounting systems and I this a rather tall bracket, like you said 3 inches of the roof deck. I'm trying to get my 400w panels as close to the roof surface as possible. I mean I like the Unistrut - but isn't there a something available which brings it closer to the roof?
You could drill a hole in the bottom of solid Unistrut and run lags thru it to the roof trusses. With slotted, you could also do this but need a large washer.
 
It’s a question of watershed. With the strut flat against the roof water has nowhere to go, not to mention the collection of leaves, dirt, etc.

Looking at theses brackets they’re a little too high for my liking. I’ll be using chunks of the cheap plastic cutting boards that everyone has around the kitchen.
 
It would depend upon orientation and length. Not everything needs a full length unistrut to be fastened. Blocking can be used under if desired, many choices out there.
 
Use two 4 inch pieces of angle aluminium with 1 nut and bolt through them to form a "u" shape, it allows for curved roofs as well. Also really easy to remove or lift panels for roof maintenance.
 
Use two 4 inch pieces of angle aluminium with 1 nut and bolt through them to form a "u" shape, it allows for curved roofs as well. Also really easy to remove or lift panels for roof maintenance.
I’m having a hard time envisioning this. Mind elaborating? I’m divining into my panel install today but am a little worried about the curve on the roof.
 
Elaborate? It's too early here to try explaining myself....
Ignore the size and material of the example and the poor mounting in the background, I wouldn't do it that way again....
You could attach to unistrut or directly to the solar panel....
 

Attachments

  • IMG_4704.JPG
    IMG_4704.JPG
    318.8 KB · Views: 56
I got the panels up, wired, and installed today!
 

Attachments

  • 28694C81-BBB5-4509-ACF8-8E8F59671D1F.jpeg
    28694C81-BBB5-4509-ACF8-8E8F59671D1F.jpeg
    158.2 KB · Views: 81
  • BE245241-6A37-45A8-8187-4523DDDD878A.jpeg
    BE245241-6A37-45A8-8187-4523DDDD878A.jpeg
    165.7 KB · Views: 59
  • F5082856-B65E-4F27-A2E7-D39148A6A308.jpeg
    F5082856-B65E-4F27-A2E7-D39148A6A308.jpeg
    221.1 KB · Views: 80
  • D899373F-C22A-49B1-B511-B297A6A710BB.jpeg
    D899373F-C22A-49B1-B511-B297A6A710BB.jpeg
    212.5 KB · Views: 80
I still have a few mid mounts that I will add for piece of mind. I just got tired and hungry. The panels are bolted from the frame to spring nuts in the unistrut. The mid panels clamps are just extra :)
 
Back
Top