I'll be honest (not directed at you), I would be contacting my credit card and doing a charge back. This is just idiots thinking they can screw us, not a chance they didn't notice.Has anyone tried to use them as is?
The aluminum is so soft that they will straighten out some even with normal torque.
And the stud will bind so it will probably be just as strong as a straight one.
Seems worth a try. I'd be pissed if I got my cells like that.
But if they hold the correct torque I think they would function the same as any other cell.


You are using an out of date browser. It may not display this or other websites correctly.
You should upgrade or use an alternative browser.
You should upgrade or use an alternative browser.
Stud Alignment Concerns
- Thread starter Woody
- Start date
Woody
Solar Enthusiast
Please post how things work out for you with the charage back.
I’m looking at this as a learning adventure. Originally I thought this would be a simple assembly effort to make a high capacity lifepo4 battery on the cheap. Well its not working out that way. Lots of little extras to big extras in using this style of lifepo4 cells. Swelling issues, bus bar issues, heating issues, need to top balance, need to measure internal resistance to validate cell quality (so new/more equipment). Would be a simpler assembly if I choose the heavy bolt terminal style cell like for a car set up and or used the axial style cells. Still will need to verify cells and top balance assuming it’s a diy battery. Boy those lifepo4 ready made batteries are looking better all the time. However, I chose not to go with them because of cost and lower AmpHour available cells. When I’m done I’ll go a cost comparison/hot wash on my experience.
I’m looking at this as a learning adventure. Originally I thought this would be a simple assembly effort to make a high capacity lifepo4 battery on the cheap. Well its not working out that way. Lots of little extras to big extras in using this style of lifepo4 cells. Swelling issues, bus bar issues, heating issues, need to top balance, need to measure internal resistance to validate cell quality (so new/more equipment). Would be a simpler assembly if I choose the heavy bolt terminal style cell like for a car set up and or used the axial style cells. Still will need to verify cells and top balance assuming it’s a diy battery. Boy those lifepo4 ready made batteries are looking better all the time. However, I chose not to go with them because of cost and lower AmpHour available cells. When I’m done I’ll go a cost comparison/hot wash on my experience.
I’ll be tracking how things work out for you guys. I’m trying to repair a stripped thread with a Helicoil and worried the hole I drilled may be off-square and the resulting grubscrew may not be orthogonal to the aluminum terminal. But no matter how bad it comes out, it won’t be anywhere near as bad as these pics!Following the lead by @Hedges ..I wonder, could something like this save the angle at a better price?

4.19US $ |4pc/8pc Mountain BMX Bike Bicycle Titanium M6 Concave and Convex Washer Spacer For MTB Disc Brake Caliper Group Mounting Bolts|Bicycle Brake| - AliExpress
Smarter Shopping, Better Living! Aliexpress.coma.aliexpress.com
Asking, as got myself the same trouble")
If these adjustable slope washers do the trick, you will have pioneered a new solution here on DIY Solar Forum!
Woody
Solar Enthusiast
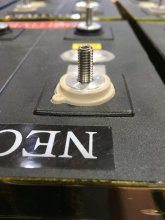
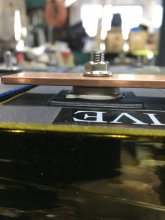
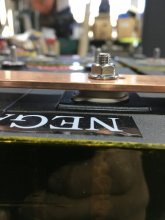
I’ve finished bending the stainless studs last weekend. Far from perfect but a lot better. I bent them with my homemade bending tool. With the copper bus bar on them I see that the nuts are almost perfectly flat. Prior to bending the studs, there was a large gap on one side of the nut while touching on the opposite side. I‘ve loctited the studs at the battery terminals and my plan is that once I tighten bus bars down at the terminal studs, I will not fiddle with them. I’m fabricating the bus bars with a bolt in the middle for the connections to be made. This way I hope to minimize any additional stresses on the aluminum battery terminals.
Attachments
austrisv
New Member
- Joined
- Jan 6, 2021
- Messages
- 14
@fafrd, On the leveling washers from alibaba - I even found some who are ready to send smaller quantities - 10 or 50. Overall good&responsive service, got blueprints/able to select diameters and "move angles" ... affordable unit price (<1$), but shipping makes it expensive (40-60$ to Europe). Maybe for somebody with 32 or 64 cells all misaligned (what a mess that would be :D), but as I need only 8 pieces - too much for me.
Have bought everything what's needed for tapping (regular and tap drill bits <10$), just need to arrange visit at friendly drill press. And also ss grabscrews (but that should be easiest part).
Meanwhile living with angled studs ... gave it a test with 1kW heat gun for an hour and could not tell the difference (e.g. inverter getting power, studs not heating up). The only strange behavior was input terminals of my 1.5kW inverter heating up (up to 70-80C/160-175F), but that's different topic.
austrisv
New Member
- Joined
- Jan 6, 2021
- Messages
- 14
Looks perfect from where I am!I’ve finished bending the stainless studs last weekend. Far from perfect but a lot better. I bent them with my homemade bending tool.
) I'm also thinking of a connection point in middle of busbars to not abuse those aluminum threads while playing around and setting it up.Nice!@fafrd, On the leveling washers from alibaba - I even found some who are ready to send smaller quantities - 10 or 50. Overall good&responsive service, got blueprints/able to select diameters and "move angles" ... affordable unit price (<1$), but shipping makes it expensive (40-60$ to Europe). Maybe for somebody with 32 or 64 cells all misaligned (what a mess that would be :D), but as I need only 8 pieces - too much for me.
Have bought everything what's needed for tapping (regular and tap drill bits <10$), just need to arrange visit at friendly drill press. And also ss grabscrews (but that should be easiest part).
Meanwhile living with angled studs ... gave it a test with 1kW heat gun for an hour and could not tell the difference (e.g. inverter getting power, studs not heating up). The only strange behavior was input terminals of my 1.5kW inverter heating up (up to 70-80C/160-175F), but that's different topic.
View attachment 40492
I’ve only got a single stripped thread I’m tapping for Helicoil which I’m concerned may not be straight, so I’m not interested in a bunch of those leveling washers.
And I’ve also read that some have been successful at straightening their angled grubscrews by force (presumably after they’ve been fixed in place with Loctite).
Your fixturing looks nice but if you are not using springs, you should probably set torque/force when the cells are at 100% SOC so you don’t apply more than the maximum recommended 600kgf).
Woody
Solar Enthusiast
fadrd- you stated ”...And I’ve also read that some have been successful at straightening their angled grubscrews by force (presumably after they’ve been fixed in place with Loctite)....”
I my opinion/recommendation:
DO NOT ATTEMPT TO BEND/STRAIGHTEN THE STUDS ONCE ATTACHED TO THE ALUMINUM TERMINALS.
I did try that on one terminal of my cells and applied a little force to see if I could bend the stud while attached. Big Mistake! The firmly attach stud did not bend much but the stud became loose. I removed the stud to find a piece of aluminum thread that came off. I then bent everything via my jig.
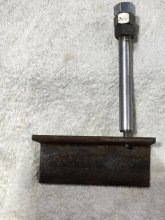
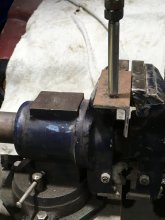
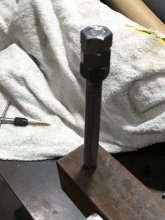
FYI -The bending tool is threaded at the base and rod so that it protects the threads on the studs.
I my opinion/recommendation:
DO NOT ATTEMPT TO BEND/STRAIGHTEN THE STUDS ONCE ATTACHED TO THE ALUMINUM TERMINALS.
I did try that on one terminal of my cells and applied a little force to see if I could bend the stud while attached. Big Mistake! The firmly attach stud did not bend much but the stud became loose. I removed the stud to find a piece of aluminum thread that came off. I then bent everything via my jig.
FYI -The bending tool is threaded at the base and rod so that it protects the threads on the studs.
Attachments
Wow, I’m glad I raised the issue. So after the stud has been bent, you thread it until it is straight, right?fadrd- you stated ”...And I’ve also read that some have been successful at straightening their angled grubscrews by force (presumably after they’ve been fixed in place with Loctite)....”
I my opinion/recommendation:
DO NOT ATTEMPT TO BEND/STRAIGHTEN THE STUDS ONCE ATTACHED TO THE ALUMINUM TERMINALS.
I did try that on one terminal of my cells and applied a little force to see if I could bend the stud while attached. Big Mistake! The firmly attach stud did not bend much but the stud became loose. I removed the stud to find a piece of aluminum thread that came off. I then bent everything via my jig.
FYI -The bending tool is threaded at the base and rod so that it protects the threads on the studs.
180-degrees past that point, the angle is twice as bad as before, right?
I’ll keep my fingers crossed that my Helicoil comes out straight, but if not, will follow in your footsteps with this idea - thanks!
I my opinion/recommendation:
DO NOT ATTEMPT TO BEND/STRAIGHTEN THE STUDS ONCE ATTACHED TO THE ALUMINUM TERMINALS.
I did try that on one terminal of my cells and applied a little force to see if I could bend the stud while attached. Big Mistake! The firmly attach stud did not bend much but the stud became loose. I removed the stud to find a piece of aluminum thread that came off. I then bent everything via my jig.
FYI -The bending tool is threaded at the base and rod so that it protects the threads on the studs.
I want to make sure I understand your process. You remove the stud from the terminal, then you put in a custom bend to make up for the angle of the terminal hole?
How much force was required to remove the stud?
Was the stud secured with thread locker?
Nice job on getting the right angle put on the stud. That can't be simple.


Woody
Solar Enthusiast
fafrd- you make a good point about securing the cells. “... if you are not using springs, you should probably set torque/force when the cells are at 100% SOC...”
The issue is how much movement can the cell’s terminals take. From my initial battery design I was going to use solid copper bus bars. After all the discussions about cell expansion/contraction I purchased copper welding cables and lugs. Soft jumper cables will put minimal forces on the terminal. Solid copper bus bars will attempt to constrain the terminals and not allow movement but additional forces on the terminals. Downside of jumpers is that you have to tighten/loose the nut at the terminals each time you need to connect or modify a jumper/fuse/sensor at the cells. To avoid this, you could make a Y jumper and attach everything in the middle. Too clunky with the Y jumpers. Since I’m fabricating my own bus bars, I’ll have a threaded bolt in the middle for connections. My goal is to minimize touching the terminals. If the terminal studs become loose because the solid bus bars will not allow movement, well I’ll have to Helicoil and go with jumpers. Time will tell which approach will be best.
As for securing the cells, currently I have them taped as Will noted. Two cell taped together will make my 2P unit cell. I will join the units together to form a 24v battery pack. How the battery pack will look/come together??? I’m going towards milk crates with 2 battery units (4 cells) lightly compressed per crate. So each crate module will comprise a 6v battery. Springs on the stock rod...maybe if I can find some at an affordable price. Then join the 4 modular crates together to form the finished 24v battery. More than 4 cells is a bit heavy for my old back to comfortably and safely move about. This modular design allows me to be able to pick up the batteries and move them easily if needed. Lastly this modular design approach allows for simple reconfiguration to 12v if needed. Just need to change out the BMS and minor cabling rework. I’m still a ways away from final assembly but will post a picture once I get there.
Woody
Solar Enthusiast
Hi HRTKD,I want to make sure I understand your process. You remove the stud from the terminal, then you put in a custom bend to make up for the angle of the terminal hole?
How much force was required to remove the stud?
Was the stud secured with thread locker?
Nice job on getting the right angle put on the stud. That can't be simple.
The process is fairly simple. The stud alignment process entails:
1) Insert stud to cell terminal
2) Tighten/Snug stud
3) Look how the stud sets and using a Sharpie mark the side that needs to be bent back. Observe how much the stud is leaning aka a little or a lot. Sorry not very quantitative.
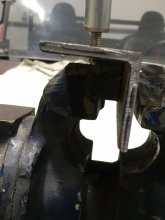
4) Remove stud from terminal and screw it into bending tool. Stud sticks out on the bottom about an 1/8” and the angle iron is about 1/8” thick. Have the Sharpie mark perpendicular to the bending base aka coming towards you.
5) Leave about a 1/16” gap between the bending rod and the angle iron.
6) Depending on how much bend you need, pull the tool rod towards you lightly. Again not very quantitative but you’ll get a feel for it.
7) Remove, reinstall on terminal, check alignment. If good enough, the remove stud, apply loctite, install and tighten stud. Leave stud to cure.
If the bend isn’t enough, remove and bend again. Too much bend, sorry toss it out and start over. I wasn’t able to salvage any studs that I screwed up on.
That’s it. Simple sort of but yes I did screw up 4 times in the bending process. Bent too much. Bent wrong side. Etc. Good thing I purchased extra studs.
Lastly this process is far from perfect but the amount of bend is a whole lot better than before.
Hi HRTKD,
The process is fairly simple. The stud alignment process entails:
1) Insert stud to cell terminal
2) Tighten/Snug stud
3) Look how the stud sets and using a Sharpie mark the side that needs to be bent back. Observe how much the stud is leaning aka a little or a lot. Sorry not very quantitative.
4) Remove stud from terminal and screw it into bending tool. Stud sticks out on the bottom about an 1/8” and the angle iron is about 1/8” thick. Have the Sharpie mark perpendicular to the bending base aka coming towards you.
5) Leave about a 1/16” gap between the bending rod and the angle iron.
6) Depending on how much bend you need, pull the tool rod towards you lightly. Again not very quantitative but you’ll get a feel for it.
7) Remove, reinstall on terminal, check alignment. If good enough, the remove stud, apply loctite, install and tighten stud. Leave stud to cure.
If the bend isn’t enough, remove and bend again. Too much bend, sorry toss it out and start over. I wasn’t able to salvage any studs that I screwed up on.
That’s it. Simple sort of but yes I did screw up 4 times in the bending process. Bent too much. Bent wrong side. Etc. Good thing I purchased extra studs.
Lastly this process is far from perfect but the amount of bend is a whole lot better than before.
Ah, OK. I thought your cells came with studs.
One suggestion: To prevent damage to the threads, I would put one, maybe two, nuts on the stud before bending. But that would require a new tool rod.
fafrd- you make a good point about securing the cells. “... if you are not using springs, you should probably set torque/force when the cells are at 100% SOC...”
The issue is how much movement can the cell’s terminals take. From my initial battery design I was going to use solid copper bus bars. After all the discussions about cell expansion/contraction I purchased copper welding cables and lugs. Soft jumper cables will put minimal forces on the terminal. Solid copper bus bars will attempt to constrain the terminals and not allow movement but additional forces on the terminals.
Sounds like we are building the same battery (2P8S). I also went from planning on using solid busbars to 2/0 welder’s cable and lugs due to concerns regarding mechanical stress during expansion/contraction.
Cinergi was one of my primary sources driving that decision, and now he’s switched back to solid busbars (partly because he sees almost no movement once his cells have settled under compression), so go figure.
Unclear to me whether you’re also switching from cables back to solid bus bars or not.Downside of jumpers is that you have to tighten/loose the nut at the terminals each time you need to connect or modify a jumper/fuse/sensor at the cells. To avoid this, you could make a Y jumper and attach everything in the middle. Too clunky with the Y jumpers. Since I’m fabricating my own bus bars, I’ll have a threaded bolt in the middle for connections. My goal is to minimize touching the terminals. If the terminal studs become loose because the solid bus bars will not allow movement, well I’ll have to Helicoil and go with jumpers. Time will tell which approach will be best.
As far as attachment points when using cables, here’s another couple ideas:
1/ use short solid busbars or a short length of copper on top of your lugs to form a separate location to bolt on additional connections.
2/ use a second harness for a parallel port (one wire to each cell), so you have BMS harness attached in parallel with a second harness to access individual cells as needed (this is what I am doing, with the auxiliary harness being used both for a BattGO monitor as well as a 5A active balancer as needed).
I can help you find sources for affordable springs, but really not worth it unless you are concerned that 3500 cycles isn’t enough and you need more. You have more to lose by overcompressing your cells than you do by lightly constraining them with something like tape and letting them breath relatively freely (but attach any rigid connections when they are fully-charged / fully-expanded).As for securing the cells, currently I have them taped as Will noted. Two cell taped together will make my 2P unit cell. I will join the units together to form a 24v battery pack. How the battery pack will look/come together??? I’m going towards milk crates with 2 battery units (4 cells) lightly compressed per crate. So each crate module will comprise a 6v battery. Springs on the stock rod...maybe if I can find some at an affordable price.
If you are going to be moving your battery a great deal, I suppose modularizing at a weight you can handle makes sense. My battery is going in the basement and if I ever need to move it, it will be through disassembly and modularizing at the single-cell level.Then join the 4 modular crates together to form the finished 24v battery. More than 4 cells is a bit heavy for my old back to comfortably and safely move about. This modular design allows me to be able to pick up the batteries and move them easily if needed. Lastly this modular design approach allows for simple reconfiguration to 12v if needed. Just need to change out the BMS and minor cabling rework. I’m still a ways away from final assembly but will post a picture once I get there.
If going with 4 cell packs, I’d be worried about the higher-resistance / different connections extra-crate versus intra-crate...
austrisv
New Member
- Joined
- Jan 6, 2021
- Messages
- 14
Your fixturing looks nice but if you are not using springs, you should probably set torque/force when the cells are at 100% SOC so you don’t apply more than the maximum recommended 600kgf).
Ups ... I had not read to that page yet:D No idea how much 600kgf is ... was tightening by hand, like to be able to "pick up"/not moving level, but not more
But your explanation makes sense ... will rather redo it at 100% and observe how much it moves. As a matter of fact, could also easily go with tape, just somehow got too much of plywood/metal videos in my timeline. Thank You for raising the point!Count me as impressed.fadrd- you stated ”...And I’ve also read that some have been successful at straightening their angled grubscrews by force (presumably after they’ve been fixed in place with Loctite)....”
I my opinion/recommendation:
DO NOT ATTEMPT TO BEND/STRAIGHTEN THE STUDS ONCE ATTACHED TO THE ALUMINUM TERMINALS.
I did try that on one terminal of my cells and applied a little force to see if I could bend the stud while attached. Big Mistake! The firmly attach stud did not bend much but the stud became loose. I removed the stud to find a piece of aluminum thread that came off. I then bent everything via my jig.
FYI -The bending tool is threaded at the base and rod so that it protects the threads on the studs.
Let me know how your process goes - mine look the same as yours. I've been circling around these potential remedies as well and keep coming back to redialing and tapping to M8. Mine will be going into a van build, so I want to be sure everything is secure and strong.Have bought everything what's needed for tapping (regular and tap drill bits <10$), just need to arrange visit at friendly drill press. And also ss grabscrews (but that should be easiest part).
Do you intend to simply drill and tap to M8, or drill and tap for M7 helicoils?
Let me know how your process goes - mine look the same as yours. I've been circling around these potential remedies as well and keep coming back to redialing and tapping to M8. Mine will be going into a van build, so I want to be sure everything is secure and strong.
Do you intend to simply drill and tap to M8, or drill and tap for M7 helicoils?
I strongly suggest you get some scrap aluminum and drill an angled 1/4” hole that you then attempt to re/drill straight with a larger-diameter bit.
Before attempting in your actual terminals, you should probably determine how easy it is to ‘override’ the natural guide that the existing (off-square) hole is going to represent.
This is fair. I plan to do plenty of test runs before drilling the terminals. I really don't want to, but I also want a stable/strong setup. I contacted Shenzhen Luyuan and they offered to send studs that can be laser welded on, but I'm not confident I would find a shop capable of or willing to do it.I strongly suggest you get some scrap aluminum and drill an angled 1/4” hole that you then attempt to re/drill straight with a larger-diameter bit.
Before attempting in your actual terminals, you should probably determine how easy it is to ‘override’ the natural guide that the existing (off-square) hole is going to represent.
Similar threads
- Replies
- 1
- Views
- 128
- Replies
- 55
- Views
- 3K
- Replies
- 7
- Views
- 520
- Replies
- 14
- Views
- 1K
- Replies
- 21
- Views
- 2K