


You are using an out of date browser. It may not display this or other websites correctly.
You should upgrade or use an alternative browser.
You should upgrade or use an alternative browser.
What was your most interesting recent non solar project?
- Thread starter JJJJ
- Start date
Kenny_
Solar Wizard
Pulled out my Canon 1Ds camera to take pics of my current art work and found the battery and backup battery dead dead dead... thought maybe I could repair it so opened on up and found a bad cell 18650 and tried to replace it unsuccessfully with a flashlight battery but the top nub was too long so didn't work... three cells cost about $25 but Ordered a third party replacement battery for $21 and it works. but still the challenge... took the backup battery apart (more carefully ") ) and was able to replace a defective cell with one form the original bad battery pack so ... and it works! Woo-Hoo. All this to take pics of my Graphite Artwork in Progress:
) and was able to replace a defective cell with one form the original bad battery pack so ... and it works! Woo-Hoo. All this to take pics of my Graphite Artwork in Progress:

The Aviator - WIP
Kenny A. Chaffin
9 x 11 inches
Graphite on Conqueror paper
Drawn from a photo reference
about 22.5 hours at this point
) and was able to replace a defective cell with one form the original bad battery pack so ... and it works! Woo-Hoo. All this to take pics of my Graphite Artwork in Progress:The Aviator - WIP
Kenny A. Chaffin
9 x 11 inches
Graphite on Conqueror paper
Drawn from a photo reference
about 22.5 hours at this point
McKravitts
Solar Enthusiast
- Joined
- Sep 8, 2022
- Messages
- 581
Not too long ago I experimented with radiative cooling.
The temperature of space is somewhere around -450 degrees F.
The amount of heat radiated from the earth has to equal the amount of solar heating for the average temperature on the planet to remain reasonably constant. Most of the radiative loss occurs at night.
We can heat our house with the sun. Why can't we cool it with radiative cooling?
I managed to keep a small shed under 75 degrees all summer using an old solar hot water panel as a radiator. A fin coil unit inside the shed coupled to the panel with copper pipe. The system was evacuated and charged with refrigerant.
IR radiation would cool the panel. Heat from the shed would move refrigerant vapor up to the panel and the cooler panel would condense the refrigerant which would flow down back to the fin coil.
The shed was very well insulated so it never warmed significantly during the daylight hours.
Last edited:
Sanwizard
Solar Wizard
- Joined
- Feb 2, 2021
- Messages
- 2,736
Ahhh, now THAT is a good point! I have made it my passion to NEVER use ANY ethenol gas in ANY small engine devices. ETHENOL FREE ONLY! Run the carb dry before storing. Ever since I started doing that, all my tools start on first or second pull every time.I do not miss my %^$%##!! 2 cycle string trimmer that didn't want to start or run worth a crap the last couple of years. I got so frustrated with having to constantly tinker with it to get it running.
I do love my battery operated DeWalt screw gun though.

PreppenWolf
Solar Wizard
- Joined
- Oct 10, 2022
- Messages
- 942

I bet SWMBO hates it when you stop and say "we've got a puncture... pass me down the spare, please"
The tire and rim are 650lbs. I have a chain hoist to raise and lower the spare along with a 25 ton jack and cribbing to lift the axle.
In case anyone is interested, I tore into ithe leaky wall/window again with the rage of a frustrated homeowner ticked off at both his own folly and the builder's incompetence that contributed to the leak (would not have needed to tear into it the first time around had it been done right the first time!). I do believe I found the issue and know the fix. Hardware store run is imminent.

Last edited:
Daddy Tanuki
Solar Wizard
Best of luck I can see how frustrating that would beIn case anyone is interested, I tore into ithe leaky wall/window again with the rage of a frustrated homeowner ticked off at both his own folly and the builder's incompetence that contributed to the leak (would not have needed to tear into it the first time around had it been done right the first time!). I do believe I found the issue and know the fix. Hardware store run is imminent.
View attachment 205224
That doesn't work. Years ago my OH made his own beer. IIRC it cost about 1/6th of the price... but, being on tap at home, he drank at least 6 times more than beer he boughthis is great. I want to get into homebrewing in an attempt to save money in the long term... I know not many hobbies work out that way, but good beer is so damn expensive. When I did back of the envelope math, it seemed like it'd be easy to save money doing homebrewing
Zwy
Emperor Of Solar
They build there without house wrap? I see they used fan fold but it doesn't cover the whole wall? The fan fold at a minimum should have been run on the outside of the top window flange, not behind it. A friend of mine had someone side his house and he installed fan fold instead of house wrap. The fella siding it ran the fan fold just like yours and water ran in every time it rained. He borrowed my off road forklift and scaffolding to pull the siding off and properly flash it. He said he should have sided it himself as he ended up having to do twice the work fixing the mistakes. This is how I do mine: House wrap on wall, on windows the wrap is cut and ran into the opening except for the top. Starting at the bottom, the flashing tape is ran across the bottom with overlap inside the opening and inside corners covered. Flashing tape up each side extending past the bottom and top. Flashing tape on top is under the house wrap which is slit slightly on each side. After installing the window, the house wrap goes over the top window flange and I run flashing tape again all around.In case anyone is interested, I tore into ithe leaky wall/window again with the rage of a frustrated homeowner ticked off at both his own folly and the builder's incompetence that contributed to the leak (would not have needed to tear into it the first time around had it been done right the first time!). I do believe I found the issue and know the fix. Hardware store run is imminent.
View attachment 205224
When installing siding, there is a metal drip flashing at the bottom corners to force any water to the backside of the siding so it runs out the weep holes in the siding. If I were you, I'd pull the siding off all around the window and see if there is any drip flashing in place. Most don't install it and years later when the window needs replacement they find under a window the sheeting and even studs or sill is rotted.
I won't install a round window like that if given a choice, very hard to flash out. Where the half round meets the 2 single hung windows is going to be a problem. I see caulk there which will not work, it needs proper flashing. To install flashing, it really should have at least 6 inches minimum in between to even have half a chance to flash it properly.
Yeah I was shocked to find no house wrap. Not sure if it is because they didn't do it as much back in 1999 when it was built, or because the builder cheaped out. Probably the latter. There was NO flashing around the windows at all. Just stuck in a hole in the side of the house with some caulking. What prompted me working on it the first time was rotted sheeting, studs, etc. I had to rebuild all that. My mistake was leaving that half circle window in place and just redoing the other two below. So now I get to yank the top half circle window and redo it with flashing and all that.
.If I had my druthers I'd take everything off, replace the random bits of foam board with actual sheeting, wrap the whole house, reinstall all the windows.... Not likely to do that though.
I suspect I'm going to have to do some repairs to another window install on the south wall. Not cool...
.If I had my druthers I'd take everything off, replace the random bits of foam board with actual sheeting, wrap the whole house, reinstall all the windows.... Not likely to do that though.
I suspect I'm going to have to do some repairs to another window install on the south wall. Not cool...
NC_hydro
Solar Enthusiast
- Joined
- Oct 14, 2022
- Messages
- 341
My place that my grandfather finished building in 1993 also had no wrap (he was cheap, and it wasn't as common back then). All the windows need to be replaced; I'm removing the siding, adding a wrap and/or possibly a foam layer for extra insulation, and going back with colored metal roofing vertically. That way I can use new-construction windows have a more durable exterior and increase my insulation value.Yeah I was shocked to find no house wrap. Not sure if it is because they didn't do it as much back in 1999 when it was built, or because the builder cheaped out. Probably the latter. There was NO flashing around the windows at all. Just stuck in a hole in the side of the house with some caulking. What prompted me working on it the first time was rotted sheeting, studs, etc. I had to rebuild all that. My mistake was leaving that half circle window in place and just redoing the other two below. So now I get to yank the top half circle window and redo it with flashing and all that.
.If I had my druthers I'd take everything off, replace the random bits of foam board with actual sheeting, wrap the whole house, reinstall all the windows.... Not likely to do that though.
I suspect I'm going to have to do some repairs to another window install on the south wall. Not cool...
Dagoth Ur Does Solar
Solar Enthusiast
Try having an 80+ year old house that also was cheaped out on in recent years. My roof, which was replaced a couple years ago before moved in, has leaks from tons of popped nails. They also re-used the flashing, so there's just a bunch of silicone holding water back. As you'd expect, it's also bottom-of-the-barrel 15-year shingles.Yeah I was shocked to find no house wrap. Not sure if it is because they didn't do it as much back in 1999 when it was built, or because the builder cheaped out. Probably the latter.
Basically, gonna have to get the whole thing replaced a lot sooner than expected.
The house, being as old as it is, also seems to have zero insulation in the exterior walls. Anyone ever had spray-in foam insulation done to a property? Seriously considering that, as we really, really don't want to rip out all of the drywall.
I could go on, and on, and on about the various issues between just being an old house, and the extremely questionable "upkeep" that had been done.
Zwy
Emperor Of Solar
You can always do one side at a time. It took 3 years to side my whole 1905 house. It had aluminum from the late 70's on it plus the original cedar.Yeah I was shocked to find no house wrap. Not sure if it is because they didn't do it as much back in 1999 when it was built, or because the builder cheaped out. Probably the latter. There was NO flashing around the windows at all. Just stuck in a hole in the side of the house with some caulking. What prompted me working on it the first time was rotted sheeting, studs, etc. I had to rebuild all that. My mistake was leaving that half circle window in place and just redoing the other two below. So now I get to yank the top half circle window and redo it with flashing and all that.
.If I had my druthers I'd take everything off, replace the random bits of foam board with actual sheeting, wrap the whole house, reinstall all the windows.... Not likely to do that though.
I suspect I'm going to have to do some repairs to another window install on the south wall. Not cool...
Today if I was to do it again, I'd put at least 1" ZIP panels on the outside and tape all the seams. No housewrap needed and I gain the R value with a full thermal break.
I'm planning on building a detached heated garage and I am considering the ZIP panels for sheathing. Not cheap but neither is plywood or OSB. Then dense pack in the walls for insulation.
Sanwizard
Solar Wizard
- Joined
- Feb 2, 2021
- Messages
- 2,736
Back in the day, they used what's called Balloon construction, which means there may not be firestops in your walls. That makes it much easier to go the cheaper "blow-in" insulation route. For open cell or closed cell foam, you will need to rip out all the sheetrock first.Try having an 80+ year old house that also was cheaped out on in recent years. My roof, which was replaced a couple years ago before moved in, has leaks from tons of popped nails. They also re-used the flashing, so there's just a bunch of silicone holding water back. As you'd expect, it's also bottom-of-the-barrel 15-year shingles.
Basically, gonna have to get the whole thing replaced a lot sooner than expected.
The house, being as old as it is, also seems to have zero insulation in the exterior walls. Anyone ever had spray-in foam insulation done to a property? Seriously considering that, as we really, really don't want to rip out all of the drywall.
I could go on, and on, and on about the various issues between just being an old house, and the extremely questionable "upkeep" that had been done.
Most of my houses have all been over 100 years old. They don't build them like the used to, and once you go 10 foot ceilings, you wont want to go back to 8 foot. That said, your energy bill will be higher due to the lack of insulation, but thats why we do solar, right?
Zwy
Emperor Of Solar
I blew cellulose in my old house and a rental that I still own. Both had plaster walls with backplaster that was in good shape. My old house just had cedar siding so I pulled the nails out of the siding every 5 feet and blew in from the outside. The rental was done on the inside, simply used a diamond tile bit to drill a hole then use a hole saw on the lath. Easy to patch later.Back in the day, they used what's called Balloon construction, which means there may not be firestops in your walls. That makes it much easier to go the cheaper "blow-in" insulation route. For open cell or closed cell foam, you will need to rip out all the sheetrock first.
Most of my houses have all been over 100 years old. They don't build them like the used to, and once you go 10 foot ceilings, you wont want to go back to 8 foot. That said, your energy bill will be higher due to the lack of insulation, but thats why we do solar, right?
I always just used full square footage, didn't subtract anything for doors or windows and used thickness that was higher with the back plaster. I would end up with 1 to 2 bags left over so it definitely was in tight. Cellulose was fed slow with air fully turned up. You can't do that with drywall, it will blow it right off the wall. I made a nozzle where it was necked down from 2 inch hose to 3/4 inch. Worked very well, nice tight pack.
Many builders are moving away from spray foam and using dense pack cellulose with netting before installing drywall. Works well with double studded thermal break walls.
Q-Dog
¯\_(ツ)_/¯
Adding spray foam to a structure that wasn't designed for it gives me the willies. I have seen a few with rotted structure under the foam because leaks can't dry out.
Dagoth Ur Does Solar
Solar Enthusiast
You are correct, in all of the original parts of the home, there are no firestops that I encountered.Back in the day, they used what's called Balloon construction, which means there may not be firestops in your walls. That makes it much easier to go the cheaper "blow-in" insulation route. For open cell or closed cell foam, you will need to rip out all the sheetrock first.
This made it even easier to run my network drops to the various rooms. If I decide to do blow-in insulation, I guess I better run all the network drops beforehand.
My main problem with going whole-home solar is that this house is grandfathered in to so many code requirements. When I moved in, the entire home had two-conductor, no ground, paper/rubber insulated wiring. That stuff has degraded and crumbles apart. I had the bulk of the home rewired with modern romex. Still need to do the circuits for the overhead lighting. But there is still a lot of stuff that would need to be updated to code, I would guess.That said, your energy bill will be higher due to the lack of insulation, but thats why we do solar, right?
I think the electricians here would be horrified to see the breaker box and associated wiring.
I kind of expect if I opt to go whole-home solar, I will need to have the breaker box relocated to something that meets the "accessible area" requirements (which might end up being outdoors due to the limited space in the home).
This whole home has been my biggest non-solar project for a few years now. The saving grace that keeps me going is that we own the home free and clear, no mortgage.
I'm not sure what my options would be. This is a brick-and-mortar home (real bricks, not fake siding). The interior is drywall. I did have the thought that filling a bunch of holes drilled in mortar sounds a lot less of a pain than patching a ton of drywall holes.I blew cellulose in my old house and a rental that I still own. Both had plaster walls with backplaster that was in good shape. My old house just had cedar siding so I pulled the nails out of the siding every 5 feet and blew in from the outside.
Not something I had thought about, but totally makes sense considering there's certainly no vapor barrier wrap or anything like that.Adding spray foam to a structure that wasn't designed for it gives me the willies. I have seen a few with rotted structure under the foam because leaks can't dry out.
Zwy
Emperor Of Solar
You are correct, in all of the original parts of the home, there are no firestops that I encountered.
This made it even easier to run my network drops to the various rooms. If I decide to do blow-in insulation, I guess I better run all the network drops beforehand.
My main problem with going whole-home solar is that this house is grandfathered in to so many code requirements. When I moved in, the entire home had two-conductor, no ground, paper/rubber insulated wiring. That stuff has degraded and crumbles apart. I had the bulk of the home rewired with modern romex. Still need to do the circuits for the overhead lighting. But there is still a lot of stuff that would need to be updated to code, I would guess.
I think the electricians here would be horrified to see the breaker box and associated wiring.
I kind of expect if I opt to go whole-home solar, I will need to have the breaker box relocated to something that meets the "accessible area" requirements (which might end up being outdoors due to the limited space in the home).
Plan to upgrade all of that when you do whole house solar. Not that hard.
This whole home has been my biggest non-solar project for a few years now. The saving grace that keeps me going is that we own the home free and clear, no mortgage.
I'm not sure what my options would be. This is a brick-and-mortar home (real bricks, not fake siding). The interior is drywall. I did have the thought that filling a bunch of holes drilled in mortar sounds a lot less of a pain than patching a ton of drywall holes.
Can't do it from outside with brick usually, most are veneer or cavity. https://abbotbuilding.com/brick-wall-types-brick-repair-massachusetts/ There is a space behind the brick to the rest of the structure. This allows moisture to run down the backside of the brick.
Not something I had thought about, but totally makes sense considering there's certainly no vapor barrier wrap or anything like that.
We are hoping to find a homestead type property sometime, so I'm not going the whole tear it all off and redo route. If we were staying, I'd put the effort into it. As is, I'm fixing what's wrong, so neither we nor the next owners will have to worry about this particular window again. No promises on the others lol.
My house was built in '55. There have been four distinct levels of work done to it.... the extremely questionable "upkeep" that had been done.
1. Original construction. Not bad, perfectly acceptable in it's day, most still very solid.
2. The Vietnam vet who owned it before me. Obviously not a pro, but did his best and most of his work I leave alone.
3. Crackhead who got the place after the Vietnam vet passed away. His work can best be described as "use a wrench to pound in a screw."
4. Me. Somewhere along the same level as the Vietnam vet. Better in some areas, worse in others.
Thus far ~half of my work has been undoing crackhead's work.
PreppenWolf
Solar Wizard
- Joined
- Oct 10, 2022
- Messages
- 942
My favorite type of previous owner is "I have 7 different types of fasteners, but only about 3 of each. That's OK, Let's modify the house"
S Davis
Solar Addict
- Joined
- Sep 25, 2021
- Messages
- 818
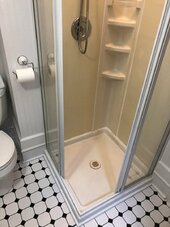
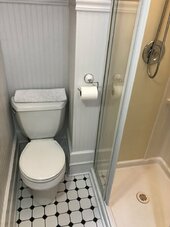
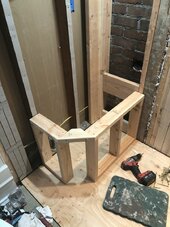
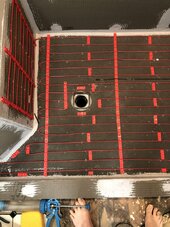
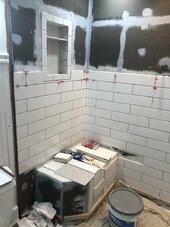
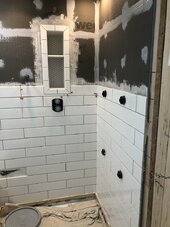
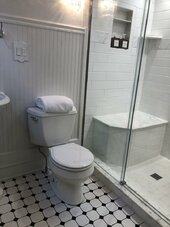
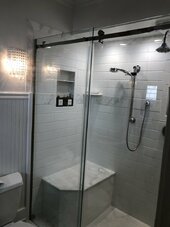
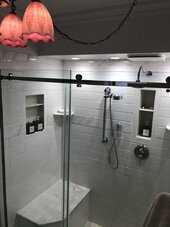
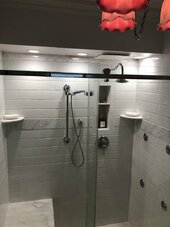
Before the deck remodel I did a bath remodel with walk in shower, heated floor and seat, rain head, hand held sprayer and four body sprayers. It was super fun as my house is 110 years old and nothing is straight, the bathroom floor dropped 1-1/4” towards the old brick chimney where they did a bad Job headering the joists.
Attachments
-
 A204AFAA-DB71-4586-B7C5-F0E4F62AFEF6.jpeg120.6 KB · Views: 14
 -
 35EECFC8-CB03-408A-BD76-05ACEF0BCB81.jpeg107.3 KB · Views: 14
 -
 AF304477-03A4-4536-83F8-BC688A4BA9DF.jpeg151.5 KB · Views: 16
 -
 7ADE5F0A-AACD-4CAB-951C-80993874B0BC.jpeg192.9 KB · Views: 17
 -
 BEA473B1-E16E-4487-A7F9-A495B7245C81.jpeg172.4 KB · Views: 16
 -
 97804991-B8E6-445B-829B-D95FDA7AB6B4.jpeg213.8 KB · Views: 14
 -
 861059EB-FC01-42DF-9536-97F8130FCEFA.jpeg165.7 KB · Views: 15
 -
 ADD8BF79-1AB5-4FB9-8624-5D89C7DA1414.jpeg239.2 KB · Views: 14
 -
 1DE7DAAD-5F7A-4AE8-85D3-5DBB85F022FE.jpeg159.3 KB · Views: 15
 -
 A48A55EB-5180-4449-82E4-B3AEF43C0DD4.jpeg119.8 KB · Views: 14
 -
 D7B55F85-9375-4319-B34C-685B56A0B824.jpeg103.8 KB · Views: 14
 -
 9E36C4E7-286D-4403-A36D-850303835A5A.jpeg111.9 KB · Views: 14
 -
 019898B3-D7F9-4328-AEB4-9DEB9A07E66B.jpeg96.1 KB · Views: 13
 -
 73042AD3-1FD2-4D55-BC8F-5F2AA951C01B.jpeg110.7 KB · Views: 14
Daddy Tanuki
Solar Wizard
i would gut the interior drywall in a heartbeat vice drilling holes in the bricks, thats an invitation for water leaks from the outside where you currently do not have any.You are correct, in all of the original parts of the home, there are no firestops that I encountered.
This made it even easier to run my network drops to the various rooms. If I decide to do blow-in insulation, I guess I better run all the network drops beforehand.
My main problem with going whole-home solar is that this house is grandfathered in to so many code requirements. When I moved in, the entire home had two-conductor, no ground, paper/rubber insulated wiring. That stuff has degraded and crumbles apart. I had the bulk of the home rewired with modern romex. Still need to do the circuits for the overhead lighting. But there is still a lot of stuff that would need to be updated to code, I would guess.
I think the electricians here would be horrified to see the breaker box and associated wiring.
I kind of expect if I opt to go whole-home solar, I will need to have the breaker box relocated to something that meets the "accessible area" requirements (which might end up being outdoors due to the limited space in the home).
This whole home has been my biggest non-solar project for a few years now. The saving grace that keeps me going is that we own the home free and clear, no mortgage.
I'm not sure what my options would be. This is a brick-and-mortar home (real bricks, not fake siding). The interior is drywall. I did have the thought that filling a bunch of holes drilled in mortar sounds a lot less of a pain than patching a ton of drywall holes.
Not something I had thought about, but totally makes sense considering there's certainly no vapor barrier wrap or anything like that.
Brett V
Mad Scientist
I have a cartoonish image of a house shaped like an apple!I blew cellulose in my old house and a rental that I still own. Both had plaster walls with backplaster that was in good shape. My old house just had cedar siding so I pulled the nails out of the siding every 5 feet and blew in from the outside. The rental was done on the inside, simply used a diamond tile bit to drill a hole then use a hole saw on the lath. Easy to patch later.
I always just used full square footage, didn't subtract anything for doors or windows and used thickness that was higher with the back plaster. I would end up with 1 to 2 bags left over so it definitely was in tight. Cellulose was fed slow with air fully turned up. You can't do that with drywall, it will blow it right off the wall. I made a nozzle where it was necked down from 2 inch hose to 3/4 inch. Worked very well, nice tight pack.
Many builders are moving away from spray foam and using dense pack cellulose with netting before installing drywall. Works well with double studded thermal break walls.

On the surface, spray foam looks like the cats meow. But if you ever have to do any work, I’d bet it’s a nightmare.
That's called deferred maintenance and encapsulates many of the decisions made by the PO.I could go on, and on, and on about the various issues between just being an old house, and the extremely questionable "upkeep" that had been done.
Keep up the good work of keeping your house up and running.
Similar threads
- Replies
- 111
- Views
- 5K
- Replies
- 85
- Views
- 5K
- Replies
- 118
- Views
- 3K
- Replies
- 34
- Views
- 1K