diy solar

diy solar

Xuba Electronics: DEAL - 280AH LiFePo4 cells. Purchase & Review

I don't know of a USA supplier. I use a Revolectrix PowerLab8 because it is automatic and can go through a charge and discharge cycle or two depending on how it is programmed. It is not cheap at $240 and years ago one broke outside of warranty and the cost to repair was more than buying a new one.
 
I received photos and a video of my 16 x 3.2v 280ah LFP cells from Xuba's Amy. All cells read 3.29v except 1 cell that read only 3.21v. Is that acceptable?
Was the impedance of the low cell different than the others? If so I'd request a better match.
 
IR of low cell was 0.17, all cells ranged between 0.12 and 0.20 IR.
I'd be more concerned with the difference in the internal resistance between the cells rather than the voltage. Voltage differences could simply be a result of the difference in the state of charge which is not an issue as Steve_S points out. I'm not sure if the variance you are seeing in the internal resistance is a major issue but for reference, my batch of 8 cells were all within 0.01 milliohm, ranging from 0.13-0.14 milliohms. If it was me, I'd ask for a closer match on the internal resistance.
 
I am ready to order some of these 280 ah cells. How should I contact Wan Amy ? Do I go through the Alibaba site or do I go direct through Shenzhen xuba Electronic trading co? I don't want to create a problem for Wen Amy by going around Alibaba.
 
I am ready to order some of these 280 ah cells. How should I contact Wan Amy ? Do I go through the Alibaba site or do I go direct through Shenzhen xuba Electronic trading co? I don't want to create a problem for Wen Amy by going around Alibaba.
I posted this in another thread, but seems appropriate here too. Note, I am in the USA, so shipping may be different for other countries.

Steps to take.
1. Create an Alibaba account and go the Xuba web page.
2. Send Amy a message stating you would like a quote on X number of batteries with air and sea shipping prices to compare cost (tell her you are from this DIY Solar Forum).
3. Pay using one of the many payment methods including credit card and wired funds.
4. Wait for batteries to arrived directly at your house as they take care of everything shipping wise and mine arrived from FedEx. She will send you a video of your cells being tested and a tracking label for FedEx that will go live once the batteries clear customs.
5. Drive yourself crazy trying to decide what BMS to get while waiting for your batteries to arrive.
 
I received photos and a video of my 16 x 3.2v 280ah LFP cells from Xuba's Amy. All cells read 3.29v except 1 cell that read only 3.21v. Is that acceptable?
Those are storage voltages. As others have said nothing to worry about. I just got my video and I couldn't read the numbers on the multimeter until I figured out it was upside down. Then I figured out it was volts and internal resistance. ;)
 
Amy has convinced her managers that they should double the bus bars sent. The ones they presently supply are 2mm thick x 15mm wide x 94mm long. These are fine IF your building a Series Only pack but they are too short if you have cells end-to-end. With the busbars doubled to 4mm, the screws don't bottom out either but they do if you only use one busbar @ 2mm thickness.
Steve, there was a discussion on the best way to screw the buss bars down I read some time back, Now that I have received mine, I can't find it to save my life. Do you recall where that might have been?
The buss bars (not sure what the material is) that I received are just long enough to connect the cells in parallel. There was talk about putting a spacer of sorts between them way back when, no way with these bars. I have not checked to see if the length is enough to series connect the cells yet, which is what I will be doing. They are parallel balancing now.
The screws are just that, phillips machine thread screws, not bolts with a ratchet head. Not sure if that matters. I always see Will ratcheting away.
 
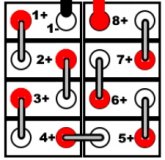
Technically Screws or Nuts, threaded posts with nuts all do the same thing. They are intended to connect the Bus Bars to the face of the contacts, the "threaded" part is not what carries the lions share of the voltage / amperage. The supplied bus bars are long enough to link cells together in series BUT not if you want to cross over... See image attached, when I mean in series is from one cell to the next (1+ & 2-) but going across from (4+ to 5-) Cell the bus bars are too short my 10mm if mem serves.
8S-24V-Square Pack.jpg
You are better off setting up / aligning the cells and binding them and then installing the busbars loose fit till all lined up and then tighten then down. Of course balancing leads etc all installed too. BE AWARE OF THREAD DEPTH ! Before doing anything else, without busbars, put a screw in and hand tighten it down to the bottom and see how much thread is left, next put two busbars on there and d the same (by hand only) and if it tightens up nicely your good to go. Ultimately you NEVER want that thread to bottom out in the cell, it could break through ad that would be Very BAD ! The best way to ensure that the thread isn't too deep is pre-checking it by hand. The "general / generic" rule is tighten the screw down by hand and then back it off at least 1 full turn and THAT is the tightest point you can safely go. With the screws supplied, two busbars & one washer ended up at just the right height. I was supplied with Stainless Steel Screws and Copper Busbars from Xuba. While I did get that material from Xuba, I elected to use COPPER C110 FLAT BAR ASTM-B133 0.125" x 0.750" to make my own busbars. The LONGER Bars to cross between 4+ & 5- are 4.250" long. (just looked up the quote) NB: I drilled the holes in my busbars to 5/16 so they are as snug as I can get while leaving a wee bit of jiggle room for adjustment.

Hope that helps, good luck.
 
Technically Screws or Nuts, threaded posts with nuts all do the same thing. They are intended to connect the Bus Bars to the face of the contacts, the "threaded" part is not what carries the lions share of the voltage / amperage. The supplied bus bars are long enough to link cells together in series BUT not if you want to cross over... See image attached, when I mean in series is from one cell to the next (1+ & 2-) but going across from (4+ to 5-) Cell the bus bars are too short my 10mm if mem serves.
View attachment 14373
You are better off setting up / aligning the cells and binding them and then installing the busbars loose fit till all lined up and then tighten then down. Of course balancing leads etc all installed too. BE AWARE OF THREAD DEPTH ! Before doing anything else, without busbars, put a screw in and hand tighten it down to the bottom and see how much thread is left, next put two busbars on there and d the same (by hand only) and if it tightens up nicely your good to go. Ultimately you NEVER want that thread to bottom out in the cell, it could break through ad that would be Very BAD ! The best way to ensure that the thread isn't too deep is pre-checking it by hand. The "general / generic" rule is tighten the screw down by hand and then back it off at least 1 full turn and THAT is the tightest point you can safely go. With the screws supplied, two busbars & one washer ended up at just the right height. I was supplied with Stainless Steel Screws and Copper Busbars from Xuba. While I did get that material from Xuba, I elected to use COPPER C110 FLAT BAR ASTM-B133 0.125" x 0.750" to make my own busbars. The LONGER Bars to cross between 4+ & 5- are 4.250" long. (just looked up the quote) NB: I drilled the holes in my busbars to 5/16 so they are as snug as I can get while leaving a wee bit of jiggle room for adjustment.

Hope that helps, good luck.
Super helpful, thank you for this.
 
Wouldn't studs be safer?
Yes, that is my theory because I can control the depth of the studs. That is one reason I would not use nylock nuts with studs. I ordered 25 mm long studs. That means in most cases I will have as much as 5 to 7 mm of thread in which I will have to hold the stud to make sure the nylock nut does not turn the the stud.
 
Wouldn't studs be safer?

Steve’s method has added enough bus bar and a washer so it’s impossible to bottom out. He is starting out from one full turn off the bottom as his endpoint as well.

Another method may be preferred by someone but it’s not safer IMHO.
 
Another method may be preferred by someone but it’s not safer IMHO.
I can be a klutz at times and am risk adverse. Therefore I do not distinguish between personal safety and the safe process of reducing the risk of puncturing a cell. The solvents used in the electrolyte of these cells is volitile and my preference is to not do any thing that will increase the risk of releasing that solvent. I did that once with a Headway cell many year ago. I do not want to repeat that experience with a cell that is 30 times more powerful.
 
96 cells for my own bank. i am now running my house on 48 200 ah cells. Will more than double my capacity. The other 48 cells are for a friend


What size array do you have? Im in the middle of trying to plan for expanding my system.
I currently have a midnight classic 200 charge controller, Aims 10,000 watt pure sinewave inverter, 24 (3 strings of 8) trojan L16 370 Ah batteries and 12 335 watt sunedison panels.

Im trying to figure out what i need to expand my system. Im looking at 3 strings of the 280 ah lithium, a sol ark 12k and 24 additional 335 watt panels for a total of 36.

Not sure yet on a bms as i have not seen anyone on here talking about a 48 volt bms. I also might have to step up to 2 sol ark 12ks.

I also have 2 1600 watt wind turbines that are a pain and havent ever worked right and a Kohler 6svg battery charger. Ive never even used it before not hooked up, have had it for 3 years.
 
Back
Top