diy solar

diy solar

64 eve lLF280k version3 cells in 8P8S configuation 24-volt build December 28th, 2023

64 cells 280Ah version 3 cells:

only charging two cells this day: March 10th, 2024


March 10th, 2024 >>> I splurged and scored a new (open box) .25-inch x 4-inch x 24-inch tinned copper busbar with predrilled holes for $67.51 including shipping and tax...(worth well over 100 dollars)
I already have insulators and bolts for it....
It will be helpful to do the 8 connections with 4/0 copper cables and hydraulically crimped lugs on one end of the 8x8 ESS battery build.
the planned improvement is all 8 of the 4/0 copper cables will be the same length to this busbar....
then the connections for fuses and disconnect switches will also be simplified...

on the 4P8S 32-cell battery builds I used equal-length cables to the busbar but the busbar was shorter so more challenging....
it seems one is always wanting more points for connecting things.

Adding more shelves, and cleaning, and organizing this morning in the off-grid solar power shed.

new lamb this morning, the wind is fierce, and trying to teach my daughter to ride a bike...no time for battery work...🤔

I really need a 3-wheel bike for my handicapped daughter....she can do 3-wheel (at school) and 4-wheeler(at the recreation park) but not enough coordination for the 2-wheeler...she tries but ???

later, all
time changed so 1 more hour of daylight tonight...😎
 
Last edited:
64 cells 280Ah version 3 cells:
today March 14th, 2024 (Pi Day) I assembled 5 parallel rows of 8 cells of the 280Ah version 3 cells .... on the new steel reinforced floor base....
I taped them together in pairs (with the supplied 2-inch strapping tape), then in blocks of 4 then every two blocks of 4 in parallel so 8 connected in parallel.
lots of bending over and lifting the cells.... a block of 4 is about as much as I care to man-handle....
I put them on the slick dollar store cutting sheets to aid positioning....and this also provides more electrical insulation for the bottom of the cells...
and put the yellow epoxy boards between all cells for extra electrical insulation (it was also supplied)

so that leaves 24 cells to reassemble... removed all the grub screws to replace them with the 30mm long M6 grub screws...also....

the replacement cell arrived today, and the 1/4-inch x 4-inch x 24-inch tinned copper busbar also arrived...

I was parallel charging a block of 8 cells connected from the closest positive and the farthest negative....but stopped as assembly/disassembly progressed...

hauled hay the last couple of days so never a dull moment....

slow but sure 😎😎 cleaning as I progress ....

I see Dacian is doing an efficiency comparison of a Victron Mppt vs the Electrodacus DSSR50...

cheers all
 
64 cells 280Ah version 3 cells:

All 8 rows of 8 cells each are now taped into blocks of 4 and then connected in rows of 8 in parallel....(copper bus bars are installed for the parallel rows)
The grub screws/set screws have all been replaced with M6 30mm long ones to accommodate the thicker busbar...

Don't work too long when tired>>>>last night>>> I taped one block wrong and had to cut it apart but at least only one....so time to stop!!!
The tape is the fixture and will put the small force needed on them...

The main negative will be on one end and the main positive will be on the other end >>>> about 60 inches apart (good electrical separation)...

The other thing I may try next time is to stack the cells on their side for a smaller footprint....just like they do in the vertical pre-fab cases...I think that would also help to get the compression fixture force for a longer lifespan.... they stack them 8 high in those cases with the cells on their sides....
They say the only position not allowable is upside down.... for the LiFePO4 cells...
I can see why people mark their cells....as they tend to look alike....the last two cells still need to be top balanced ... so I marked them with a grey Sharpie or I would have to test more to find them...

Maybe tomorrow I will do more of the series interconnections with the thicker busbars...I did one and as expected the voltage doubled....just the same as the other builds...
a 2P8S and 4P8S.... two of each functioning without issues..
This is my first 8P8S 24-volt build....

The 0.25-inch x 4-inch by 24-inch tinned copper busbars are heavy and I need to make a mount for them also....but I like them....I have 4 of those but only needed two....for this build....

There is still a bit of man-handling to maneuver them into better positioning (the blocks of 280Ah version 3 cells)....(I sure wish they were at counter height and not floor level). but my shelf was not strong enough so a steel reinforced shelf on the floor was the option for the moment...(glutton for punishment) >>>> do not do them at floor height...( a back killer)

I hauled more alfalfa hay today (March 16th, 2024)and started assembly of the seven-speed 3-wheel bicycle for my daughter....of course, one bolt was missing!!!! 🤔🤔
have a great weekend....
Today it was windy and cold but the sun was out....😎
 
64 cells 280Ah version 3 cells:

yesterday March 19th, 2024 update:
the 24-inch busbar arrived for $67.51 (but was a 4-pack) so, in reality, this 1/4-inch x 4-inch x 24-inch tinned copper busbar was only $16.88 each including tax and delivery..... wow....(only the busbars--- no hardware was included) a steal of a price for sure....!!!!😎
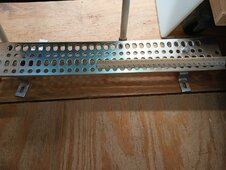
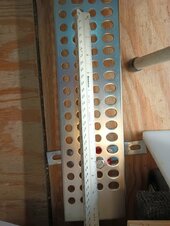
I assembled two: one for positive and one for negative from other hardware parts (that I previously acquired), and now one is mounted in place and the other is ready to mount in place...
they have 3/8 inch holes so I ordered some red 4/0 copper cables (Temco Direct) and (SELTERM) tinned copper lugs for the positive end.... I already have some black 4/0 copper cable for the negative end...

although you can not see it >>> I used 3&1/8-inch torx screws and screwed some 3/4-inch plywood to the sheet rocked wall to mount the 24-inch busbars,,,, sheetrock has no functional strength to support heavy things.... the 4/0 copper cables will have a short radius possibly 12-inches to 18-inches long when assembled....

if I had more of the white cutting board I would have used it....(need/want to find/acquire more of that) a great insulator for electrical things...!!!

IMG_20240318_154956609.jpgIMG_20240318_155029587.jpg
then after a couple more hours working on the new 3-wheel seven-speed bicycle assembly for my daughter and feeding the critters; it is dark outside again..... more another day
it is windy but cold today....lots of sun predicted though😎😎
 
Last edited:
64 cells 280Ah version 3 cells:

I liked the commercial-made mounting hardware ,,,, for the large tinned copper busbar (0.25 inches x 4 inches x 24 inches)>>> so I ordered replacements for the busbars that I already had...this morning.($11.77 per set) I got 3 sets of commercial mounting hardware coming... actually $11.41 plus $23.91 for three sets >>> so that is $35.32 or $11.77 each with tax and delivery for three sets of the commercial-made mounting hardware...two different eBay sellers...but I will use them on another project....!!!
The state sales tax system collects some for eBay purchases...

the wind is fierce again so it hampers some of the work....🤔

I am charging the last two cells this morning...with the Riden 6024 buck charger...
I will start the hydraulic cable crimping in the next few days... I think the large 4/0 x 3/8 tinned lugs will arrive today, and the red Temco Direct 4/0 copper cable on Saturday...😎
 
Last edited:
once in a while, a supper bargain can be found on eBay. There is no way I can buy a 150-200 dollar (0.25 inch x 4 inch x 24 inch tinned copper) busbar for $16.88 any other place....
when I find them I try to buy them....
they cost a lot more than that from a metals vendor...🤔🤔
 
64 cells 280Ah version 3 cells:

yesterday, (March 23rd,2024)>>>I made the eight red 4/0 copper cables for the positive connections to the 0.25-inch x 4-inch x 24-inch tinned copper busbar....with tinned copper lugs on each end (.25-inch lug holes for the M6 studs on one end and 3/8-inch lug holes on the other end for the busbar connection) so a different lug on each end....)

the 64 cell 280Ah cells have M6 set screws/grub screws.
the 0.25-inch x 4-inch x 24-inch tinned copper busbar has 3/8 inch holes.

the first hydraulically crimped DIY 4/0 cable I made was too short so I have a short cable extra...(use for a disconnect switch someplace else???)
the correct cut length ended up being 1 foot of cable to make the slight radius bend connections on the positive end of the 64-cell build.

Perhaps, today I can make the 8 black negative 4/0 cables for the negative end of the 64-cell build.

I will add a 350 amp DC disconnect switch on the negative end connecting to the inverter.... that seemed to be a good solution on the previous 32-cell build...

A 400 amp fuse will be installed on the positive end of the 64-cell battery build after the 500 amp shunts.
the 400 amp fuse is there to protect the 4/0 wire ( the catastrophe fuse)... ((possibly a NH 355 amp blade fuse as I have one of those also))

more later,,,,it was snowing and cold yesterday and more predicted the next two days....(Spring does not know what day it is )🤔🤔

(((SS = stainless steel)))
of course >>> found I needed some more SS 3/8 inch 1.25-inch long bolts so I ordered 50 (had all kinds of SS nuts and washers)....(always some piece of hardware needed) I will use those SS bolts on the ends of the new 4/0 cable to busbar connections.... I prefer SS hardware to limit the galvanic corrosion issues of dissimilar metals.... not that much more money invested in the end result...(eBay had the 3/8 x 1.25-inch SS bolts for the best price>>>$35.86 for 50 SS bolts including tax and delivery)😎😎

Baby lambs show up about every day at the off-grid farm so always some joy to be found no matter what the weather brings for the day!!
cheers all,
 
Last edited:
64 cells 280Ah version 3 cells:

Temco Direct red 4/0 copper cable was $94.46 for 15 feet. so it is $6.30 per foot including delivery.

The 4/0 Selterm tinned copper lugs with 3/8 holes from Amazon are about $44.15/25 = $1.77 each...
SELTERM 25pcs 4/0 AWG 3/8" Stud Marine Grade Tinned Copper Battery Cable Lugs, 0000 Gauge Ring Terminals, UL Wire Lugs Electrical Battery Cable Ends, Tinned Copper Lugs Battery Terminal Connectors (bought on Amazon)

I previously bought the 4/0 tinned copper lugs with 0.25-inch holes in quantity for less than a dollar each....(((rampant inflation big time on pieces and parts)))

So the 12-inch long red 4/0 copper cables are $6.30 plus $1.77 plus $1.00 = about $9.06 each
the black
4/0 copper cables will be longer (not sure of exact length yet but likely similar cost when done...
So the total cost for 16 hydraulically crimped 4/0 copper cables approximate cost will be $9.06 x 16 = $144.96 (no charge for my time)😎

The 4/0 black copper cable had previously been bought for about 4 dollars per foot but I want the positives as red cables and the negatives as black cables....my preference but not required...🤔🤔

darn >>> snowing again and wind at my off-grid farm(3/23/2024)...but the sheep all came out to eat and the 5 newborn baby lambs are doing well with the cold and snow??? they are always tolerant ( I am always amazed)😎
at least the January lambs and February lambs are off to a grand start....!!!!!!😊
The December 2023 lambs are growing like crazy....These are "hair" sheep so there is no shearing of wool and their meat is leaner>>> similar to deer or bison!!!
 
Last edited:
What I like to find and now have 4 >>> are old cutting boards for super cheap to use as insulating bases for electrical busbars...
other things can be used..
the white cutting boards from meat-cutting businesses. but I found that they are very expensive to buy new...

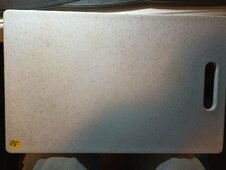
here is a picture of a 50-cent garage sale cutting board I am repurposing for my electrical insulator...
I bleached it yesterday to clean up the surface.... this one is 9.5 inches by 15 inches 3/8 inch thick for 50 cents...
I think they can be bought relatively cheaply in other places also..

I bought a black one 13 inches by 17 inches 1/2 inch thick for a dollar at the local resale/thrift store....

these can all be cut or left full size as backer for the electrical bus bar stand-off bracket mounting...
DIY repurposing of useful materials....
the surfaces can be smoothed with a scraper or sander if one chooses to do so....

Some people do not know how to recondition these cutting boards, and they just discard these cutting boards......or choose not to take the time and effort to do so... so finding them at thrift stores (used) for pennies on the dollar is a good source for me...

IMG_20240325_062816203.jpg
 
Last edited:
64 cells 280Ah version 3 cells:

the weather is still miserable outside so not much work progressing in the outside solar power shed....
it is insulated and being heated with light bulb and inverter heat to 65 to 70 degrees Fahrenheit in the coldest of weather...
but after working outside for a few hours in the snow and rain I was soaked and had to warm up (thaw my body up).(yesterday)
this is all done with off-grid solar-generated electricity....

so I installed some LED 4-foot lights inside the house and had some coffee etc...
the Braun 4-foot LED light (sold at Harbor Freight Tools) can hook up to 8 together... I installed and connected 3 of the 4-foot LED lights in the home office and put the fourth one in the solar power shed.... these lights put out a lot of light and come with mounting chains, hooks, and 6-foot plug-in cord with a plug-in receptacle on the other end to connect the next one --- I like them!!!! ($16.99 each when on sale)

I did locate the 4/0 black copper cable and have it ready to start making the negative cables.... (it is being warmed up inside the off-grid solar power shed now)
the 64 cells are all connected with the bus bars and interconnects.
I am working on the big tinned copper busbars (0.25-inch x 4-inch x 24-inches) on each end presently (one on each end) positive end is almost done.... ((((the 5 foot plus separation from negative to positive is a plus IMO!!!!))))
I will have everything ready for the stainless steel bolts to arrive from eBay in a couple of days....
I need to put a little heat shrink on the ends of the hydraulically crimped cables....
more later,
they canceled school so it must be very icy outside this morning...🤔
 
Last edited:
Sams Club / Costco is my source for the big cutting boards at a reasonable price.
My sure the wind is blowing away from ya if you rip them down on the table saw outside...
 
64 cells 280Ah version 3 cells:

My
March 25 2024 progress:
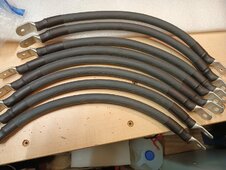
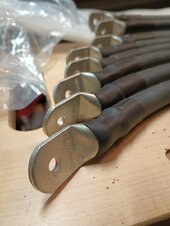
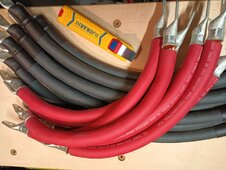
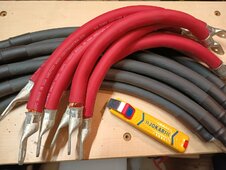
Black 4/0 copper cables are 16 inches and now have the heat shrink...(Carolpreme is the brand of the 4/0 cable made in the USA);
I found some red heat shrink for red 12-inch 4/0 copper cables (Temco brand)(tomorrow maybe if I have time to heat shrink the red ones)
snowing again😎
IMG_20240325_175928844.jpgIMG_20240325_175938491.jpgIMG_20240325_175952999.jpgIMG_20240325_180234551.jpgIMG_20240325_180304152.jpg
 
Last edited:
64 cells 280Ah version 3 cells:

My
March 25 2024 progress:
Black 4/0 copper cables are 16 inches and now have the heat shrink...(Carolpreme);
And found some red heat shrink for red 12-inch 4/0 copper cables (Temco)(tomorrow maybe have time to heat shrink the red ones)
View attachment 204749View attachment 204750View attachment 204751View attachment 204752View attachment 204753
That's some tedious work, nice job.
Out of curiosity did you sacrifice any of your crimps and cut in half to make sure you are getting a good cold weld?
 
That's some tedious work, nice job.
Out of curiosity did you sacrifice any of your crimps and cut in half to make sure you are getting a good cold weld?
no, I did not cut one up (sacrifice a crimp)
The 16-ton hydraulic crimper with 95 dies works well....
I suppose I could cut one up but not likely...
you can not pull them apart....I could hang some iron weights on one if I get time...
yes tedious work,,,
anyone who says it is 20 minutes of work to do 16 crimps and heat shrink etc is a super efficient worker...i can not do it...
I did utilize the large 36-inch cable cutter today but I wish I had a smaller ratcheting one.... the 10-inch manual cable cutter was hard to use so I tried the 36-inch one....
once I get the pattern/length determined >>. it takes me about 2 hours to strip them, crimp both ends, and heat shrink eight 4/0 copper cables...
I am still waiting on the 1.25-inch 3/8 stainless steel bolts....from eBay....beats driving to town and I have lots of other work taking care of other things,, so online ordering is convenient and actually cheaper (when I factor in the gas in the vehicle for a special trip)😎
 
Last edited:
no, I did not cut one up (sacrifice a crimp)
The 16-ton hydraulic crimper with 95 dies works well....
I suppose I could cut one up but not likely...
you can not pull them apart....I could hang some iron weights on one if I get time...
yes tedious work,,,
anyone who says it is 20 minutes of work to do 16 crimps and heat shrink etc is a super efficient worker...i can not do it...
I did utilize the large 36-inch cable cutter today but I wish I had a smaller ratcheting one.... the 10-inch manual cable cutter was hard to use so I tried the 36-inch one....
once I get the pattern/length determined >>. it takes me about 2 hours to crimp both ends, stip them and heat shrink 8 cables...
still waiting on the 1.25inch stainless steel bolts....from eBay....beats driving to town and I have lots of other work taking care of other things,, so online ordering is convenient and actually cheaper (when I factor in the gas in the vehicle for a special trip)😎
No worries, I didn't cut any of mine either, was just curious.
Just make sure you check them for hot temperatures when you get everything together and load it up for testing. You can also check for voltage drop...
I can relate, roughly $8 in fuel to drive to town and back but I wouldn't want to be any closer.
 
Back
Top