diy solar

diy solar

64 eve lLF280k version3 cells in 8P8S configuation 24-volt build December 28th, 2023

Hey Michael, I got a question for you. I noticed you and others hook up Positive (+) to Ground/Earth instead of the + terminal on the bench power supply. I'm trying to understand why, and when you'd do this — can you shed some light? I'm trying to understand it, and ideally be able to decide when one or the other is appropriate for a given task (for example, here you're charging an LFP cell, I'd like to understand why connecting + to Ground/Earth is correct, vs connecting to Positive). I've been using + to + (and to ) on my own bench supply to charge my LFPs and I'm now questioning everything :)
 
Hey Michael, I got a question for you. I noticed you and others hook up Positive (+) to Ground/Earth instead of the + terminal on the bench power supply. I'm trying to understand why, and when you'd do this — can you shed some light? I'm trying to understand it, and ideally be able to decide when one or the other is appropriate for a given task (for example, here you're charging an LFP cell, I'd like to understand why connecting + to Ground/Earth is correct, vs connecting to Positive). I've been using + to + (and to ) on my own bench supply to charge my LFPs and I'm now questioning everything :)
on the Riden 6024, 6018, 6012, etc >>> the correct way is to use the left two for use in battery cell charging>>>> when the cell is charged to the set voltage the amps will drop to zero and the charging will stop.....

our mind seems to think alike, but the Chinese design is not designed for the American mindset...

when you use the right-hand connection on the Riden DC buck chargers they work as a bench power source but not the correct way to charge the battery...
I am sure with this quick reply I am not wording some of this correctly....

another member helped me realize this to be the correct way to connect the Riden...
Thanks again "Just John"
it will change and show as battery charging when connecting the way I show in the Pictures...
if you study up and go to the Riden videos they also indicate it as the correct way...

the new Riden 6024 has the ability to remove the input terminal and install a ring terminal and with 10AWG silicone wire and ring terminal connections>>> this way I get the best connections....and more power to the battery being charged (it does make a marked improvement)
the wire and connection on the Riden Buck chargers is the key to better functionality....
one other thing is to invest in a heavier gauge plug for the AC side of the Riden... a simple but effective improvement...

windy and cold, hope the sun comes out!😎
 
Last edited:
on the Riden 6024, 6018, 6012, etc >>> the correct way is to use the left two for use in battery cell charging>>>> when the cell is charged to the set voltage the amps will drop to zero and the charging will stop.....

our mind seems to think alike, but the Chinese design is not designed for the American mindset...

when you use the right-hand connection on the Riden DC buck chargers they work as a bench power source but not the correct way to charge the battery...
I am sure with this quick reply I am not wording some of this correctly....

another member helped me realize this to be the correct way to connect the Riden...
Thanks again "Just John"
it will change and show as battery charging when connecting the way I show in the Pictures...
if you study up and go to the Riden videos they also indicate it as the correct way...
Interesting. I would like to understand this better, if anybody else can chime in. I've seen others do it and am not clear as to when you want to connect the Positive lead going to the battery to Positive on the power supply, vs when you want to connect it to Ground/Earth. Usually, ground is used to get a voltage "in reference to ground/earth," this is a video I found useful although I'm still not as clear as I'd like to be — in particular, as to how it related to charging batteries.

the new Riden 6024 has the ability to remove the input terminal and install a ring terminal and with 10AWG silicone wire and ring terminal connections>>> this way I get the best connections....and more power to the battery being charged (it does make a marked improvement)
the wire and connection on the Riden Buck chargers is the key to better functionality....
one other thing is to invest in a heavier gauge plug for the AC side of the Riden... a simple but effective improvement...
Will def look into it, and I'm likely gonna pick up a 6024 myself.
 
8P8S diagram more or less of the 64 cell 280Ah version 3 build:

IMG_20240329_070209299.jpgIMG_20240329_070212685.jpg


1711852469062.jpeg
note: added the blue lines for the parallel connections to the graph paper drawing (above)
and added the green lines for the series connections to the graph paper drawing

the center diagram is similar except the positive is all on the left end and the negative is all on the right end...
the left end would be connected like shown in the middle diagram....

below is a 32-cell 4P8S
if you double that it would be the 8P8S build

have to add pictures later...sorry ....technical difficulties with the photos

my math was off a bit on my drawing I see now
280 x 8 = 2240Ah, not 2280
 
Last edited:
Interesting. I would like to understand this better, if anybody else can chime in. I've seen others do it and am not clear as to when you want to connect the Positive lead going to the battery to Positive on the power supply, vs when you want to connect it to Ground/Earth. Usually, ground is used to get a voltage "in reference to ground/earth," this is a video I found useful although I'm still not as clear as I'd like to be — in particular, as to how it related to charging batteries.


Will def look into it, and I'm likely gonna pick up a 6024 myself.
"Kiss Analog" has a YouTube video where he shows the Riden 6018 build and addresses a lot of your questions and concerns....
Eddy Aho the Kiss Anlog channel man is a power supply specialist... he is good at his explanations...
the power cord to the AC to DC switching power supply needs to be heavy-duty >>> not just any light-duty power cord....
I updated my AC power cords for the power supplies
you have to buy the internal cr1220 battery, and the power supply cord when you buy the kit,
you also buy the AC to DC power supply separately...
I bought the wifi version but do not use that feature.

the new Riden 6024 allows you to buy better quality leads and have ring terminal connections on each end...
YouTube video from Kiss Analog below>>>


hope it helps you some....

the sun is back and the snow is melting so the mud returns to the off-grid farm...😎😎
 
64 cells 280Ah version 3 cells:

My
March 25 2024 progress:
Black 4/0 copper cables are 16 inches and now have the heat shrink...(Carolpreme is the brand of the 4/0 cable made in the USA);
I found some red heat shrink for red 12-inch 4/0 copper cables (Temco brand)(tomorrow maybe if I have time to heat shrink the red ones)
snowing again😎
View attachment 204749View attachment 204750View attachment 204751View attachment 204752View attachment 204753
Gee, Deja-Vu / Flashback...
Doing my own systems, I spent 2 Long & Tedious days cutting, crimping and Heatshrinking alone and NOT short easy days either...
Now I am going to do it all over again as I am redoing my whole bank & adding another 21kWh into it. At least I won't be using 4/0 for the packs to main DC bus again. I use Royal Excelene Fine Wire Welding wire (made in USA) which is also perfect for this use.
 
64 cells 280Ah version 3 cells:

Here is a 4P8S color diagram from Filter Guy's PowerPoint reference on this DIY Solar forum.
I flipped it upside down as my positive is on the left end and my negative is on the right end.

If you double that you will get the 8P8S I am assembling....
In my build there are eight red positive copper 4/0 AWG cables from the positive end,,, and eight black 4/0 AWG copper cables from the negative end (an 8 x 8 64-cell build = 8P8S) they have 0.25-inch lug holes to the battery cells; and 3/8 inch lug holes to the large 0.25 x 4-inch x 24-inch tinned copper busbar...(different tinned copper lug on each end of the hydraulically crimped cables --- of course)

IMG_20240401_081552636.jpg

coffee to get warmed up>>> yes
It is raining this morning and cold for the 1st day of April, 2024
Definitely need the rain,,,, but it is miserable for doing the outside off-grid farm chores....😎
 
Last edited:
64 cells 280Ah version 3 cells:

All connections on the 64-cell battery are done... ((((April 3rd, 2024)))
the small provided Allen key for the grub screws arched the second to the last one so it is really too long or needed a bit of electrical tape or something on the end of it..
I carefully re-snugged all the 30mm long M6 grub screws, but the second to the last one had to touch wrong with the long allen key...
always wakes you up ( that spark )
the battery is at 26.60 volts right now...
I need a few more details and connections yet.... but progress is slow...
large 24-inch x 4-inch x 0.25-inch tinned copper busbar on each end is also fully connected.
 
Last edited:
64 cells 280Ah version 3 cells:

26.60 volts (measured via multimeter) in an 8S battery is at the 90 percent SOC...
so it is time for the NH fuse and inverter connection....
the 3200-watt high-frequency 24-volt inverter will be the easiest to connect for the moment...
more later,,,😎
1712165170032.png
 
64 cells 280Ah version 3 cells:

All connections on the 64-cell battery are done... ((((April 3rd, 2024)))
the small provided Allen key for the grub screws arched the second to the last one so it is really too long or needed a bit of electrical tape or something on the end of it..
I carefully re-snugged all the 30mm long M6 grub screws, but the second to the last one had to touch wrong with the long allen key...
always wakes you up ( that spark )
the battery is at 26.60 volts right now...
I need a few more details and connections yet.... but progress is slow...
large 24-inch x 4-inch x 0.25-inch tinned copper busbar on each end is also fully connected.
Lol. At least you didn't have a cell flipped and connect a busbar creating a dead short, that spark really wakes you up fast 😉.
 
64 cells 280Ah version 3 cells:

April 3rd 2024 progress:

I hooked up the 24-volt inverter and used a 24-volt continuity tester to pre-charge the capacitors in the inverter.... worked great>>> was absolutely no spark when doing the final positive connection to the 3200-watt high-frequency inverter....
this automobile continuity tester has a bulb that will light and go dimm as the capacitors are charged up; but if you have the wires reversed the bulb will continue to be bright and will not go dim.... ( don't ask me how I know >>> duh) things always happen so it is best to test all connections as you go,,,,when tired or in a hurry things always seem to occur...
I turned the inverter off as I had no load for it yet....
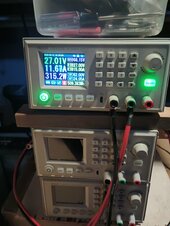
I also hooked up the Riden 6024 buck charger and added another 30Ah to the battery and it said 26.85 volt SOC....(((see what it reads in the morning...)))
I set it at 27.00 volts; and later bumped it up to 27.30 volts for charging in the battery charge mode....(((Riden 6024)))
when it reaches the preset voltage it will reduce the current (amps) until it is done....but I still turn it off overnight....
I turned it off overnight.... >>> no reason to let it go unattended for the moment....(the Riden 6024 buck charger)
need to make sure everything is working as designed...
still, a few more connections are to be done with other parts of this 64-cell build....
but the honey-do list will take priority tomorrow...

and another hair sheep lambing so busy busy busy....
lots of sunshine today....😎

IMG_20240403_192224765.jpg


I had to make longer leads for the Riden so I spliced each cable with extra grub screws and serrated flange nuts etc... a lot of tape and plastic around the splice...(not my finest work so no pic of that part >>> I will build better cables in a few days)
I have an 8-ton hydraulic crimper that is good for smaller cables and a 16-ton hydraulic crimper that is better for larger cables....

I also had to make longer inverter cables,,, but I used 5/16 inch stainless steel bolts and washers, etc for that splice and again plastic and lots of electrical tape for that splice (( not pretty but functional for the test )) I will make longer cables in a few days or so....the inverter had 5/16 compatible terminals (but unfortunately), the busbar was set up for 3/8 inches.... (never simple)...different lug needed for each end!!
I used stainless steel bolts and washers etc for all connections!

more another day🤔🤔😎
 

Attachments

  • IMG_20240403_192226357.jpg
    IMG_20240403_192226357.jpg
    132.9 KB · Views: 1
Last edited:
64 cells 280Ah version 3 cells:
over
night the cells and 64 cell battery settled down to 26.65 volts, so I turned the Riden 6024 on this morning and set the voltage to 27.10 volts for charging a bit more....

Amazon has a "Katzco" continuity tester for $11.99 delivered. it has a bulb that lights and dimms down as the capacitors are charged up in the inverter when doing the initial pre-charge connection....
no sparks using this method...
and this is a tool you can use for other wiring tasks for your 12-24 volt projects...
can not seem to get a picture of it off of Amazon probably have to take a picture of the one out in the solar power shed and post it later...

more later....😎
 
Last edited:
64 cells 280Ah version 3 cells:
the NEEY 15Amp smart active balancer is running tonight 4/5/2024.
that was easy to hookup, annoying to get the "neey electronics" blue tooth app to work on the android cellular....lots of downloading and re-setting etc, more on that later
A regular pain in the Axx..
but I set the battery as a 2200 Ah 8-cell battery and it started with a 31mV differential.... so not bad to start
for an 8P8S 64-cell battery....using 64 of the new 280Ah eve version 3 cells...

It is at 26.75 volts and I turned the Riden 6024 battery charger on and set it to 26.80 volts for some overnight charging and balancing....
I will go out later and see what it is doing, but the led indicator lights on the NEEY 15Amp active cell balancer and the app show it to finally be functioning...
at least no red warning light now...
green, blue and yellow(the yellow is for balancing/equilization is in progress)

never found an instruction manual anywhere so, I had to go by the off-grid garage YouTube video and wing it some....🤔🤔😎
 
the NEEY 15Amp smart active balancer :

active balancing the 64 cells in the assembled 24-volt build...

this morning the cell differential is 19 mV, so it is actively balancing slow but sure... at 5amps ( it started with a 31mV differential )
I contacted a seller of the NEEY 15Amp smart active balancer through Alibaba and they said to contact them on Monday.
at least I got a partial reply....
so maybe I can get an instruction manual vs (not quite sure method)!!!!
super windy but the sun is out so that is a plus for the solar off-grid farm today Saturday >>> April 6th, 2024🤔🤔😎
have a great weekend!!
 
the NEEY 15Amp smart active balancer :

the NEEY 15Amp active balancer was down to a 9mV cell differential at 2 a.m. this morning....(April 7th, 2024); {{{6mV at 5:52 a.m.}}}
it (the NEEY 15Amp smart active balancer) is balancing fine on the 64-cell build of 8P8S 280Ah Eve version 3 cells in the 24-volt configuration...

I added a battery-positive wire from port 24 to the battery thinking maybe it needed that; so the yellow LED would go away or change but it did not change anything...
when I disconnected the power the timer reset on the NEEY balancer when I reconnected to the Bluetooth app...
The Bluetooth app works great at close distances but the Bluetooth signal does not transmit through walls into my house.... but functions fine outside in the insulated solar power shed...
the status says everything is normal so maybe by guess and by golly I may have it connected correctly...🤔
the "HankzorBMS Store" Aliexpress vendor wrote they would send me the apk for the Android phone but I think I already got that part....it still would be good if it had an actual manual that is better suited for the NEEY 15Amp smart active balancer...
Lots and lots of fierce wind yesterday and some rain late in the day....
April showers are predicted today...
more later....🤔🤔
 
Last edited:
I forget if you have a Cell Resistance Tester like a Yaorea YR1035 type of device.
Now that you have it all together and are doing the NEEEY Balancer on there, I am REALLY Curious what the actual cells say in the 4P sets.
Are all the cells in parallel @ same Voltage & IR ? Or is there any deviation in the parallel sets ?
they are in 8P sets.
i do have one of those resistance testers.....maybe later I do that..
 
64 cells 280Ah version 3 cells:

NEEY 15amp smart active balancer at 5mV (April7th 2024)
64 cell build
I have it set to stop at 1 mV maybe should change that to 5mV???
20240407_083035.jpg20240407_081931.jpg20240407_081953.jpg20240407_081310.jpg20240407_081315.jpg
 
NEEY 15Amp smart active balancer >>> each cell being balanced is actually 8 cells in parallel...
that is why I set the 2200 Ah on the neey
I just guessed on that but 280 x 8 = 2240Ah...so close ....🤔
20240407_081953.jpg
 
I have it set to stop at 1 mV maybe should change that to 5mV???
I dunno how much if any gain of any sort is achieved below 0.010. Not likely any gain of any significance but won't cause any harm either.

Sorry, 8P Yes, boy looking at those pics (dunno bout that Chicken Salad LOL) there's a LOT of OOMPH there.
64x 280AH @ 5X "short" Dump: 89,600A dump potential. Talk about a REALLY BRIGHT Flash ! There is a big OUCH lurking there, hehe.
 
Back
Top