diy solar

diy solar

Building a mobile 8S Cart based Solar Generator - sort of...

OffGridForGood

Catch, make or grow everything you can.
Joined
Nov 3, 2021
Messages
3,314
Location
Canada, NW Ontario
I wanted to share some of the work I have done on my mobile 24v system.
Yes @EastTexCowboy You are my inspiration for this!
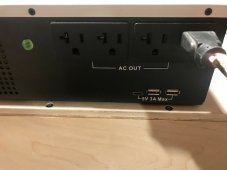
First up, the base of the system is my MPP 2724 AIO inverter. This unit is unique among all the All In One inverters that I know, as it is the only one I came across that has 20 amp outlets (plus two USB) Built Right into the side of the Inverter.
This is very handy for a mobile set up, since it saves you the bother of adding a power bar, and it is nice and neatly part of the inverter case.

So this is the battery build section - lets see a DIY battery:
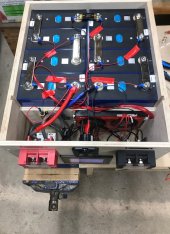
image6.jpeg

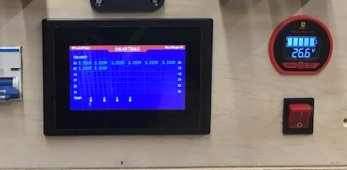
This is a set of eight Envision 315Ah cells set in twin rows, with a fuse between cell #4 and #5 at the turn (rear of the pack, top of the pic) controlled with a Daly 150A 8S BMS. The Daly was available with a 4.3" screen and activation button so what the heck, just install that for quick info and setting changes with the touch screen. The wiring could be more neatly organized but oh well it looks good with the lid on.
I used the peal and stick type of separator sheets made from 'fish paper' (funny green looking thick paper you see in lots of electonic equipment) and foam between the centre row to hold the cells from moving around. They are not technically 'under compression' but when fully charged they are very firmly set. The Fuse at the rear of the pack is 200 Amp ANL and is an idea one of the members passed on to me, if ever a dead short takes place this fuse will cut the pack into two 12 volt halves and break the circuit. A class T wasn't going to fit the cells, and if required could be used on the exterior of the battery at the through terminals.
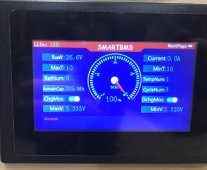
image4.jpeg
The touch screen is very easy to use, just touch the parameter you want to adjust, and a menu pops up, type in the change and hit SET. Done.
The settings are not adjusted in the picture, yeah took the pic before changing the settings to see if any Eagle Eyed members can spot the setting errors like the 180A charging current setting. ya got me!
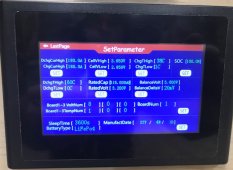

image5.jpeg

You can easily scroll through the menu and see cell voltages without an I-phone or wifi being required. These cells have only done a few cycles however they are close to a balance with about 6mv delta. If I need to adjust that one low cell, a few screws opens the lid of the case and gives me access to adjust cells with a bench top charger, or an automotive bulb depending which way we are trying to go.
IMG_5012.jpg

Since this is my mobile set up, I didn't really want to be messing with bolting on battery cables and then taking them off again to move the battery and inverter separately. The battery is about 100 lbs (45kg) and that is enough to move on it's own, then I can move the inverter and set these up in a garden wagon or in my truck - even on the back of the quad. To make the battery connection easy I used an Anderson plug wired with 4AWG cables in the battery case.
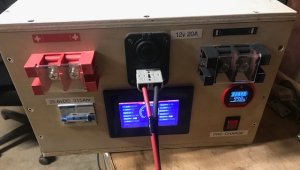

image1.jpeg

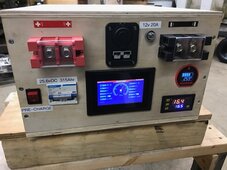
The Anderson plug is "24 volt" ie 8s is about 25.6 volt nominal for the inverter, I liked the idea of a 12 volt plug too for things like USB adapter or a few things I have from my truck like a trouble light, tire pump and phone charger that all fit this 12 volt outlet - so used this handy Anderson & 12 volt plug from Aliexpress. I installed the bigger through-case battery terminals as well for two reasons: one, so I can have the full 150A capacity of the battery when I need it, and two so I can put a second battery in parallel with this one using the double terminals.
The inverter needs the capacitors pre-charged so I installed a 2P rocker switch in the bottom right of this photo, connected to the neg after the BMS and connected to the Pos via a 50W 100 ohm resistor. With the main 2P 125A breaker (on the left of the photo) off, the pre-charge switch allows 24 volt via the resistor to pre-charge the inverter before switching on the main breaker.
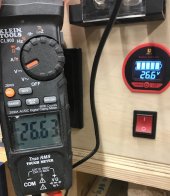
image3.jpeg

The pre-charge takes 30 seconds to pre-charge the caps, then flip the main breaker and turn off the pre-charge.
The activation button also shows either the SOC or the voltage - user selected. The touch screen also has a wake-up button but this looked fine above the pre-charge and it is quick and easy way to spot the SOC even from a distance.
I have been using these cells for a couple months now, but the case was only just assembled. Next up: setting up the garden cart for the battery and inverter. Stay tuned. More to follow.
 
Last edited:
The pre-charge takes 30 seconds to pre-charge the caps, then flip the main breaker and turn off the pre-charge.
The activation button also shows either the SOC or the voltage - user selected. The touch screen also has a wake-up button but this looked fine above the pre-charge and it is quick and easy way to spot the SOC even from a distance.
I have been using these cells for a couple months now, but the case was only just assembled. Next up: setting up the garden cart for the battery and inverter. Stay tuned. More to follow.
Impressive! Good to know I inspired someone in something! :ROFLMAO: You obviously put a lot of thought and planning into this and came up with some great stuff.

I've been ghosting y'all for a while now and apologize. It's been a zoo around here with a pot load of actual paying work that came up added to an already long list of projects. But this has inspired me back to get involved a little bit on here again.

Can hardly wait to see your "more to follow".
 
Impressive! Good to know I inspired someone in something! :ROFLMAO: You obviously put a lot of thought and planning into this and came up with some great stuff.

I've been ghosting y'all for a while now and apologize. It's been a zoo around here with a pot load of actual paying work that came up added to an already long list of projects. But this has inspired me back to get involved a little bit on here again.
And maybe - JUST MAYBE! - we (and by WE I mean @timselectric and I) will be able to temp ya into trying a DIY Battery ETC! :ROFLMAO: ;)
 
Very nicely done! I like it, well thought out.
I'm kicking myself for not ordering more of those Envision cells.
Thanks 42Ohms!
I ordered a few items for this build that have not arrived, including spring loaded heavy duty lift handles, a few push-button style re-setable breakers, and a silicone heating pad on it's own thermostat. Will add these when they arrive, and see how it all does in 'action'.
 
The MPP 2724 is a small inverter. literally 15 inches wide x 13 inches tall and 4 inches thick.
It comes with what I think is a unique feature - US type outlets (and a few USB) built right into the left side of the case:
image2.jpeg
I am unaware of any other AIO with this feature. {correct me if you know another model like this}
With the outlets built in, I picked this unit for my mobile power station.
I have tested it with a wire feed welder, a steel-cutting chop saw, 7" angle grinder, an 8" worm-drive skill saw, and with sufficient battery hooked up it runs all these big loads. This lead me to ordering the cells in post #1, so I would have enough battery amperage to supply what the inverter needed to start those high inductive load tools.
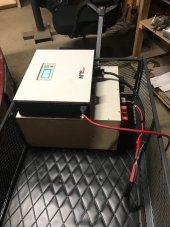
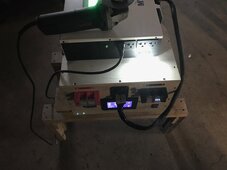
With the battery built, time to get some wheels under it, so it is mobile:


image3.jpeg

I picked up this 'Garden Cart' at Canadian Tire {our version of...ok you don't have a store like this really, half way between Walmart and Lowes}
It is 4 feet long and 2 feet wide inside the fold down sides. Here it is just sitting, waiting for me to decide how I want to secure it, which direction it should face in the cart, and if the inverter should be flush on the back or front or centred. The plug and cables are way too long, from it's last location on the wall of the green house. Part of the idea of the cart is to do double-duty in the green house, doing green house things.

I could install a cross wall inside the cart, to keep the inverter/battery separate from other cargo, as well as keeping the inverter/battery from sliding around. I ordered some clamping tie-downs that would attach to the battery case, and clamp to the cart. Will see how these fit/look when they arrive.
I have some smaller clasps that would be suitable to hold the inverter to the battery. I made the battery case 1/2" wider than the inverter so they can easily be connected with clips of one type or another. Now I have to pick which way to do this, and if I will mount the inverter to a board first or not.

The other item I am working on is a roof/side shields so the inverter and battery are protected if working outdoors and it starts to rain. I am thinking of clear plastic plexiglass for the roof so I can still see the screen and all the displays etc. Set it sloped towards the front of the cart, so access to the plugs remains easy.

I have a 'brake' for bending sheet metal, so I could just brake form a removable roof and sides all one piece, but I like the idea of clear material. Window in the metal?
I have also pondered brake forming a metal cover just for the battery case, to cover top sides neatly and be more water resistant. Still thinking about that as an option.
 
And maybe - JUST MAYBE! - we (and by WE I mean @timselectric and I) will be able to temp ya into trying a DIY Battery ETC! :ROFLMAO: ;)
That's a big maybe! But you never know. I've been so tied up with other DIY projects I'm not seeing it in the near future, but that doesn't mean it won't happen someday. I know it's not a difficult build, and with the way my production has been this winter I also know I need some serious upgrades, including a lot more batteries.
 
WE will keep pecking at ya until one day soon you try out a DYI pack, THEN YOU WILL BE HOOKED! LOL :ROFLMAO:
I don't have a problem with doing the DIY part. It's obviously not that much trouble. I've gone with the factory-built batteries in the past because there wasn't that much difference in cost and I expected to have less maintenance or warranty issues. Since last spring the bottom has dropped out of the cells from 18650 so there is a considerable savings now. Plus I have to say I haven't been thrilled with the EG4 batteries. Nothing major but I have two out of twelve that are having problems. I need to do some documentation on them and get with SS about warranty or whatever they recommend, but at this point it has me second guessing my decision. So yeah, I'm leaning more towards doing some DIY packs. Gonna be next spring at the earliest though. I want to sell some real estate and replenish the coffers before I dump another $20k to $30k into solar.

I knew I shouldn't have gotten involved in this conversation. I almost had my addiction under control. Somewhat. Kinda. :ROFLMAO:
 
LOL :ROFLMAO: Not letting you get away from us that easily!
Hey wait to ya see the price for battery cells!, been dropping, steady, so great time to get into DIY packs! :):):)
I looked on 18650 Battery and I can get 32 of the 304ah cells for $3,760. That's just a hair over the kWh of a six pack of EG4s at a few dollars less than half the cost. I realize you have to add in the busbars, BMS, and come up with a case or cabinet but that's a substantial savings. I've been planning on probably two more racks or approximately 60 kWh to add to the 60 kWh I already have. It looks like I could easily save $6k or more by going DIY. That would cover the cost of one inverter. Throw in the tax incentive and it's almost like getting it all for free! :ROFLMAO: :ROFLMAO: :ROFLMAO:
 
Hey guys, sorry for the delay, you know, life and all that stuff that gets in the way of What Really Matters - DIY Solar!
So back from an Arctic trip, and glad to hang out in the shop (and thaw out) LOL.
So, a few parts came in, and some don't run the way I was expecting, so we will discuss options and all that. Help me get this mobile unit to do what I need it to do, before the Greenhouse needs it back!

First up,
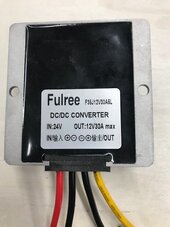
I got a 30A 24v to 12v DC buck converter - so I can use the auto outlet (ok I will admit I had the 12v plug running last month buy just feeding it from cells 1-4, but we all know any actual use like this would just result in out-of balancing the cells, but it worked for a short term fix and run a few small items. Now that the buck converter is in, I shoe-horned this into the bottom of the wiring area:
IMG_5098.jpgI figured, best to oversize a bit for a few dollars more, so bought the 30A even thou the outlet is 20A.
The install gave me an opportunity to add a push-button-reset breaker - this one is 20A, so I can easily reset if the breaker trips out, and this style is moisture and dust resistant, for the outdoor/greenhouse environment the mobile unit is designed for.
{See the new push button breaker reset under the 12v 20A label, to the right of the 12v outlet.

IMG_5100.jpg
I gave this a test to confirm opertion - all good.

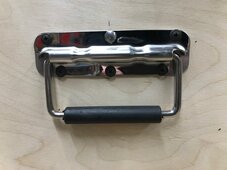
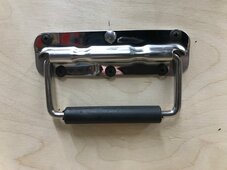
Next up I the spring-loaded handles I ordered had come in while I was away, so installed these: (5" stainless handles with rubber grips)
The springs keep the handles down and firmly against the case sides until you need them. These handles have 90-degree stops so they don't pinch your fingers while lifting the 100-lbs battery. As a test I left the inverter on top for an extra 30 lbs and lifted both together, and quickly put it back down. (don't hurt your back, what are you thinking...!)

IMG_5103.jpg
I didn't put these handles at the centre point from front to back, I put the whole pack on a 1/2" wood-dowel and rolled the dowel a bit front to back to find the balance point for the pack. The Cells are off-set to the rear of the case, a few inches, and this makes the balance point also a few inches rear of centre-line. Finding the exact balance point and centring the the handles at this line, keeps the case perfectly level when I lift it. It is heavy enough without fighting to keep it from tipping back as you lift.
IMG_5104.jpg
The other small item I added were a couple of small LED lights that are USB plugs, so I can plug them into the inverter USB outlets and this gives me sufficient light to see the plugs, and the display and terminals etc, Winter is DARK and a couple small lights make it so much easier to plug in some tools ! When the Inverter is turned off, the lights stay on for about 30-seconds, then go off. Perfect.
Next up: Self-Heating function for the pack, on a simple control. Stay tuned folks.

Edit: and my comment about 'something not working the way I want - I bought a 24v 120W silicone heating pad and controller to go inside the battery box, to ensure the cells remain above freezing, only problem is, the stat is opposite from what I want, it is closing the relay when temp is above set point, instead of below. - doesn't appear to be dual, no switch to reverse the operation. okay, I have a stat for cooling function I guess...
 

Attachments

  • IMG_5103.jpg
    IMG_5103.jpg
    72.6 KB · Views: 1
Last edited:
So did some experiments with the heating pad and stat.
There are a number of programable functions, and yup! one is a toggle between "C" and "H" = cooling control and heating control.
I also noticed they have built into the programable functions the range above and below set-point for "on" and "off" controls.
So today after the shop was done for the day, I had time to play with the test set up again, and now the stat controls the heating pad perfectly.
I am thinking of using a wide margin like 4-5 degrees C for the operating range, and when activated, have the silicone heating pad keep the temperature inside the battery box about 10C (50F).
I also noticed the Stat has a high limit shut down temp, so I will set this to maybe 30C to ensure the heating pad doesn't get on a break-a-way and go too hot.
The control display will be on the front exterior of the case, so always accessible for changing the settings anytime, and to immediately show the interior temp and set point temp when activted.
I have another push-button style resetable breaker for the heater - 10A that will go between Pos and one leg of the silicone heater.
Now I have to decide if I want the heater able to run with the battery off.

IMG_5119.jpg

If the heater is powered after the main breaker - it can't run if the breaker is off.
To allow the heating pad to run while the battery is say sitting in the box of the pickup truck, the breaker would need to be switched on. This makes the main breaker like a kill switch - off means everything is off.
However, the main breaker on, means the through terminals are live. That may not be a good idea while driving down the highway.
The heater only runs at 5A, and I have a bus between the cells and the main breaker so the BMS can be on with the battery terminals off, so I can connect the heater without the terminals being live. The control Stat lights up while "on" so it will be clear when the heater is on, and the Stat has it's own on-off button so the battery terminals can be on without the heater being active - for summer.
Connection after the BMS will mean if the BMS shuts down the pack, for low SOC or any reason, then the heater will also shut down.

This seems like the best idea, connect after the BMS but before the main breaker. Fuse the heater, and be able to have heating function on while main terminals are not live during transport. It would be easy enough to move the connection if I change my mind.
 
Last edited:
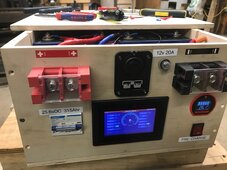
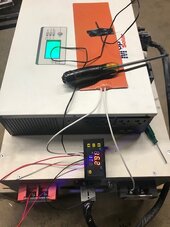
And the battery final result:
I installed the heating pads, and wired it up between the BMS and the the main breaker using an inline fuse.
The space for wires, and the size of the stat display resulted in swapping sides - precharge on the left and heater control on the right.
This seems more intuitive anyway, the pre-charge and the main breaker should be together.

Next I will work on the mounting to the cart, and a removable insulated cover for the battery/inverter for weather protection.
IMG_5126.jpg
 
And the battery final result:
I installed the heating pads, and wired it up between the BMS and the the main breaker using an inline fuse.
The space for wires, and the size of the stat display resulted in swapping sides - precharge on the left and heater control on the right.
This seems more intuitive anyway, the pre-charge and the main breaker should be together.

Next I will work on the mounting to the cart, and a removable insulated cover for the battery/inverter for weather protection.
View attachment 191239

Showoff

😁
 
Back
Top