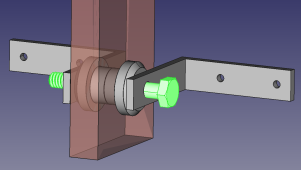
diy solar

diy solar

DIY M8/M10 connection terminal of copper bar, how to isolate the mounting?

Messier11

New Member
Joined
Dec 26, 2021
Messages
234
Location
Sweden
Hi guys,

When dimensioning my solar project all connections, joining 2 cables into 1 or splitting up cables as well, become rather expensive. An item like this often costs like 100 USD:
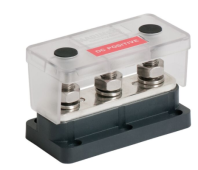
1645360574278.png
And when I look at cheaper options, they often have low ratings (like 48V DC (I am not sure if they really are true, and that they would burn up if you hooked them up to 56V, but I don't know, recon that is another topic).

But getting a large copper bar is not expensive and its of course easy to cut off and make holes in them with threads for the bolts. So that takes care of the connection, right. But how do I mount that bar to the wall of my installation? In my cabin, my installation is mounted on the wall where I basically have a chipboard with paint (original board), then a little bit of air, a plyboard and finally a plaster board on it. So in theory, one could even consider if I couldn't just screw the cut off bar right onto the plaster board, but that just don't feel right.

I know that these products exists:
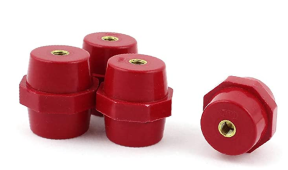
1645361924415.png
And I recon it might be overly cheap, but they are like 10USD a piece at Amazon, and it just seems like such an easy construction to DIY.

Have anyone a solution for how to mount a shorter piece of a copper bar on on a wall under these conditions?
 

I’d use thick piece of polycarbonate plate to mount the busbar. (Local plastic shop Etra sells cut-off pieces for 8eur/kg)

Thanks, the product in the link seems better than anything else I've seen!

But you would just use a polycarbonate plate to create a distance and then screw it into the underlaying board to which the gear is connected? In my case a plaster board on top of plywood? It should be alright, right? I just got afraid of some kind of arch being created... :)
 
Use wood. Attach a piece of wood to the wall then your copper to the wood. Make it as fancy as you want. Both a scrap of a 2x4 or a stained oak or cherry will be a great insulator.
 
Use wood. Attach a piece of wood to the wall then your copper to the wood. Make it as fancy as you want. Both a scrap of a 2x4 or a stained oak or cherry will be a great insulator.

Will do! Was actually what I thought of first.
 
This may be a bit out of the ordinary, I'll throw it out here.
Its not all that difficult to download a free version of Design Spark, watch a couple of YT videos and then develop your own 3D model of a suitable plastic insulator base in exactly the shape you want. Export the design as a .STL file and most commercial 3D printers can make your part. The fabrication cost of 3D printing is not super cheap. I would estimate 2 pieces that would replace the 4 red stand-offs shown in your earlier post would run about $100. So not going to save you any money but if you have the time and desire it is a satisfying process. IMHO

Thanks and great advice.

It’s at times like this I kind of regret that I haven’t gotten into 3D printing. Could definitely be used so much when building a system like this.
 
wood is a decent insulator but not a fan of mounting electric to it unless there is another barrier just because it can catch fire.
I'm using hardy board, it's a cement board if not familiar with. It can withstand around 1500 F for a decent amount of time.
They also make ceramic standoffs as another option to use.
edit to add, thats a great price on vte btw.
 
Look at the mass of this copper bar. Why would a copper bar we drill be more than 48 volts? Also this bar is rated for 300V AC at 545 amps, but only 48V DC at 600 amps?? Makes me wonder of the ratings.
 
The Amazon Gloaso offerings appear to be a copy of IMB Electric products. I would be suspect of their ratings without documentation.

IMB Electric busbar PDF

I understand Nickel plated brass is not the "absolute" best material combination but for a documented, multiple industry rated/conforming product -the VTE offerings are an excellent value, plus are usa produced with very good availability.
 
IMB Electric busbar PDF

I understand Nickel plated brass is not the "absolute" best material combination but for a documented, multiple industry rated/conforming product -the VTE offerings are an excellent value, plus are usa produced with very good availability.

That's a nice catalog of bus bars. Once you get to page 3 it looks like they're all tin plated copper.
 
Back on topic...

But getting a large copper bar is not expensive and its of course easy to cut off and make holes in them with threads for the bolts. So that takes care of the connection, right. But how do I mount that bar to the wall of my installation?

I'm planning to experiment with these electrically-insulated ceramic sleeve washers from both sides to capture the bus bars in my next installation: https://www.mcmaster.com/92107A461/

I'll report back once I've got them in hand and know more about how they're going to work.
 
Back
Top