diy solar

diy solar

Solar house generator I started DIY back in 2000 - My path from Trace to Xantrex (on FLA battery) to XW Pro inverters on Tesla Model S batteries

A fast service delivery came today that I didn't expect until next week

I replaced these 10 year old golf cart T105 batteries from my 12v solar system (HAM, backup lights to the backup house system, etc)

View attachment 31819
The best day of my life was ripping out my 4 Trojan T-105's and putting in the 8 Battle Borns.... :)
 

Attachments

  • EE78595C-65A1-4EB9-89A8-573E6962B299.jpeg
    EE78595C-65A1-4EB9-89A8-573E6962B299.jpeg
    113 KB · Views: 14
  • 5116813B-E2CC-4E99-B2E5-C3CF33C47867.jpeg
    5116813B-E2CC-4E99-B2E5-C3CF33C47867.jpeg
    92.2 KB · Views: 14
Don't get me wrong, the lithium batteries on the market are great, but my wallet is not that deep
Plus, what fun is that... simply unboxing and hooking up.... you're not a no code tech/machine operator... you're old school ham, half the fun is the design and building.
 
Jack mentioned in this last video (or the one prior to that) that he had set things up to have the business continue on.

I think I got the ESP32 in less than 2 weeks. I think it was in stock

As to price, so many look at the $2500 price (not knowing you need another $1000 of various parts to connect things) and say: Too much, but heavens. EACH Simplify battery is $2900 for only 3.8kwh (48v) vs the $1200 (24v) tesla that has 5.2 kwhr

I bought my Teslas one at a time OVER time as I got the pennies. Now as mentioned, I am coming up on 30kwh of storage

6 * $1200 is $7200 plus the $3600 for the ESP32 and parts, that is $10,800

compared to the $23,000 for the Simplify's with equal storage size.
For those want lots of storage which is more expensive

I grant it costs too much for just 1 or 2 modules, but when your target is 20 ..... no question then

Linux Mint is my workstation's OS and I love my 12 Raspberry Pi's - and growing
Debian rocks
 
Plus, what fun is that... simply unboxing and hooking up.... you're not a no code tech/machine operator... you're old school ham, half the fun is the design and building.
to be honest, I got my General ticket on the first day of "No need for Morse"

I never wanted to be a human modem
 
You are a Schneider gal as well! Yeah
The Schneider gear is what I'll use when I build the cabin and put up the 20 370 watt mono panels I have in storage, that will be when I build out the Tesla system. On my RV I threw them in to test them and ran it as a 4S2P 48VDC 20ah but I was clipping the ceiling on the 150 volt charge controller with the panels on top of the RV (was running approx 160VDC) so I ripped out the Schnieder and put it in storage till I do the build and replaced it with Victron running 800ah at 12VDC (all parallel). I bought 4 Tesla's in one ebay auction and I'll do the same as you, buy them as I can afford them and need them. :)

I modeled my system after a friend of mine (a fellow Canadian) who lives down in south east Arizona and did a series of Youtube videos using the other style Tesla modules... link here to his playlist with lots of good videos: https://www.youtube.com/playlist?list=PLhdSS6wmVEgN_8yCyASTMPEC6fE71AfIE

Truth be told, I'm not to happy with Schneider at present. I bought the SW4048 because it was advertised as able to be stacked and everywhere I looked sold the stacking kits for it and still are, see link below.

https://www.thepowerstore.com/schne...FhhgBVjjufyJzSTlgqaatAhEnFjgMA_hoCcmQQAvD_BwE

Now that I bought it, they out of the blue have revoked any support for stacking the units due to firmware issues they're having. Keep in mind the XW's are still stackable and they've not revoked that feature from them... I suspect this may be an effort to sell more XW's and I'm not impressed.


No give a feces for all of us who bought them because they were stackable, just out of the blue, removed a huge benefit that some of us purchase it for... oh well, too bad so sad I guess they feel.... here's a video of a stacked system and was hoping to do the same with mine.


Attachments

  • 844DE319-BBE0-461B-8656-F77B2D9E4D76.jpeg
    844DE319-BBE0-461B-8656-F77B2D9E4D76.jpeg
    86.5 KB · Views: 6
  • BCC075D9-A6F9-49C8-8903-8E9120184FA6.jpeg
    BCC075D9-A6F9-49C8-8903-8E9120184FA6.jpeg
    113.1 KB · Views: 6
  • 8DF678C5-DBE4-46F3-9A09-EE1FFD17A9C0.jpeg
    8DF678C5-DBE4-46F3-9A09-EE1FFD17A9C0.jpeg
    93.6 KB · Views: 6
Last edited:
Battery Number 6, received, at room temperature and 22.7 volts

battery pack at 23.6 volts and slowing falling. I will be watching it this evening until it too reaches 22.7v, when it does so then switch the house to the grid off of the battery. Will disconnect the inverter from the pack, watch the voltage for it to stabilize for a bit and then connect and insert #6 into the pack, and let it stabilize with the ESP32 controller attached while it performs the balance act.

Finally, will reconnect the house back to the battery to be off grid

jan 2021 Battery #6.JPG

Will take an after picture as well

dougbert
 
The Schneider gear is what I'll use when I build the cabin and put up the 20 370 watt mono panels I have in storage, that will be when I build out the Tesla system. On my RV I threw them in to test them and ran it as a 4S2P 48VDC 20ah but I was clipping the ceiling on the 150 volt charge controller with the panels on top of the RV (was running approx 160VDC) so I ripped out the Schnieder and put it in storage till I do the build and replaced it with Victron running 800ah at 12VDC (all parallel). I bought 4 Tesla's in one ebay auction and I'll do the same as you, buy them as I can afford them and need them. :)
I meant 4S2P 48VDC 200Ah, not 4S2P 48VDC 20Ah but no edit button... woops.
 
Battery Number 6, received, at room temperature and 22.7 volts

battery pack at 23.6 volts and slowing falling. I will be watching it this evening until it too reaches 22.7v, when it does so then switch the house to the grid off of the battery. Will disconnect the inverter from the pack, watch the voltage for it to stabilize for a bit and then connect and insert #6 into the pack, and let it stabilize with the ESP32 controller attached while it performs the balance act.

Finally, will reconnect the house back to the battery to be off grid

View attachment 32661

Will take an after picture as well

dougbert
Very cool.... hey, is that a Klein, I have the exact same one... great meter...
Jen
 
Battery number 6 is now installed, connected and the pack is at 22.7 volts and the house is OFF-Grid and on battery

1400 amp-hr pack - abt 30 kwhr - my hope is that the system will stay off grid more

Battery #6 installed and connected.JPG

all current batteries

Alll 6 batterys in 1400ahr.JPG


nearly 1AM, house is drawing 790 watts of load, batteries are at 22.7
sun is 7 hours away and plenty of energy to stay off grid for the night
SoC is 77.5%, grid CUT-IN happens at 19.1v when SoC is 26%

pack is at 22.7 volts.JPG


data for this past month's billing - From the 8th to the 7th
So for this past December, 61.11% of the energy consumed came from the sun
Last December 2019, 32% of the energy consumed came from the sun (That was on Lead Acid batteries)
I will get the ACTUAL bill on the 15th for final actual and cost numbers


Bought
Generated
Percent
Actual
Cost
Kwhr
329​
516.92​
61.11%
cost/kwhr $
0.0868​
Elec cost
$28.56
$44.87​
HLP Fee
$14.70​
UT Tax
$0.52​
Total used
845.92​
Wasco Tax
$0.07​
Heber Tax
$0.26​
Fran tax
$1.57​
Hwy Tax
$0.08​
Total Tax
$2.50
Total Bill
$45.76
$90.63​
 
Last edited:
Question, have you done any testing to see if you're losing any charge (inbalance) into or out of that bottom battery by feeding/drawing from the top one instead of having one of the legs go to the other end like instead of having the red circles, like the green, drop the negative down to the bottom for better balancing, or do you think the oversized cables are accommodating for any loss?

1610392120575.png
 
I have done no testing on placement of the inverter tap points. In Jack's Powersafe 100, he uses flat copper bar with the inverter at the top of the stack, drawing at the top just like I have done above.

With those 4/0 cables, each side is basically shorted together. Those are big cables and can handle 600+ amps while my max will be on the order of 240 input from solar, so voltage drop probably won't be much.

Also I am drawing down 500+ amp-hrs a day, so each battery is contributing and being recharged.

With that 6th battery, I generated 28.7 kwhr today, again my highest every
Production was like 5kwatts in bright sunshine

dougbert
 
But millivolt differences with lithium is significant SoC difference.
At least connect inverter to diagonally opposite corners.
Best is if you can do symmetric wiring for perfect balance.
 
I have done no testing on placement of the inverter tap points. In Jack's Powersafe 100, he uses flat copper bar with the inverter at the top of the stack, drawing at the top just like I have done above.

With those 4/0 cables, each side is basically shorted together. Those are big cables and can handle 600+ amps while my max will be on the order of 240 input from solar, so voltage drop probably won't be much.

Also I am drawing down 500+ amp-hrs a day, so each battery is contributing and being recharged.

With that 6th battery, I generated 28.7 kwhr today, again my highest every
Production was like 5kwatts in bright sunshine

dougbert
Yea those bars and 4/0's will sure help compensate for that..... just keeping an eye on your build as I do mine, you've got some great ideas.. thanks for posting.

73
Jen
 
But millivolt differences with lithium is significant SoC difference.
At least connect inverter to diagonally opposite corners.
Best is if you can do symmetric wiring for perfect balance.

Eventually the 4/0 cables will be removed and replaced with a 2"x1/4"x6' buss bar, copper core, and tinned. (See pic below for comparison)

When I get 5 rows of 2 modules, that will become more practical
This is what Jack Rickard did in his Powersafe 100 product.

Remember my goal is to have 20 of these modules eventually, 2S10P configuration, just like the Powersafe 100


Flat buss bar.JPG

I measured voltage difference between UPPER left and right with UPPER left and LOWER right and there was a .02 volt difference.

I do have a length of 4/0 I can extend the POS leg going to the battery from UPPER right and move it down to LOWER right.

And what do you mean by 'symmetrical wiring' specifically?


thanks
 
While waiting for more pennies for buying battery number 7, my next task is to install the bigger 240v Inverter Bypass Switch. My 24v DC to AC inverter is only 120v AC input/output. My next inverter will be 240v AC and I need (and now have) a new Inverter Bypass Switch to be installed.

The Inverter Bypass Switch allows switching between 2 AC sources (1 the grid or 2 the inverter, but not both at the same time) and powering the 'critical' service panel.

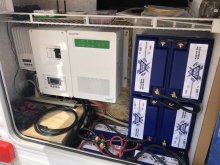
This next picture shows these switchs/panels:

The service panel is the obvious large box in the upper center and to the upper right is the white 24v inverter.
Currently mounted on the board, is the current (small) bypass switch with the red tags/signs on it.

Then on the upper left shelf, is the new (to me) 3 position 60 amp ON-OFF-ON bypass switch. When the red handle is up, the grid will be powering the service panel. When in the middle both will be disconnected. When the red handle is down, then the inverter will power the service panel.

It is a 3 pole switch, which allows L1, L2 and neutral wires for the 240v to be switched between the 2 sources.

20210128_220020.jpg

Looking further to the right, is the complete inverter and to its right, is the 250 amp disconnect switch feeding the inverter.
Under them are the solar controllers for Arrays 4 and 3, left to right. And the 4 array disconnect breakers, 80 amps each, on the very lower right.

20210128_220023.jpg

Further to the right we see array controller #2 below, then controller #1 above it.
Furthest right is the battery shelving unit. Between the 250amp breaker and array #1 controller are the 4 incoming 60amp breakers from the 4 arrays.

20210128_220045.jpg

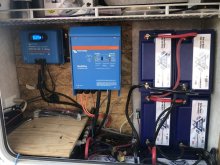
Update pictures as of today
 
Last edited:
Back
Top