diy solar

diy solar

Stud Alignment Concerns

Woody

Solar Enthusiast
Joined
Dec 13, 2020
Messages
167
Location
High Plains Northern Nevada
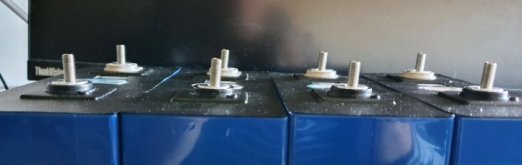
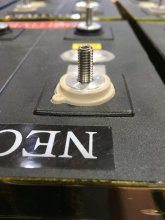
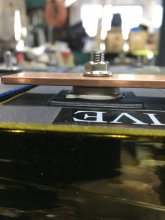
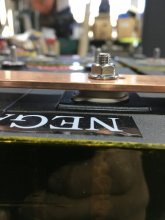
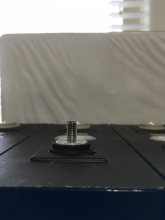
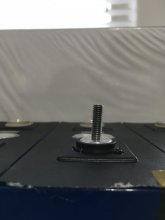
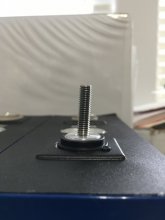
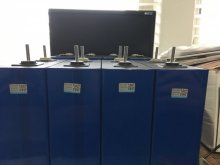
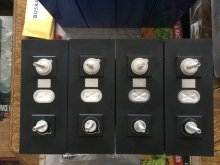
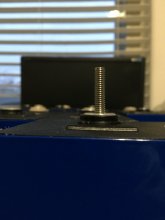
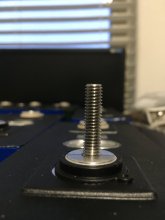
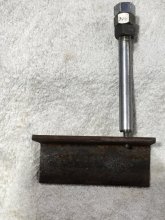
Just received my 16 280Ah LiFePo4 cells that were ordered back in November 2020 and I’m just starting the unboxing process. All cells arrived in physically good condition. As I started to install the M6 studs, I observed an issue with the cells. Some of the terminals on the cells were NOT drilled and tapped well. Some holes still had threading debris in the bottom of the holes. Must inspect and clean out all tapped cell terminal holes. The holes are not that deep, so I need ever millimeter possible in order to have a firm stud fit. After installing a couple of studs, I observed that some of the terminal holes were drilled and tapped off axis. Because there has been a lot of discussion regarding how to properly torque the bolts/studs to the cells, the poorly drill and tap issue could be why some are stripping out their terminal holes.

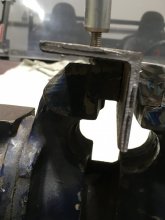
Since I‘m just starting the inspection/QA process on these cells, I haven’t give much consideration on how to compensate for the studs being off true from the vertical axis. I’m using 1/8” x 1” flat copper busbars with M6 serrated flange hex lock nuts so the studs and terminals are going to be under a bit of force to align back to vertical. I might need to install the studs, observe the off axis angle, remove and pre-bend these studs. Then install studs with thread locker. This along with fabricating the bus bars with slightly oversized elongated holes will help a bit to reduce the twisting forces on the terminals.

Thoughts / suggestions??


Attachments

  • C69C07B7-ABF6-4868-8B04-E79F716D089D.jpeg
    C69C07B7-ABF6-4868-8B04-E79F716D089D.jpeg
    100.5 KB · Views: 60
  • AB78EA1F-C9CB-4948-81B0-B2556479FE2B.jpeg
    AB78EA1F-C9CB-4948-81B0-B2556479FE2B.jpeg
    33.6 KB · Views: 58
  • 127B6B79-5684-4386-80A7-2FC4C225B90C.jpeg
    127B6B79-5684-4386-80A7-2FC4C225B90C.jpeg
    40.8 KB · Views: 54
  • 7C3E9E0B-74E4-4EB8-B290-F1F537D179EF.jpeg
    7C3E9E0B-74E4-4EB8-B290-F1F537D179EF.jpeg
    43.6 KB · Views: 55
  • 7AA18BFF-57C1-4C5E-BDD5-EF2F0F9ED8F6.jpeg
    7AA18BFF-57C1-4C5E-BDD5-EF2F0F9ED8F6.jpeg
    58 KB · Views: 59
Well .... Those are about as messed up as any I have seen posted .... really bad when they don't even get them straight or consistent depth.

Curious what vendor you purchased those from?

The weak threads is emerging as the biggest problem with these cells.
 
In that first pic, the terminal has what appears to be a "pattern" of wear on it....like it was clamped or resting on a rough but evenly patterned surface (or more likely, something was clamped down to it...maybe a braided bus bar?)

I just posted this pic in a separate thread, and it looks like some of those terminals have a similar wear pattern...thought admittedly its hard to see in that picture.

Are the cells from Xuba?

3CF5B7BAC72D95C0CAA9061C43CC2A45.jpg
 
I purchased these cells from LitokalaVariCore Flagship via AliExpress. The only cell identification on these cells are the QR code denoting: VariCore Original Product, www.varicore.cn, YINQIAN ELECTRONIC TECHNOLOGY CO LTD.

Not to surprised over the quality control issues as long as the product is usable. Years of experience has shown that if you need tight specification/requirements on parts from China you need to do a lot of due diligence on vendor selection and incoming testing/screening is a must. Expect culling of parts. Worst I’ve seen was a +90% parts rejection on a batch of high precision resistors. That was another lifetime ago. As such, I plan and design systems using these parts in a degraded specification to begin with. Otherwise one must test and screen these parts. You also need to purchase more parts than you need to cover rejects. I see a lot of users doing just that to obtain a quality build. I just want a decent diy battery bank and will be very happy if the final design is within 5-10% of claimed capacity since I doubled the design capacity upfront.

I know I can make these poorly drilled/tapped hole work but the aluminum terminal is rather soft, the hole isn’t that deep, the stud angle is enough to put a fair amount of disproportionate stress on those threads and a firm tightening of the nuts might be more than enough to fracture the threads off. In giving this a bit of further thought, to compensate for the stud angle and provide a flat surface for the nut, I could machine a slight bevel in the top busbar where the studs come through, or modify washers to make a beveled/tapered washer, or try something else. My thinking is to get the stud bent back vertical and not make a lot of extra work ie K.I.S.S. I‘m interested in hearing how others addressed this issue and/or suggestion on how they would address it.
 

Attachments

  • 39C28BBA-3D52-43C2-8E3D-9CBE529B46A0.jpeg
    39C28BBA-3D52-43C2-8E3D-9CBE529B46A0.jpeg
    69.5 KB · Views: 20
Straightening the screw/stud would be challenging since it is so short.

A slight bevel on the bus bar seems to be the easiest solution to me.
 
The holes are quite small compared to terminals.
Drill oversize and square in a drill press (or mill), and tap larger?


Now this may look like it comes from the chart we've all seen with bolts for offset holes etc. ...

But how about leveling washers? Might be a perfect fit!


(Once again, don't complain about the price! I'm offering technical solutions, not value. Something tells me these are machined, not stamped.)
 
Wow, those spherical leveling washers a really neat. I didn’t know that they made these but is is why I ask for help/suggestions. This forum rocks!

The price tag is a bit step but a viable solution. The bevel busbar notch might be my budget solution since I have the means to do it. It just takes my time. I’m thinking as of the moment to try the stud bending solution first with the 30mm studs. The studs are long enough to work with and I can cut them down to size after the busbars are installed. I’ll machine a bevel on the bus bar too. I want to see what is the best solution with the least effect and cost too.

Thanks for the suggestions. Any other ideas?
 
Thanks for the suggestions. Any other ideas?

Yeah, since you're going to strip the threads in the end anyway. Or have poor contact. Or both ...
Cut/drill a larger size hole, straight up this time, and use larger studs?
The only real trick is making sure the process doesn't exceed the torque those terminals can handle.
 
Hedges sarcastic reply isn't without merit. Once the studs are installed, there is no way I would do any machining of the stud, such as cutting it to length. Given the fragile nature of the terminals threads, I wouldn't touch the studs at all once they're installed. The more you put them in and pull them out, they get looser and looser. A stainless steel stud could cause wear on the threads the more it is used.
 
Wow, those spherical leveling washers a really neat. I didn’t know that they made these but is is why I ask for help/suggestions. This forum rocks!

The price tag is a bit step but a viable solution. The bevel busbar notch might be my budget solution since I have the means to do it. It just takes my time. I’m thinking as of the moment to try the stud bending solution first with the 30mm studs. The studs are long enough to work with and I can cut them down to size after the busbars are installed. I’ll machine a bevel on the bus bar too. I want to see what is the best solution with the least effect and cost too.

Thanks for the suggestions. Any other ideas?
If you put a washer and nut on the stud and tighten it down does the stud stand up perpendicular to the top of the terminal?
If it does you could put thread locker on the threads and tighten it lightly and let it dry.

Otherwise, you could put in helicoils. See resources I just posted a document that shows how to make sure the thread axis is normal to the terminal.

I think this is for holding a tap perpendicular if you don't have a drillpress -

1612018571046.png

 
Last edited:
Here’s a couple more pictures illustrating what I need to address in assembly my battery bank. The first two pictures illustrate the leaning problems.

Milling bevels into the busbars requires to many different angles, makes the busbars less usable in future battery builds, and just requires too much time to implement. Love the conical washer approach but the price for them is more than I would want to spend. I need too many of them. The approach that I’m going to proceed with is to install the stud, note/mark the side that needs to be bent back, remove the stud, insert it into my bending apparatus, bend stud, reinstall/verify stud is vertical or almost vertical. Pictures 3 and 4 denotes studs bent to compensate for the poorly tapped holes. Not perfect but should be good enough. This is the cheapest approach and if it fails, well I’ll be going the drill tap helicoil route. At this time I’m waiting on Amazon to deliver my 20mm studs so that I can start this process. The 30mm are too long.

Pictures 5 and 6 are of the bending tool I made from scrap to manually bend the studs. The base and rod are threaded to keep the threads intact, allows for proper alignment position for the stud and it seems to work well enough from my initial testing. I’ll update this post once I get further along with this effort.
 

Attachments

  • 476BB015-4B19-4404-AE23-1DB046324821.jpeg
    476BB015-4B19-4404-AE23-1DB046324821.jpeg
    37.2 KB · Views: 55
  • F43D1046-414E-4A9D-B883-F2511BA9F2A3.jpeg
    F43D1046-414E-4A9D-B883-F2511BA9F2A3.jpeg
    61 KB · Views: 48
  • 80FF56C4-313B-401F-A11C-B690D07E4A36.jpeg
    80FF56C4-313B-401F-A11C-B690D07E4A36.jpeg
    59.7 KB · Views: 43
  • FBAD5FF3-67B4-4ED8-B804-335B67DD5AFE.jpeg
    FBAD5FF3-67B4-4ED8-B804-335B67DD5AFE.jpeg
    67 KB · Views: 43
  • 47322D54-E821-4655-9654-9D8B4639D1ED.jpeg
    47322D54-E821-4655-9654-9D8B4639D1ED.jpeg
    149.5 KB · Views: 47
  • 3C5BCFFD-8AF8-4771-90E5-BF39CE61857F.jpeg
    3C5BCFFD-8AF8-4771-90E5-BF39CE61857F.jpeg
    83.2 KB · Views: 55
Sorry these turned out like this. I had just placed an order from the Liitokala VariCore Flagship store because they were first on Wills suggestion page but after seeing this I’m canceling my order and going to do some more research before buying more. I’m comfortable with electronics, but the potential of having to drill and tap new threads on brand new high capacity batteries is a little concerning for me. I see some other threads with batteries that come with laser welded bolts to connect to and will probably be looking into that option closer.
 

Attachments

  • edited_20210227_100513.jpg
    edited_20210227_100513.jpg
    24.5 KB · Views: 19
Last edited:
Has anyone tried to use them as is?
The aluminum is so soft that they will straighten out some even with normal torque.
And the stud will bind so it will probably be just as strong as a straight one.

Seems worth a try. I'd be pissed if I got my cells like that.
But if they hold the correct torque I think they would function the same as any other cell.
 
Following the lead by @Hedges ..I wonder, could something like this save the angle at a better price?

Asking, as got myself the same trouble:)
wowsers those holes are drunk as hell! are they drilling them with a hand drill LMAO.
Almost worth asking for them undrilled if you have a drill press
 
The washers for bike calipers look like a cone, not a spherical shape.

How about a short piece of 1/4" soft copper tubing? It would start to crush and spread out contact.
Maybe cut a wedge shape with hacksaw instead of square with tubing cutter.
 
My terminal holes were nice and straight. There was a sticker that said, "Drilled by Irene." Check around for a sticker on yours that says, "Drilled by Ilene."

And, to hopefully lighten the mood...

 
Has anyone tried to use them as is?
That is my plan actually. At least try it before going for a redrill M8 option (will go for it if any thread breaks/messes up)

The washers for bike calipers look like a cone, not a spherical shape.
That's what I was afraid/did look suspicious to my eye, too. Too good of a deal:)

This looks better ... if can figure out what to do with an extra 92 pieces :D
 
This looks better ... if can figure out what to do with an extra 92 pieces :D

Resell them for $8 apiece. ($0.80 for forum members)?

I needed a small plastic bb but NSF approved, as check valve for a water pump. McMaster-Carr had what I needed, bag of 100 for $8 plus shipping. I can now overhaul my espresso machine every 10 years for the next millenium.

 
Has anyone tried to use them as is?
The aluminum is so soft that they will straighten out some even with normal torque.
And the stud will bind so it will probably be just as strong as a straight one.

Seems worth a try. I'd be pissed if I got my cells like that.
But if they hold the correct torque I think they would function the same as any other cell.
I'll be honest (not directed at you), I would be contacting my credit card and doing a charge back. This is just idiots thinking they can screw us, not a chance they didn't notice.
 
Please post how things work out for you with the charage back.

I’m looking at this as a learning adventure. Originally I thought this would be a simple assembly effort to make a high capacity lifepo4 battery on the cheap. Well its not working out that way. Lots of little extras to big extras in using this style of lifepo4 cells. Swelling issues, bus bar issues, heating issues, need to top balance, need to measure internal resistance to validate cell quality (so new/more equipment). Would be a simpler assembly if I choose the heavy bolt terminal style cell like for a car set up and or used the axial style cells. Still will need to verify cells and top balance assuming it’s a diy battery. Boy those lifepo4 ready made batteries are looking better all the time. However, I chose not to go with them because of cost and lower AmpHour available cells. When I’m done I’ll go a cost comparison/hot wash on my experience.
 
Following the lead by @Hedges ..I wonder, could something like this save the angle at a better price?

Asking, as got myself the same trouble:)
I’ll be tracking how things work out for you guys. I’m trying to repair a stripped thread with a Helicoil and worried the hole I drilled may be off-square and the resulting grubscrew may not be orthogonal to the aluminum terminal. But no matter how bad it comes out, it won’t be anywhere near as bad as these pics!
If these adjustable slope washers do the trick, you will have pioneered a new solution here on DIY Solar Forum!
 
I’ve finished bending the stainless studs last weekend. Far from perfect but a lot better. I bent them with my homemade bending tool. With the copper bus bar on them I see that the nuts are almost perfectly flat. Prior to bending the studs, there was a large gap on one side of the nut while touching on the opposite side. I‘ve loctited the studs at the battery terminals and my plan is that once I tighten bus bars down at the terminal studs, I will not fiddle with them. I’m fabricating the bus bars with a bolt in the middle for the connections to be made. This way I hope to minimize any additional stresses on the aluminum battery terminals.
 

Attachments

  • 5A908D6B-2CEE-4EEA-8471-700A740987A3.jpeg
    5A908D6B-2CEE-4EEA-8471-700A740987A3.jpeg
    106.3 KB · Views: 27
  • 3CF9B59D-0314-45BB-B544-990BA68BD3A9.jpeg
    3CF9B59D-0314-45BB-B544-990BA68BD3A9.jpeg
    78.8 KB · Views: 28
  • 41C89ADC-9D48-4455-8D11-78D9B85C051B.jpeg
    41C89ADC-9D48-4455-8D11-78D9B85C051B.jpeg
    79.8 KB · Views: 27
@fafrd, On the leveling washers from alibaba - I even found some who are ready to send smaller quantities - 10 or 50. Overall good&responsive service, got blueprints/able to select diameters and "move angles" ... affordable unit price (<1$), but shipping makes it expensive (40-60$ to Europe). Maybe for somebody with 32 or 64 cells all misaligned (what a mess that would be :D), but as I need only 8 pieces - too much for me.
Have bought everything what's needed for tapping (regular and tap drill bits <10$), just need to arrange visit at friendly drill press. And also ss grabscrews (but that should be easiest part).

Meanwhile living with angled studs ... gave it a test with 1kW heat gun for an hour and could not tell the difference (e.g. inverter getting power, studs not heating up). The only strange behavior was input terminals of my 1.5kW inverter heating up (up to 70-80C/160-175F), but that's different topic.
1615479300290.png
 

diy solar

diy solar
Back
Top