diy solar

diy solar

Topband Navitas Prismatic at BH

adding salt speeds up the reaction. not sure exactly why-I'm not a chemist, just the recipe I've used since high school.

I clean a lot of small bus bars, and I've always used the muriatic acid for a quick pickle, but the surface ain't pretty. There's absolutely no oxide or surface contaminates, but they're kinda odd looking. I'm lazy, so I want as little touch time as possible, but I want them pretty. I usually throw them in a vibrotumbler with cut steel rod and soapy water. Sometimes they come out amazing, and other times, it just sucks.

I still haven't arrived at the perfect formula, so I might give yours a try.
 
so after reading all 8 pages i assume these are decent starting batteries for someone as a first backup option, when i beginner i dont mean absolute beginner, i have installed solar systems and a electrician
 
I would go with the Daly one in the screenshot.
You'll probably want some kapton tape to keep everything together, and if you've got a 3D printer, I can send you some files to print to make a nice cover for the top to protect the cell connections.

I would also recommend getting some 1/4in crimp on ring terminals to make the BMS balance lead connections, and you'll also need some kind of connector for the pack (I assume since you're doing ham radio, you'll be using powerpoles, but I use XT60s for all of my radio gear).

You'll also need a charger, and i'd recommend a CC/CV benchtop power supply for top balancing before you build the pack up.
 
I would go with the Daly one in the screenshot.
...
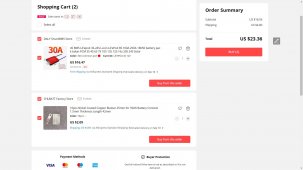
Thanks, I ordered the BMS, Bus bars and a 10Amp Charger.

Kapton tape in Amazon shopping cart.

Nope, don't do 3D Printing.

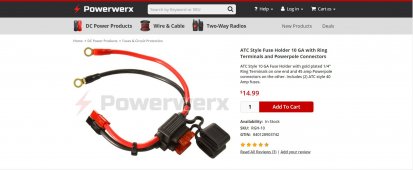
Got crimp on terminals. I'll use one of these:

Fused connector.jpg

"CC/CV benchtop power supply"

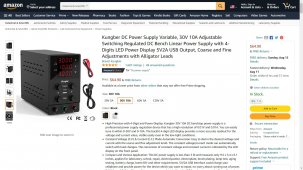
Yeaup I knew that was coming. I've been reading some of the threads. This looks like my pick so far:

Bench Power Supply.jpg

So...
~$75 for the batteries with tax & shipping
~$75 for the BMS, bus bars & charger
~$75 for Power supply & tape
$225 is more than the Bioenno 20ah and less that the 30ah. But look at the learning experience!
 
Looks like a pretty good set of stuff.
As you said, the learning experience is great, and once you have the equipment and knowledge, it becomes much easier and cheaper to build your own packs in the future.

I have a 50Ah pack I built for POTA, which runs my FT-891 at 100W for way longer than I ever need, and I also have a 75Ah pack I built for another radio box which has a TS-480HX, FT-891, and a TM-V708a together with a solar charge controller, raspberry pi, and a 15in 1080p LCD display.
I love it! Pictures!

I have the FT-891 - had it less than a month. Played with it some in the shack but it hasn't ben to the woods yet.
 
I love it! Pictures!

I have the FT-891 - had it less than a month. Played with it some in the shack but it hasn't ben to the woods yet.
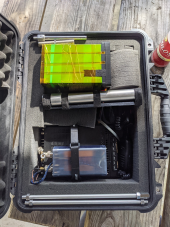
Here's the small box for POTA:
1628544191054.png
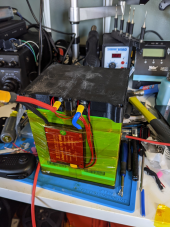
FT-891, 100W tuner kit from ebay, 50Ah pack with the navitas cells (4S2P with a Daly BMS), SuperAntenna (can't remember the model number, but it's an old one) in a Pelican 1550.

Here's the 50Ah pack itself with the 3D printed cover.1628544364053.png

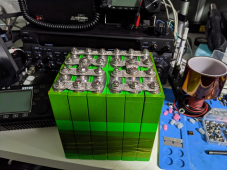
And here's the big 75Ah pack (4S3P), before the BMS was installed, while I was building it:
1628544701589.png

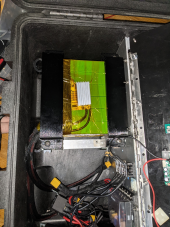
And here it is installed in the Pelican 1650. I built a mount for it out of some aluminum extrusion, random bits of aluminum bar and angle I had lying around, rubber shock rings, and some 3D printed mounting parts. The wiring is a bit of a mess in this photo, but it's been cleaned up since then, lol.
1628544924398.png
 
~$75 for Power supply & tape
Make sure that when you get the bench power supply that you make your own leads with ring terminals and high quality 10 or 12 awg wire. The voltage drop across the wimpy leads, crappy connections (mine didn't even have the wires properly stripped, they just crimped the alligator clips so hard they punched through the insulation), and alligator clips can be pretty extreme, and severely limit proper charging.
 
Thanks, I ordered the BMS, Bus bars and a 10Amp Charger.

Kapton tape in Amazon shopping cart.

Nope, don't do 3D Printing.

Got crimp on terminals. I'll use one of these:

View attachment 59413

"CC/CV benchtop power supply"

Yeaup I knew that was coming. I've been reading some of the threads. This looks like my pick so far:

View attachment 59416

So...
~$75 for the batteries with tax & shipping
~$75 for the BMS, bus bars & charger
~$75 for Power supply & tape
$225 is more than the Bioenno 20ah and less that the 30ah. But look at the learning experience!
A cautionary tale regarding that power supply. I have two of them, just like that but white. Kungber, 30V / 10A CV/CC. You may wonder why I have two of them. Well, the first one stopped working after about a week. I was charging some cells at about 28V and 9A. I came back an hour later and the LEDs were out, and no voltage on the terminals. On inspection something inside had blown, and when I turned the box on its side ashes from whatever blew fell out the side.

I contacted the seller through Amazon, and had almost decided they were never going to respond. Two weeks later the contacted me and said that it sounded like a defective unit, so they sent me a new one. They never wanted the first one back. After I got the new one I was using it for a while and decided to open both units up to see what blown. Looking at the charred device on the blown box didn't tell me much, but but looking at the same place on the new, working one I knew what size of thermistor had gone bad. I ordered it on EBay, and a couple of weeks later put the new thermistor into the blown unit. Now they both seem to work fine (I did write "refurb" in red sharpie on the fixed unit).

Since then I've used them for several charging tests, but I try and keep the amps no higher than 8.5A, especially if I'm charging the 8S pack at 28V. If I'm charging a single cell, I think it's OK to go to 9.5A.
 
A cautionary tale regarding that power supply....

Since then I've used them for several charging tests, but I try and keep the amps no higher than 8.5A, especially if I'm charging the 8S pack at 28V. If I'm charging a single cell, I think it's OK to go to 9.5A.
Thank you
 
Got the cells today. All four were at 3.31 volts.

Power Supply is due in tomorrow. BMS and bus bars sometime in September.

While I'm waiting I think I charge them individually up to 3.5 volts.
 
Thinking about a box for the completed 4s battery. It's 3"W x 4.5"L x 7.5"H. That's before the BMS.

7.5"H is a killer.

It would lay down nicely in something like:
Plano Sports & Outdoors Gun Storage 1312 Ammo Can:
  • 11"L x 5"W x 7"H
Would that be OK? Laying down.

Suggestions?
 
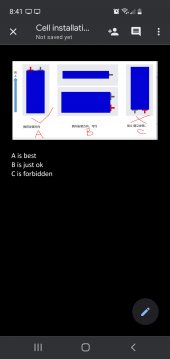
I just wanted to add to this thread that I had contacted Shenzhen TopBand about laying those cells on their side, I received this as an answer. It seems to be okay to lay them on their side but not upside down.
 

Attachments

  • Screenshot_20210815-204154_Docs.jpg
    Screenshot_20210815-204154_Docs.jpg
    66.7 KB · Views: 20
I would also recommend getting some 1/4in crimp on ring terminals to make the BMS balance lead connections, and you'll also need some kind of connector for the pack (I assume since you're doing ham radio, you'll be using powerpoles, but I use XT60s for all of my radio gear).
As I said on another thread, I worked in the auto repair industry for a long time, and many electrical problems were traced back to customers using crimp connectors that either had high resistance or the wire had pulled out of the crimp.
Solder and shrink wrap them, don't just rely on the crimp.
 
Back
Top