Did you mean 45 degree flare block? I thought 37 is for hydraulic, and 45 is hvac, plumbing, propane?All true.
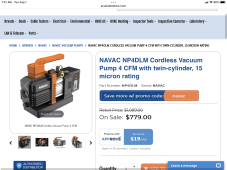
I think a 40cft nitrogen tank is 200, regulator is about 150, micron gauge is around 200, vacuum pump anywhere from 150 to 900, depending on quality, 37degree flare block about 150, for correct minisplit flares...
Anybody buying a minisplit for a diy install, needs this stuff, or they can buy a diy minisplit like Mr cool that has precharged lineset... plug and play communication wiring, and requires no flaring...
Having a minisplit and installing it incorrectly leads to a system full of acid, and a failing unit needing service and refrigerant added frequently...
what tools would you recommend (type of tools, and “tier” of tools) given the following considerations:
1. When I retire I’ll be taking a 5 month AC tech course at a community college (going to start acquiring my tools)
2. I’ll likely be instaling at least 15 mini splits at our lake (monkey see monkey do) as everyone contributes on the lake, and I’d like to bring this skill set.
3. I’d like to do a small retirement hustle focusing on mini splits in cottage country. (No interest in traditional AC and duct work)
the only hvac tool I have right now is a ridgid (or husky) flare tool from Home Depot that I used for our propane flares.
im a buy once/cry once kinda guy.
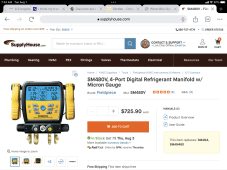
I kinda have an idea what I need (flare tool, nitrogen, vacume pump, Nylog blue, and a manifold, vacume guage, and valve stem tool/various adaptors, etc. just not sure “what” to buy if that makes sense? I gather Yellowjacket is a good brand.
I order 2 service manuals from this website, and they have a tool list for mini splits. Just wondering your thoughts?