Balsman225
New Member
- Joined
- Apr 29, 2022
- Messages
- 2
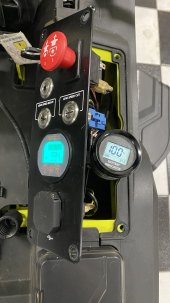
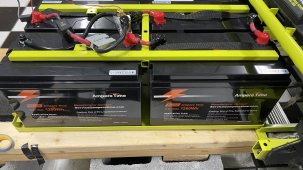
New comer here, I have read through the this thread a few times and I want to start out by saying thanks you for for all the great info and sharing your experiences. I am starting to gather up the parts to convert my RM480e. It sat in the garage all last year since the SLA are totally dead and I'm ready to get it running again with a new setup.I've finished my build and successfully mowed my yard with the new battery. 100 Ah cells, 16s Overkill BMS. Mowed my entire yard 0.8 acre on 22° slope using 30% of the battery capacity (80% → 50% SOC). One nice thing: with the old SLA OEM setup the fuel gauge would swing 20-30% depending on whether the battery was under load ( voltage vs SOC lookup table I presume ). I never knew that the actual percent was with the SLAs. With the shunt it's really nice knowing the exact SOC.
Max current while mowing with the new battery 108 Amps as reported by Overkill app, which did make me a little nervous. It must've been very brief since the 100A OEM battery fuse didn't blow. My old OEM battery was the 70Ah SLA. It might be placebo effect, but the mower seems peppier going up hills (shedding almost 200 pounds of lead and having more max current to work with I presume). I noticed no difference in center of gravity change: the mower doesn't seem any more likely to tip.
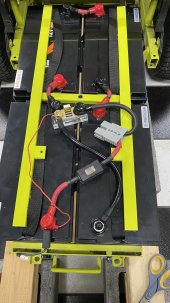
Here's a full Tinkercad of my build. I've been keeping SOC max 80% for battery life. AIMS charger set to charge LiFePo4 @ 15 amps. Planning to add a mechanical timer, estimate how long it will take to reach ~80% and have it turn off after that duration.
- The design I used is a modded version of @rio 's brilliant build, here are the changes I made
- added the middle lid notch to accept the steel lid brace (rough cut using a jigsaw)
- used high quality 1/2" birch plywood for the sides and bottom, 3/4" for the lid and middle spacers
- box held together with #6 screws and waterproof wood glue
- middle spacers screwed into side
- outside finished with 3 coats of spar polyurethane
- 5 mm EVA foam (white Cosplay foam from Hobby Lobby) to pad the hold-down braces under the lid
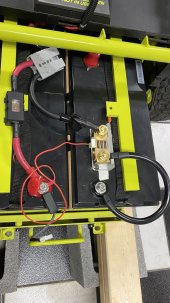
- 3d printed shunt holder, dust cap and stabilizers for middle brace, and the mains dust cap
- used this enormous stepper bit to enlarge the hole for the shunt display, took 10 minutes with hand drill
- I destroyed my OEM charging port by plugging in the AIMS Charger the first time causing a large arc from (we suspect) the inrush current filling the charger capacitors from the battery. I have a complaint filed with AIMS Corp to see if this is normal. Here's how I repaired:
- removed OEM charger receptacle and plug
- replaced with Anderson SB50 plugs
- 3d modeled the receptacle to hold the SB50 onto the mower (see pics)
- connected the blue wire from the lockout circuit to battery positive, permanently disabling the lockout†
- going to build a $20 protection circuit to prevent this moving forward using a diode and resistor in parallel
- for now I have been disabling the battery using iOS app, then connecting AIMS charger, last turning battery on to charge without arcing
† With rio's help we reverse engineered the lockout circuit in case anyone wants to see how it works, and how I decided to connect the lockout circuit to battery positive, see pic.
Do you happen to have an STL for the Andserson SB50 plug you made for the charger? I purchased the AIMS charger that was mentioned several times I figured I might as well swap out the original charger plug while I’m doing the build so I don’t have any arcing issue like you did the first time.