1201
Net zero
I thought we were supposed to be keeping topics on topic?
OP brought the topic into the conversation.I thought we were supposed to be keeping topics on topic?
Considering that buying prebuilt batteries would have cost me about $9k more, a couple of hundred Dollars of waste is not so bad, I think.Waste 4 feet, you are out $20. It just adds up when .
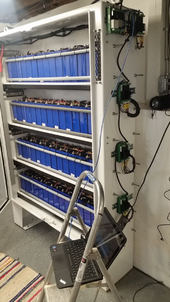
That was how I designed my battery rack. With 4 batteries each having a 100 amp BMS and breaker, I used #2 wires to the bus bar and 4/0 to the 12k inverter. Theoretically it’s still ok if 2 batteries are off line for any reason.Considering that buying prebuilt batteries would have cost me about $9k more, a couple of hundred Dollars of waste is not so bad, I think.
Also by using the savings on extra battery you can reduce the size of wire in most cases.
Example I have 4x 280ah batteries with 12kw inverter. The most one bms will ever see is around 60a. Wire size for that is reasonable
Or you could just buy the cells you want, and purchase a vertical wall mount or horizontal server rack kit ( like a Seplos Mason) which includes the BMS and everything you need for a few hundred bucks plus shipping.Circling back on topic then, DIY 16S harness has 16 sensor/charge wires each need to go to on battery. A ground, and the primary connection thru the relay. A couple of control pins maybe 24 or so pins with RS-422/CAN you have to pin out. Back in the day a CEN50, you soldered down onto the pins and clamped it in maybe 12 wires, 8+4 control if uni-directional. The BMS harnesses are kind of annoying if you need to extend the sensor/bleed wires, but you should be able to get away with some crimp connectors and heat-shrink tubing. The issue with DIY is where to put the BMS. For a 15KWH setup with ~300AH batteries, you may want a 300A BMS, this makes for bigger wires, but interconnect FTA you can probably get away with a pair of #1/0 or something. Now you have to mount this bad-boy on something strong and clamp all the high current bus wires to something strong as well. If you are like some of the guys above with small machine shops, and tools, and can source raw materials easily it's not a problem. If you don't, then you have a tendency to spend quite a bit more than you realize on do-overs and waste. 1/0 is around $4 to 5 per foot. Waste 4 feet, you are out $20. It just adds up when you build it out. Now if you already figured all this out so it would scale, adding additional capacity would get much cheaper, because you know exactly what you need, so if you have the space and can engineer it to scale out, you will benefit greatly if you DIY it. The last part is you are going to want to make sure you decide how you want to communicate with the BMS system(s). Most of them will now talk to the bulk of the larger scale systems, but you are not going to get the integration of say an EG4 AIO with EG4 batteries. Back to the computer analogies, your going to have a custom SCSI card that runs your drives, that might create boot problems if you don't get out in front of it.
Definitely not for everyone.
Love that skit. Is that from "Secret Policeman's Other Ball"?I'm old enough to remember punch cards and being so excited to get an 80 column graphics card.
But all this talk of remembering back about building computers does remind me of the classic Monty Python skit about "back in our day" (which I am so guilty of).
Oh how times have changed. My kids equivalent to "when dinosaurs roamed..." is "the olden times like when phones were stuck to the wall."
Back on topic. For me, I really enjoy the discovery and tinkering of DIY.
I think it is from Live at the Hollywood Bowl.Love that skit. Is that from "Secret Policeman's Other Ball"?
Embarrassingly, yes. At school we learned FORTRAN; handed in punched cards which were sent away to a PDP11 somewhere and got a print out / result a week later - frustratingly slow, especially if you made a typo and it didn't run!LOL... lucky you... I had to use a soldering iron to build my first computer. Not just for connecting bits together, but soldering all the components to the PCB... Yes, I am that old
Do you remember punched cards? That's how I learned to program.
LOL - sounds similar era to my Z80 based computer, with lots of TTL chips and about 8k bytes of static RAM.H-8, H-19, H-89, Wire-wrapped SRAM for the H-8, my design, discrete logic, lot's of LS240's,. Re-built an ADM-3A for fun, pretty bad input device. Owned an actual VT-100 . . . It does not have a backspace key, total garbage why it became an the basis for ANSI standards is beyond me. Wy-50 was really fast. Wy-150 was a workhorse
MMM, "A few hundred" meaning ~ $600 + shipping from Alibaba or something. This of course includes no cablesOr you could just buy the cells you want, and purchase a vertical wall mount or horizontal server rack kit ( like a Seplos Mason) which includes the BMS and everything you need for a few hundred bucks plus shipping.
Unless you have slightly oddball cells like me (230AH) and your master BMS expects all of the same capacity batteries.Or you could just buy the cells you want, and purchase a vertical wall mount or horizontal server rack kit ( like a Seplos Mason) which includes the BMS and everything you need for a few hundred bucks plus shipping.
I use a seperate BMS for each battery, so every cell is monitored, I can remove an entire battery for maintenance if needed, and I can mix battery sizes (like 135AH in parallel with 280AH) on the same busbar.Unless you have slightly oddball cells like me (230AH) and your master BMS expects all of the same capacity batteries.
My Seplos Mason 280AH kits were around $400 shipped. I also lucked out and bought four of the complete 135AH kits (which included the cells) for $1000 each introductory offer rate.MMM, "A few hundred" meaning ~ $600 + shipping from Alibaba or something. This of course includes no cables
https://www.amazon.com/LiFePO4-Bluetooth-Appliances-Off-Grid-Maintenance-Free/dp/B0C4LB48MV $700 thru amazon. + shipping
I did look. I've bought a few e-device batteries from aliexpress, < $100, but I'm hesitant to send > $500 to some place in china. Also this results in a extremely heavy 300-odd pound cabinet. If someone made a DIY "Shelf" or battery cabinet similar to some of the stuff these guys are making, with a bus bar, BMS mounts and wiring channels with fitment for the 280AH/305AH profile I'd re-consider. Something with 6-8 shelves engineered for it. Some of these folks have made some pretty impressive mounts/racks.
But did you have a Merlin modem?LOL... lucky you... I had to use a soldering iron to build my first computer. Not just for connecting bits together, but soldering all the components to the PCB... Yes, I am that old![]()
I trust that is a sarcastic "thank-you"... 1.5 years with no power !First, for 1.5 years I couldn't get the micro inverters to turn on and produce power at all. Then Enphase released an update to the firmware that fixed this issue. Thank you Enphase.
Just to clarify, this has to do ONLY with their off grid operation. When these inverters were grid tied they produced power as they should. They operated with basically perfect reliability. It was only when "cutting my cord" to the grid that I had problems.I trust that is a sarcastic "thank-you"... 1.5 years with no power !OMG
Possibly you’ve over complicated it? Can be as simple as lining the cells up, crimping rings on the balance leads, placing the busbars and screwing them all down.This is an anti-DIY message specific to DIY batteries, so I apologize, but my message for the masses is, unless you know what you're getting into, consider buying a pre-assembled battery.
Deciding to DIY my solar battery was one of my worst mistakes ever.
I'm still not done yet, and so far the project has wasted about 12 million hours of my time.
Originally I was going to buy fully wired batteries in a box from Amy, but was told the boxes were too big and couldn't be shipped to my country. So stupidly, I figured I could do all the boxes and wiring myself.
Even for pro-level handymen, to do this right, with all the research required, the fixtures and compression and flexible busbars and sizing and building the box and top balancing and the BMS and the fuses and wiring... etc. etc. this is a really big project. For the record, I happen to be a pretty crappy handyman. So maybe for some of you this is a walk-in-the-park.
But my message for the masses is, unless you really really know what you're getting into, buy a pre-assembled battery. For the vast majority of people who are working for a decent wage, when you figure in the cost of your time, a DIY battery doesn't save you anything. I guess if building one of these is your idea of a good time, then go for it. But in my case, I'd rather spend the time doing other things.
/rant
Edited to fix typos
No I get that, building a computer is easy, I didn't mean to compare the complexities, but the broad strokes of it all. But with the amount of time you've spent, I bet you've learned some stuff along the way, so maybe not a complete waste of time![]()
i have mine compressed to raise cycle count, to keep the pack neat, and to bring my aluminum plates in firm contact to transfer heat in the winter from the heating pads. I used spring loaded rods to put a variable load that starts out at 10PSI at 30% charge and climbs up to 16 at full charge.There's nothing wrong with that. The only reason why I have mine somewhat compressed is because it takes up less space.
Hmmm... thinking back on some of my worse mistakes ever. Nope can't do it. Too gruesome.
Are those the 180Ah from batteryhookup?I recently completed my first battery build using nylon case CALB cells. I used a MRBF terminal fuse and corrugated plastic separators.
Do I qualify for "CHAD" status? Please note it is only a 12 volt system.![]()