diy solar

diy solar

Original EVE LF280 cells?

That is what it looks like for now. I know it looks horrible, because it is :)
But at 6a nothing other then these tiny charging leads should have a chance of getting warm.
The stuff for the compression frame is still in the mail, aswell as the cables for the new charging leads and the torque wrenche.
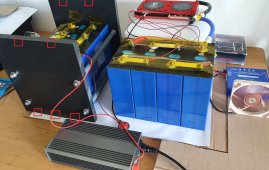
I used 2 long bar clamps with plywood ends for top balancing as my compression fixture was for 24V with 2 rows of cells.

Get rid of the small power supply leads, I went to 12 ga silicone wire and double leads at that as I use stackable bananna clips. You want to reduce voltage drop to increase amps, any resistance slows down charging whether cells are in series or parallel.
 
I have 10awg in the mail, but doubeling up sounds good.
If I want to change something I have to wait a few days for it to arrive . Stores are still closed over here. Its really anoying.
 
I have 10awg in the mail, but doubeling up sounds good.
If I want to change something I have to wait a few days for it to arrive . Stores are still closed over here. Its really anoying.
I couldn't find any ends that fit 10 awg. If you find some, post it here.
 
If you had the charge source leads at one end of the parallel set for top balance the cell closest to the leads can take more of the available charge. I saw a constant, but small drop down the cells as they were farther from the leads when I charged like that. I went to connecting the leads on opposite cells of the pack and things evened out quickly.
 
Little update.

One pack was charged up to 90% SOC and put in a compression frame to be charged in parallel now.
It is only taking 2A at 3.6V which is a little painful to watch, but it shows me that serial charging them up to 90%, before putting them in parallel, was definitely the way to go.

The second pack is being charged in serial now using my little Imax b6ac which had an awful time at 14v 6a, so it's charging with 5A now and I treated it with a PC case fan that I had lying around. That seems to help keep it at a reasonable temperature pretty well.
The compression frame isn't completely done jet. I plan to cut out 2x2cm squares where the markings are, and fill in 32x2x2cm strips to keep the cells from touching the floor and on the top to mount the BMS.
(The locking nuts on the inside of the Frame are to keep the plastic I used as walls from bending inwards over time, and will be covered in isolating tape once the battery is completely finished.)

@Terrapin thanks for reminding me, I would probably have forgotten and put the leads on the same side.

Edit: Put a new pair of selfmade charging leads (10AWG) on the parallel pack and now im back to charging 7A at 3.5V.
 

Attachments

  • 20210509_101321 - Kopie.jpg
    20210509_101321 - Kopie.jpg
    321.3 KB · Views: 23
Last edited:
Back
Top