diy solar

diy solar

Post your Ground Mount Setup

Hi
I only had 5 out of the final 8 panels on the top row.
So I had not put on the last "end" clamps.

Just the end clamps on the start of the top row and all the middle clamps.

I think that the wind must have started that last end panel moving which loosened the nearest
set of middle clamps.Then they started to come of one after another...sort of unzipping.

Another thing was that I had placed 1mm thick plastic shims between the clamps and the panel frames.
These may have made it easier for the clamps to work loose.

I had checked the array that morning as the wind had got up and everything was as solid as.
Looked out the wind that evening and all the top row were gone.

Surprised and pissed me off I can tell you.

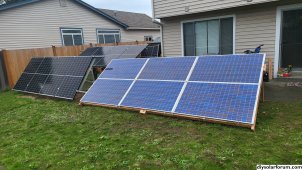
So I ended up losing one panel as per pic and it looks like the rest are ok.
Expensive exercise getting a single replacement panel shipped.

So we get these wind storms reasonably often in the season but my property is quite sheltered from them.
That just means that the wind swirls around now rather than coming in straight.

Lesson learnt and I am hoping that the extra steel strapping will stand up.
Thanks
Richard
 
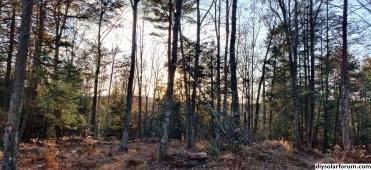
Walked 20 acres last night, didn't see a power line anywhere remotely close to where I'd plan to build and smiled the entire time.
My mind is racing, thanks to the inspiration in this thread, on how I'll put together my ground mount arrays while making best use of the natural landscape.
I should slow down and wait to see if my offer is accepted...

Photo looking West.
 

Attachments

  • IMG_20231107_161451.jpg
    IMG_20231107_161451.jpg
    2.3 MB · Views: 42
Walked 20 acres last night, didn't see a power line anywhere remotely close to where I'd plan to build and smiled the entire time.
My mind is racing, thanks to the inspiration in this thread, on how I'll put together my ground mount arrays while making best use of the natural landscape.
I should slow down and wait to see if my offer is accepted...

Photo looking West.
Good luck! Sending hope!
 
Walked 20 acres last night, didn't see a power line anywhere remotely close to where I'd plan to build and smiled the entire time.
My mind is racing, thanks to the inspiration in this thread, on how I'll put together my ground mount arrays while making best use of the natural landscape.
I should slow down and wait to see if my offer is accepted...

Photo looking West.

I’m so excited for you man! We closed on our 20 just over a year ago. It was absolutely game changing, for everything.
Some beautiful country out there. I’ll throw a wave since you’re looking west ?
 
My 10 acres is a steep up-slope, so really 15 acres. With an option on 20 when the Big One hits.
My land is from Point Reyes, neighbor's is from Pinnacles. Mine is pure muck, his you can drive up switchbacks in the winter.
"A fault line runs through it."

Got water?
 
This has a couple switchbacks to the top then it's paradise.

Water will be taken care of with a nice deep hole pushed with a grundfos pump.
No concerns with making it happen according to USGS data for the area.
 
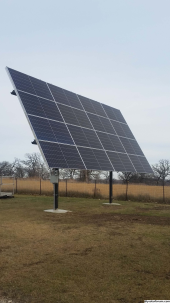
Next array I put up will be that high also. Just takes a deep hole to set the poles in. 8.5 feet deep and I dig it in about 10 minutes.

Array will tilt like this one too, no brushing of snow off the panels.
Via a mini-X?
 
Via a mini-X?
36 inch post hole auger. Takes a rock probably close 3 feet across to stop digging. I'm pretty amazed on how fast it goes.

Cement contractor didn't get the job done so I bought a post hole auger for the skidsteer. I also bought a stump shaver bit and use that for grinding stumps after I cut ash trees down. 23 ash trees in the yard, that post hole auger paid for itself. Next I will purchase a cone splitter bit for the auger head to split all the wood.

No forms needed with that big hole and MT Solar wants the dirt undisturbed around the hole. Just set the pole in the hole, brace it and call the redi mix truck. Trowel the top off slightly above the ground and you're done.
 
Nice set up!

Of course not everyone can afford that or needs that much power.
Just tilted the array to the winter angle of 65 degrees.

Only thing I would do different is black frame panels if given the option. But at the steep angle I don't think it makes a difference.

Next pole mounts will be fabricated by me. I'm thinking of using some old pickup rear axles for the tilt mechanism as I have a few laying around, just want a matched pair.
I am considering doing a post mount with variable tilt next year but smaller than yours.

I would like to try those bifacial panels with that.

I might try a powered swivel tracker.
 
I am considering doing a post mount with variable tilt next year but smaller than yours.

I'm undecided on 2 separate pole mounts or make it all one array again. Next spot won't be as protected against the NW wind that blows hard here after a cold front sweeps thru.

I would like to try those bifacial panels with that.

With it tilted to 65 degrees in winter, I get additional PV from snow reflection in front. Behind is a big shaded area due to the height.

I might mount some completely vertical panels on the south face of my 60 x 80 cold storage shed above the 14 foot tall doors. We have plenty of PV power in summer, winter is where some extra PV comes in handy with short days combined with cloudy weather for several days. No snow to move off those either or shovel away.

I might try a powered swivel tracker.
My son just took possession of an acreage on November first and I spent the last weekend there running the chainsaws taking the ash trees down. There is a large satellite dish there, he said I could have it. Not sure if I'll use it for a small array but experimenting can be educational.
 
36 inch post hole auger. Takes a rock probably close 3 feet across to stop digging. I'm pretty amazed on how fast it goes.

Cement contractor didn't get the job done so I bought a post hole auger for the skidsteer. I also bought a stump shaver bit and use that for grinding stumps after I cut ash trees down. 23 ash trees in the yard, that post hole auger paid for itself. Next I will purchase a cone splitter bit for the auger head to split all the wood.

No forms needed with that big hole and MT Solar wants the dirt undisturbed around the hole. Just set the pole in the hole, brace it and call the redi mix truck. Trowel the top off slightly above the ground and you're done.
That is so dang cool! Thx so much for elaborating. May ask what skid & how many hp?
 
I wonder what the production like compared to fixed due south ?
I also have fixed mounted panels on my roof: Slope 22°, Azimuth 117° (~East-southeast)

Production comparison the last 12 month:
- Fixed mounted panels: 810 kWh/kWp
- Tracker: 1240 kWh/kWp

Note.
The panels on the tracker are 290W Monocrystalline, from 2017 and the panels on the roof are 410W Halfcut, PERC from 2022
The newer PERC panels has a much better performance, especially in cloudy weather, than the older panels
 
That is so dang cool! Thx so much for elaborating. May ask what skid & how many hp?
Bobcat 7753, same as a 773. About 46 hp.

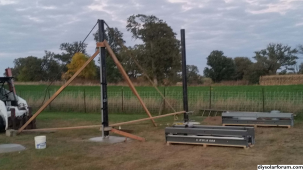
Auger drive is a Lowe 1650 Classic. I needed one shaft extension to get deep enough but have two. Drilled the hole at the high spot first, then used a transit to dig second to the right depth. The second hole takes a little more time for measuring. About a 1.5 foot square cement block dropped in the hole for the pipe to rest on. Just used some square wooden sleeves slid over the pipe, then diagonal braces to hold pipe upright. I used a board between the skid steer and the pipe as blocking, then a come along, ratchet strap or chain with a ratchet binder to basically hold the other direction in place so the redi mix truck had access on one side. On the first hole I also used my forklift as an extra anchor, one second hole I used the other pole as an anchor.

1699528991298.png
 
Bobcat 7753, same as a 773. About 46 hp.

Auger drive is a Lowe 1650 Classic. I needed one shaft extension to get deep enough but have two. Drilled the hole at the high spot first, then used a transit to dig second to the right depth. The second hole takes a little more time for measuring. About a 1.5 foot square cement block dropped in the hole for the pipe to rest on. Just used some square wooden sleeves slid over the pipe, then diagonal braces to hold pipe upright. I used a board between the skid steer and the pipe as blocking, then a come along, ratchet strap or chain with a ratchet binder to basically hold the other direction in place so the redi mix truck had access on one side. On the first hole I also used my forklift as an extra anchor, one second hole I used the other pole as an anchor.

View attachment 176824
WOW! Nice job!
 
30-Canadian bifacial 390w
5S-6P
4- 2"x2" steel posts in concrete
2x12 beams
2x6 stringers
Unistrut
Growatt 12K
Growatt 4880
61 KW-EG4 lipo4's
My jaw dropped when I saw the 6 bank server rack stacked on top of the other one. How the F did you get that up there?
 
My jaw dropped when I saw the 6 bank server rack stacked on top of the other one. How the F did you get that up there?
Yeah great question! I have trouble just getting one battery where I want it. I assume he did it one at a time but still ..... mine are currently sitting on the ground awaiting a rack and I'm not looking forward to getting them into it...
 

diy solar

diy solar
Back
Top