diy solar

diy solar

Ryobi Zero-Turn Mower SLA to LiFePo4 Conversion - (Updated - Build Complete With Pics!)

Finally enough stuff came together that I was able to complete this seemingly endless project. The below is what I've wired up:
View attachment 152732

The idea of the circuit above is to use the capacitors in the mower to delay enabling a relay turning on and off the contactor in the mower. It seems that the key enables a 48 to 12v converter which then turns on the contactor relay. I don't know that the actual circuit in the mower is the way I have it above, it is just my way of thinking about it.

The key has 48v (52-56 actually with the LiFEPO4 batteries) on one side and that enables a path to the 48-to-12v converter. I disconnect the later and run it through a relay so that the 48-to-12v only gets turned on when the relay closes. In my wiring the key enables a path through a resistor (plus diode) that goes to the mower side of the contactor. When the key is turned on it slowly brings the capacitors up in voltage and eventually it reaches a level where the relay can fire. The purpose of the diode is to prevent the closing of the contactor from keeping the relay engaged (the other diodes across the relay coil is just good practice to keep the collapsing field of the relay from sending a reverse voltage spike into the circuit .. you will notice that Ryobi has one across the contactor relay coil). I've wired this up and there is about a 3-5 second delay after I turn on the key until the mower's contactor "clunks" into place and turns on the mower. When I turn off the key the mower shuts down immediately and then about 3-5 seconds later I can hear the relay that I added disengage.

The astute here may recognize a problem that I did not pre-think and rather found during testing. If you turn off the mower and then turn the key back on again prior to the relay turning off the capacitors in the mower won't have been brought back up to voltage and instead the contactor will immediately engage, look like a short to the battery, and the battery's BMS will shutdown. Argh. I am sure there is an elegant solution but I'm tired of working on this, the lawn has gotten too long .. for now I'm just going to be careful.

One other thing: in the above I show a 200 ohm resistor for the pre-charge leg. In my build I actually used 167 ohms 'cause I was cheap and ordered a 10-pack of 5w/500 ohm resistors. I put three in parallel for the "200 ohm" part (making 167 ohms) and two in parallel for the 250 ohm part that feeds the relay.

With that said, the parts I used are these:
Relay
Resistors
Diodes

With that relay you probably don't want to change the 250 ohm resistor much. The relay has a coil resistance of 86 ohms so the 250 ohm resistor makes the voltage across the relay max out at about 52 * 86 / (86+250) or about 13.3 volts.

FWIW I was hoping to use this relay instead of the DPDT one linked above. It is a 48v SPST relay, I experimented with it, but alas did not have on hand the resistor I'd likely need to make it work. As I said, the grass is getting long and the wife unhappy.

I like the second relay 'cause it has a coil resistance of about 1.25k ohms. The problem with it is that cuts in at some very low voltage, significantly lower than the 48v for which it is rated. In addition it cuts out at an even lower voltage, something on the order of 10v. This means it will need something on the order of 2-4k ohm resistor in series to drop the voltage enough to make it effective (I did not have that and observed it had like a 15-20 second on/off delay).

One concern I have is that I don't know what the current rating is for the key switch. Perhaps a painful lesson will follow.

If anyone is interested I can post pictures later of the actual hook-up. Right now I should get to work. ;)
No idea if this is of any interest but figured I'd come back and update the record here.

I simplified my original hookup today. The one above was my "Murphy build": worked 100% through all my testing right up until I got all the skins back on the mower and a full charge in the belly of the new battery. Then it got "finicky". I was too lazy to chase it down and instead just tolerated having to make multiple key-off/key-on attempts getting it started. Wish this simpler mechanism had occurred to me earlier. But it did not.

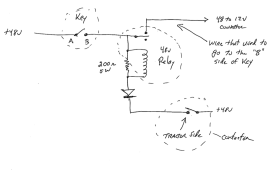
The simpler circuit looks like this:
1692580546846.png


Good news is this one is skins-on tested. Full battery too! It uses the alternate relay I mentioned before, a single 200 ohm 5W resistor, and one diode. The circuit uses the parallel resistance of the 200 ohm resistor and the relay to pre-charge the capacitors in the mower. That in-rush current causes the relay to close until sufficient voltage builds up in the capacitors to where there is nothing significant across the resistor. While the relay is closed it disables the voltage going to the 48-to-12v converter (which is what feeds the contactor in the mower), therefore the contactor does not activate. You need the 200 ohms across the resistor because the relay has a resistance of 1.2k and yes, that would precharge the caps but you'd be waiting quite a while. The 200 ohms speeds this up and that particular relay has a very low drop-out voltage so it all works. The diode prevents feeding back through the relay / resistor to the 48-to-12v converter when the key is turned off.

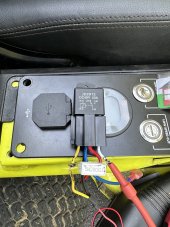
Below is a picture of the relay (the black is not a burn, I had it wrapped in electrical tape and figured I should remove that for the picture .. mistake as it left an ugly mess). You can see the 200 ohm resistor spanning the relay coil (yellow and white leads). The yellow and black are joined and go to the key switch. The white has the diode (inside the red shrink wrap) and the other side of that goes to the tractor side of the contactor. The blue is the normally closed and it goes to the wire that was removed from the key switch (this feeds the 48-to-12v converter that turns on the contactor). Red is not connected. I used automobile style connectors on everything, you can see one at the end of the blue wire.

I also today installed a meter (you can see it just below the relay in the photo). This requires a plus feed from the battery to the shunt block and so I used the same connection point on the contactor for that. This works nice 'cause the meter comes on when I turn on the mower. The display takes so little power that I can watch it fade as the capacitors drain after I turn the key off. That is actually handy as it makes a visual indicator as to when it is safe for me to engage the key again: I simply watch for the display to go out. Wrong, don't do this. I reread the instructions that came with the meter and it wants to be always-on. This makes sense as it measures current going both directions through the shunt block, one for discharge and the other direction for charging.

I've been reading that many don't seem to need the precharge. This was not the case for me and my battery seems really, really sensitive to that in-rush current. This works for me and I'm putting it here for the record (and am hoping I don't need to update it again). :rolleyes:
Relay.jpg
 
Last edited:
No idea if this is of any interest but figured I'd come back and update the record here.

I simplified my original hookup today. The one above was my "Murphy build": worked 100% through all my testing right up until I got all the skins back on the mower and a full charge in the belly of the new battery. Then it got "finicky". I was too lazy to chase it down and instead just tolerated having to make multiple key-off/key-on attempts getting it started. Wish this simpler mechanism had occurred to me earlier. But it did not.

The simpler circuit looks like this:

View attachment 163790


Good news is this one is skins-on tested. Full battery too! It uses the alternate relay I mentioned before, a single 200 ohm 5W resistor, and one diode. The circuit uses the parallel resistance of the 200 ohm resistor and the relay to pre-charge the capacitors in the mower. That in-rush current causes the relay to close until sufficient voltage builds up in the capacitors to where there is nothing significant across the resistor. While the relay is closed it disables the voltage going to the 48-to-12v converter (which is what feeds the contactor in the mower), therefore the contactor does not activate. You need the 200 ohms across the resistor because the relay has a resistance of 1.2k and yes, that would precharge the caps but you'd be waiting quite a while. The 200 ohms speeds this up and that particular relay has a very low drop-out voltage so it all works. The diode prevents feeding back through the relay / resistor to the 48-to-12v converter when the key is turned off.

Below is a picture of the relay (the black is not a burn, I had it wrapped in electrical tape and figured I should remove that for the picture .. mistake as it left an ugly mess). You can see the 200 ohm resistor spanning the relay coil (yellow and white leads). The yellow and black are joined and go to the key switch. The white has the diode (inside the red shrink wrap) and the other side of that goes to the tractor side of the contactor. The blue is the normally closed and it goes to the wire that was removed from the key switch (this feeds the 48-to-12v converter that turns on the contactor). Red is not connected. I used automobile style connectors on everything, you can see one at the end of the blue wire.

I also today installed a meter (you can see it just below the relay in the photo). This requires a plus feed from the battery to the shunt block and so I used the same connection point on the contactor for that. This works nice 'cause the meter comes on when I turn on the mower. The display takes so little power that I can watch it fade as the capacitors drain after I turn the key off. That is actually handy as it makes a visual indicator as to when it is safe for me to engage the key again: I simply watch for the display to go out. Wrong, don't do this. I reread the instructions that came with the meter and it wants to be always-on. This makes sense as it measures current going both directions through the shunt block, one for discharge and the other direction for charging.

I've been reading that many don't seem to need the precharge. This was not the case for me and my battery seems really, really sensitive to that in-rush current. This works for me and I'm putting it here for the record (and am hoping I don't need to update it again). :rolleyes:

View attachment 163789
Thank you for the great post Nightstorm. I am currently in the process of doing this mod and am wondering if there is any chance you could be able to describe the wires for us electronics illiterate folks. Like when you say tractor side of contactor and there are 4 wires going to it.. Thank you and this would be a very popular how to video.
 
Shoot! If I wait long enough, all you guys will have every bug worked out and a drop in kit for us to mod our mowers.
This thread is great, I'm glad I finally got one of these.
 
Thank you for the great post Nightstorm. I am currently in the process of doing this mod and am wondering if there is any chance you could be able to describe the wires for us electronics illiterate folks. Like when you say tractor side of contactor and there are 4 wires going to it.. Thank you and this would be a very popular how to video.
Life (and wife) willing, tomorrow I'll take some pictures, maybe video and see what I can come up with that might be of use.
 
Newby-poster here. Just wanted to give my thanks to everyone who's shared their experiences and results here. I've got a Ryobi 42" ZeroTurn with dying lead batteries, so I've been trying to figure out the best conversion method for my needs. I've built a solar-battery setup for my trailer, but never swapped out drive-power packs like this. All the different experiments and details here have really helped me out.

I just pulled the trigger on the Vatrer pack. The "all-included" setup along with the higher current capacity made it worth it for my family - my son and his grama are the chief riders/operators of the mower at our place, so I feel safer putting them on that package.

I'll report back how it goes!
 
I just replaced the slave deck motor controller and implemented your modification - but using a pack of 10 x 330 ohm resistors in parallel that I had from another project (so 33 ohms x 50 W). I checked with an oscilliscope and voltage stabilises after about 2 secs. Presumably that is OK? I suspect it can be left on as the contactor becomes a dead short when engaged - other than it will slowly discharge the battery if left on after mowing - is that correct?
I also had the capacitors blow on one of my deck motor controllers (master controller, twice), both times about 60 seconds after turning off the power to the deck motors. I had been using the mower without issue for ~90 minutes each time and then while driving it back from the back of my 3 acre lot to the front (without blades engaged) the capacitors blew. I haven't put the mower back in service in over a year now and the price for those motor controllers has increased to ~$350+. Has this series circuit/bypass with resistor helped to solve your problem with the deck motor controller?
 
I also had the capacitors blow on one of my deck motor controllers (master controller, twice), both times about 60 seconds after turning off the power to the deck motors. I had been using the mower without issue for ~90 minutes each time and then while driving it back from the back of my 3 acre lot to the front (without blades engaged) the capacitors blew. I haven't put the mower back in service in over a year now and the price for those motor controllers has increased to ~$350+. Has this series circuit/bypass with resistor helped to solve your problem with the deck motor controller?
There must have been an issue with some older blade motor controllers. Mine smoked when the mower was sitting idle with the key on, just stopped to talk to my wife. At the service place, there were about 4 other Ryobi's with the same problem. Luckily it was repaired under warranty. Since then, I've had no problems. Maybe the higher voltage of 16x Lifpo4 cells vs 4x 12v agms was hard on the earlier controllers. 15x cells may be a better voltage match.
 
So, installed the Vatrer 48V battery today and am happy to report, It works without a need for any pre-charge circuit!

4 provisions need to be made:

1. The charger lockout circuit will need to be bypassed (see past posts on how to do that), the battery comes with a new charger.

Can you post some pics or give more of a description on how you actually bypassed the charger lockout circuit? I can't understand why I need to even plug it back in.

I can splice the red and yellow wire, but what do I do with the separate blue wire coming out of the box?

I plan to use the Vatrer charger directly, and not use the Ryobi plug or port at all.

Thanks!!
 
So, installed the Vatrer 48V battery today and am happy to report, It works without a need for any pre-charge circuit!

4 provisions need to be made:

1. The charger lockout circuit will need to be bypassed (see past posts on how to do that), the battery comes with a new charger.

Do I even need to plug this back in if I don’t use the original charger or plug?

What do I do with the blue wire?
 

Attachments

  • IMG_4028.jpeg
    IMG_4028.jpeg
    678.6 KB · Views: 21
  • IMG_4031.jpeg
    IMG_4031.jpeg
    1.1 MB · Views: 21
Did some more digging in the thread and found this post by UltrasoundJelly.

If I understand correctly, I don't need to mess with the yellow or red, I just need to connect the blue wire coming out of the 'box' to the battery-positive lead. That bypasses the charging circuit lockout.

Did I get that right?
 
I'm always a little extra-wary when it comes to wiring, but the "hotwire blue to battery-positive" made the most sense to me, so I went with it.

I reused the blue wire coming out of the original charging port and connected it directly to the positive terminal on the battery, and plugged it into the barrel-plug (blue wire) coming out of the charge-control-"box". Then I plugged the box (white plug with red/yellow/black) back in like normal.

Then I finished mounting the Vatrer battery and hooking everything else up, and IT WORKS!! My son mowed both our front and rear yards - which is only about 0.7acre - and said the battery only dropped to about 71%. We all listened and watched it run, and you can hear the difference in how the mower does NOT bog down as it cuts.

Thanks to everyone who "came before" and sorted all this out; it made the swap so much more straightforward for me. :)

Also; I took the old 12V batteries to a local tire shop and they load tested them for me... Three of them tested fine, and one was D.E.D. DEAD. They took the dead one off my hands, and I'm going to use the other three in home-power-backup applications.
 
I also had the capacitors blow on one of my deck motor controllers (master controller, twice), both times about 60 seconds after turning off the power to the deck motors. I had been using the mower without issue for ~90 minutes each time and then while driving it back from the back of my 3 acre lot to the front (without blades engaged) the capacitors blew. I haven't put the mower back in service in over a year now and the price for those motor controllers has increased to ~$350+. Has this series circuit/bypass with resistor helped to solve your problem with the deck motor controller?

There are weird surges that happen with battery packs, controllers and motors, starting and stopping.

Try putting in some voltage suppression / clamping diodes to keep the voltage spikes from going crazy high.
 
I will have to come back to my issue of the blade motor controllers burning up, as right now I am trying to get my mower put back together and am having difficulty getting things to work correctly.

Main question: Where is the 48v+ source to the key getting it's power? Is it from the battery 48v+ side of the contactor coil or is it from the "charge controller" wire? I THINK it is coming from the battery 48v+ side of the contactor coil, vut this keeps my dc-dc converter on constantly, which engages that coil, which doesn't make sense. This was working before but somehow I seem to be running into multiple issues as I am getting it back together. I have the RY48RZT100.

If it is getting it's power from the "charge controller" then I must have an issue there, because that doesn't seem to be send 48v + to the key despite that I seem to be getting continuity. Thanks for assistance.
 
Right now the Chins 48V battery that seems to work as a drop in solution is 15% off with a lightning deal on Amazon, stackable with the usual $70 off coupon.


I'm thinking about getting this, but I'm also thinking about this alternative from Enjoybot. Seems to have similar specs (with the same 500A peak current). Typically, it's the same price as the Chins battery (except for the $70 coupon), but it seems like tax isn't assessed when I get to the checkout. The Enjoybot battery is about 5 lbs lighter, and appears to have a click button shut off. Anybody have good experiences with Enjoybot?
I hope it doesn't suck as I just bought one for use with my home inverter.

To big to fit in my cub cadet zero turn electric. But I needed a battery for the house so I snagged one.
 
I have built a couple packs now for golf carts and decided to buy a broken rm480e which needed a controller after getting it working I found the 4 year old batteries barely have enough charge to get through my 1/2acre lawn... So I ordered 3- fiat 5 cell lithium ion packs for $99 each from the battery hookup which came pre compressed and had balance leads already attached. I bypassed one of the cells to keep the voltage below the likely 62volt cutoff (its just over 58v full state of charge since it uses 14 4.2v nmc cells vs the usual lifepo4 I prefer but you cant beat a 64ah pack for $420 out the door with shipping and including the jk 100a bms cost.. tomorrow will be the first test as its charging now but since the 75ah sla batteries only had about 35ah of useable capacity these should work great for me. technically they are twice the ah capacity as the original 75ah sla batteries were.

I also plan to charge with one of the many cheap $50 mppt boost chargers I purchased and tested while building my solar roof charging lithium golfcart. I have some spare commercial panels I plan on wiring up on my shed to used for charging. I also could just tap into the panels on my pop up camper since its sitting there parked next to my shed normally and in full sun.

I got the rm480e ryobi mower for $480 so all in all I have about 1100 total with the cost of the new controller that was needed to repair it. I'm pretty happy with that.
 
Last edited:
The Ampere Time 12v 100Ah LifePO4 batteries should fit in the mower fine, although I have not tried. If you look at the dimensions of the OEM 100Ah batteries for these mowers (Leoch LPC12-100) the dimensions are 13 x 6.81 x 8.66. Nearly identical to AT and many of the Amazon 12v 100Ah LifePO4 ones. The battery frame should have bars on the sides that can be adjusted to the length of the battery as seen in the photo. This was from a post in the first page of this thread.

I'm not sure if it is on this thread or another one but I've seen where anything less than ~60Ah will not even start this mower much less be enough for it. These mowers pull a good amount of amps with the blades on and going up an incline. I believe this has been discussed on previous pages as well.
just want to clear up this misconception. I keep seeing people in this thread talking about being afraid to go with 50ah or 60ah cells because they wont be enough.
This in reality completely depends on if 1c or 2c cells are being used. the actual amp draw while mowing depends on what model ryobi but the rm480e I have for example is typically like 40amps from what Ive read and peaks at about 100 for seconds. I used 63ah fiat cells which are good for 300amp discharge. I also built a 36v golf cart pack with 2c 74ah cells for a friend which has worked out great for them even though golf carts tent to draw serious amp loads when coming up to speed.

The first pack I built I had read about not having enough and made a pack that was overkill for my solar roof charging cart which uses 3c 86ah cells and a 300/600amp jbd bms after monitoring my amp current in real time I realized this was way overkill and the 360w roof panel always keep the cart topped off and charged between uses so I didnt even need the capacity.

a 50ah lithium battery is aprox = in run time to 100ah of lead acid.
 
Last edited:
Nice! Never was able to get more than 1.5 acres with mine, if that. To be fair, my property has many obstacles that slow down the process greatly. I also cut down to 1.5" - 2" and don't let the grass get overgrown. I would be extremely happy with 2 acres to a charge.

When my attached garage was unheated I used a heated battery blanket around the batteries during the few times the garage actually got below freezing. Now that I insulated and installed heat in the garage, that is a non-issue.

Any issues with the new charger?
I realize this is an old thread but for those reading this, you absolutely do not need to keep these batteries warm during the winter as you should NOT be mowing or more importantly charging them . Its also a bad idea to store them fully charged during this time so keeping them on the charger would be a bad idea regardless. I typically leave my batteries at about 3/4 of a state of charge with the discharge shut off on the bms over the winter in my camper and cart and will do the same on my mower. you can discharge and use these batteries without harm in freezing temps, You just dont want to charge them that way.
 
Just mowed my lawn which is just under 1/2 acre with 244ft of fence line... i used less than 20% of the 64ah batter pack somehow. Maybe its because its all flat land IDK but there was a huge difference in the strength of the mower blade as before when I mowed in certain low spots where the grass tended to be really think the blades would bog down a bit. this did not happen this time. I still need to fully charge and actually balance the pack as I havent done that yet but im very impressed and glad I decided to upgrade. I did notice the 14s lipo pack voltage stays higher than my 16s lifepo4 packs. was 55. 6volts when I started and just under 55 volts when I finished. I only had the 4.2v cells charged to about 4.090v when I started.
 
Last edited:
I realize this is an old thread but for those reading this, you absolutely do not need to keep these batteries warm during the winter as you should NOT be mowing or more importantly charging them . Its also a bad idea to store them fully charged during this time so keeping them on the charger would be a bad idea regardless. I typically leave my batteries at about 3/4 of a state of charge with the discharge shut off on the bms over the winter in my camper and cart and will do the same on my mower. you can discharge and use these batteries without harm in freezing temps, You just dont want to charge them that way.
I was referring to the original SLA batteries that came with the mower. Ryobi recommended keeping them on the charger and above freezing. Never understood the above freezing part as SLA batteries in cars, etc. are subjected to freezing temps all the time.

This is a moot point for me now that I did the conversion to Lifepo4. I never keep it on the charger and try not to fully charge/discharge the battery, I try for 80 - 85% charge and down to 30% discharge. This has been working well so far.
 
I do still have the stock monitor hooked up...it doesn't really serve a purpose though, as it's not accurate, and the Vatrer came with its own that plugs right into a RS486 port on the battery.

As for the runtime, I haven't tested it thoroughly, but so far it's looking like I got a little more than the Ryobi had even in it's first season.

I got 3 acres to mow, and on the stock batteries in the first season, I'd end with 10-20% (which I reduced doing as it's bad for the batteries), this new one has ended with 20-30%

Of course the stock batteries going from season 2-3 started going under 20% before half the yard was done.
I am considering doing a "drop in" conversion with the Chins battery. The question I am hoping someone can answer is "What happens when the battery runs out?"

With the stock AGM and the stock monitoring systems, it will stop the blades but the mower will still drive, allowing you to return to the charger.

With a conversion, will this thing just die?

Thanks for any input?
With the conversion... ya wont run out of energy...
 
^ Definitely possible!

But its likely the stock controls will still work the same way. The drop in battery BMS will probably cut out at 10.0 or 10.5v, so as long as the stock mower controls disengage the blades higher than that, it should still allow you to drive across a lawn before cutting out for good.

If you really want to know youll probably have to hit that blade cutoff voltage while actually watching voltage to see what exactly that voltage is.
 
I am considering doing a "drop in" conversion with the Chins battery. The question I am hoping someone can answer is "What happens when the battery runs out?"

With the stock AGM and the stock monitoring systems, it will stop the blades but the mower will still drive, allowing you to return to the charger.

With a conversion, will this thing just die?

Thanks for any input?
The voltage curve on Lifepo4 batteries is quite a bit more severe then the stock SLA's from the facebook group i'm in, if you drain the Lifepo4 battery low enough to have it cut off you are stuck, as it doesn't have the "bounce back" that SLA's get.
This is simply what i've read, I haven't confirmed this for myself yet as I have yet to do a conversion on my Zero Turn, my Chins battery is being used as a battery expansion for my Power Station, I haven't put it in the mower yet and might not ever, if I can swing the budget to do the full 280Ah cells that I wanna do.
 
kinda unrelated, but how good are these electric sit on mowers?
I know Ryobi is a cheap brand but <3 years of battery life seems a bit poor.
I have a large area to mow, looking at sit on (prefer robotic), seems like a no brainer to upgrade to an electric, any recommendations?
 

diy solar

diy solar
Back
Top