diy solar

diy solar

Putting Lipstick on a Pig - Fixing the camp! (Photo heavy)

Our cabin is somewhere roughly near yours. I bought a grounding plate thinking that I would never get a proper rod down into ground because of the rocks. I was wrong. I used a t post pounder and got a rod all the way down after a couple attempts. I have an unused ground plate if you are still in the market for one.
 
I just made my own. Nothing a plasma cutter and some 6013 couldn't fix. ;)

In other news today, when I left the sun was still behind the hills but it was generating 20w. I just got back well after dark and the shunt went from 62% to 86% + the 700Wh in self consumption, so WOOT!!!

Today was Trade Labor Day where I spent 8 hours splitting wood and cutting rounds and arguing with my chainsaw in trade for my friend and her nephew coming out Saturday to help me build shed. I'm hoping I can get the floor built and insulated before they get here so all we have to do is raise walls and lay roof. If that gets done Saturday I can start insulating and wiring and sheathing inside on my own. Unfortunately (as my knees and back are reminding me right now) I'm not 30 anymore and can't get sheet goods up on my own or lift and hold a wall while I brace it.

So tired...
 
God I remember throwing 3/4 ply up on the roof and then getting up there and throwing them up to another roof building a rooftop deck!
These days...can't even get em on the cart without grabbing a apron !
Getting old really sucks !!!
 
I just made my own. Nothing a plasma cutter and some 6013 couldn't fix. ;)

In other news today, when I left the sun was still behind the hills but it was generating 20w. I just got back well after dark and the shunt went from 62% to 86% + the 700Wh in self consumption, so WOOT!!!

Today was Trade Labor Day where I spent 8 hours splitting wood and cutting rounds and arguing with my chainsaw in trade for my friend and her nephew coming out Saturday to help me build shed. I'm hoping I can get the floor built and insulated before they get here so all we have to do is raise walls and lay roof. If that gets done Saturday I can start insulating and wiring and sheathing inside on my own. Unfortunately (as my knees and back are reminding me right now) I'm not 30 anymore and can't get sheet goods up on my own or lift and hold a wall while I brace it.

So tired...
Is it charging now?
 
Is it charging now?
I got about 25% charge plus overhead yesterday, still too early to tell today. I'll keep y'all posted.

Edit: yup, battery is full and it's down to 40w for standby. I just threw the breakers and I'm now running on solar (well battery, the sun is behind the trees now).
 
Last edited:
So, today was a wasted day, mostly because 3 hours round trip to get lumber. So I unpacked the shed kit this morning. I paid the extra couple hundred bucks for the floor kit and I cut the straps, pulled out a sheet of OSB, then two half-sheets of OSB, a 2ft x 2ft piece of OSB, and another sheet of OSB. On the little packing slip it lists the 5 pieces of OSB and in tiny font at the bottom was *Floor framing not included...

WTF?!?! I could have built the floor weeks ago if I had known I still needed to go get a stack of 10ft 2x's. Ffrrraakkk...

But wait, there's more!

20231019_105019.jpg

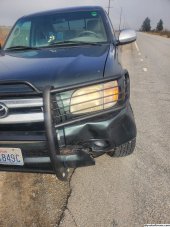
FRAKKING DEER!!! Worst part is that I got the custom grill guard and the deer completely missed it! Gah!!!! ??

I'm fine, just some plastic damage on the bottom of the bumper and the inner wheel well. The process to get that fixed is mire than I want to tackle today.

I also got the outdoor shower heater tuned in. It actually steamed up the mirror! Woot! Nice to finally have a HOT shower!

Ok, I'm tired again now.
 
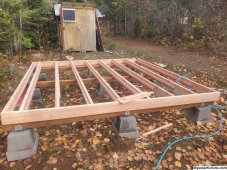
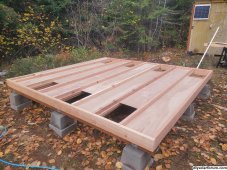
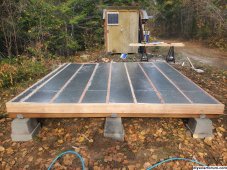
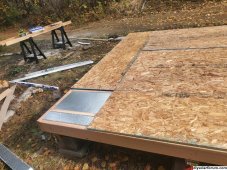
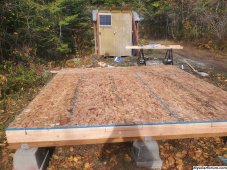
So productive day today for the most part. I got the frame together, made a jig to line up the rails, trimmed down plywood and foam, threw the sheathing on, and tried to paint... tried.

20231020_100848.jpg 20231020_104037.jpg

I built a jig to get the 1x2 rails the right depth for the 1/4" plywood underlayment and the 2" foam board so everything would be nice and tight against the OSB flooring.

20231020_114943.jpg 20231020_115607.jpg

20231020_122547.jpg
.
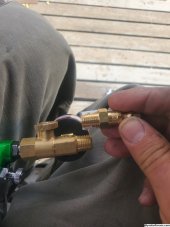
The paint gun I bought had a small issue...


20231020_123639.jpg

It also says in the book (not on the box mind you, so you gotta buy it to find out that (it doesn't work with latex paint, like the Kilz I wanted to throw down to give it some protection. Damnit! I picked up a 1/4" NPT coupler which got everything working, but even thinned 2:1 I couldn't get the paint to shoot evenly. So plan B I guess later.

Tomorrow I'll have some help throwing up walls and roof and then hopefully we'll have enough time to get some range time in.

In solar news, a bit of a vent here so please bear with me, but it seems that being a solar enthusiast requires you to live in the worlds shartiest places on earth to get enough solar radiance to actually generate power which seems to be why everyone starts at 6kw split phase 200 panels systems with 50Kwh of battery to get them through a day of air conditioning it takes to survive in the miserable environments that you have to be in to get solar to work worth a damn. Seems like a bad feedback loop of "Not for you P00rs!".

OK, vent over.
 
So quick update on an annoyance I was facing with my heaters.

The newest one I bought for the pump house was so simplistic that I coukdn't control it by temp, nor could I put on the controller that would allow me to do it. The little computer inside was just too dumb.

Well, last week my other 2 cabin heaters were fighting me tooth and nail and it was getting a wee bit chilly at night. Turns out one of them had its computer fail and the other had too much dust and wear on its fan motor to run at speed. Fortunately I've tracked down parts years ago so a new computer module got the one up and working. The other one was the very first heater I bought back in early 2018 and finally just wore out.

So, thinking to myself, these bodies are the same, the guts are the same, I wonder if I can salvage the computer unit for the pump house.

Yup, sure enough it had ports in wrong places but the wires all reached. Threw a temperature capable controller on there and after a small eternity priming the brand new fuel line it fired right up. I watched it for a while to make sure it was lighting off right and ramped itself down once it was up to temp on the casing.

Whew! Supposed to start getting down to freezing in the next day or two and I really REALLY don't want to burst ANOTHER pipe in there.
 
What kind of winter temps you expecting?
Snow?
Did ya get some steaks out of the roadkill?
Well, once winter properly hits there's going to be snow on the ground and it'll probably stay right at or below freezing for the next few months straight. So many of my projects up here have become complex because of the months on end of sub-freezing temps.

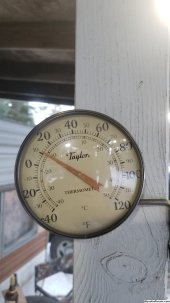
20210211_080034.jpg


As an example, here's a shot of the thermometer the one (and only) time I got my eldest nephew up here. We spent a week cutting and installing foam board under the living room half of the cabin, so lots of dust and Styrofoam! Yes, we had to bring the beer inside to keep warm.
 
@timselectric

Here's screen shots of the application and its settings. Hopefully there's something in there that grabs your attention. Do you know of a way to get all the settings by setting number other than buttonbutton write buttonbuttonbutton write buttonbuttonbuttonbutton write?

View attachment 172828 View attachment 172829
yo Red :) ive got a Growatt SPH3600 and a DIY batterypack with Seplos BMS. I can get the Growatt to charge more than 0,7A, not a lot :) So i need to get in contact with the growatt for checking up the parameters and would like to use PVkeeper, got it downloaded but how do i connect ? is it USB growatt - USB PC ( windows ) ? or is it RS232 ?? what com port ? baudrate ? best regards martin
 
Well, when you don't have time to "go hunting" there is always the roadside option :ROFLMAO:
I actually used to hunt deer like that in the old days. I had a 1980 suburban "state model" that I picked up back then pretty cheap. They were designed for the state usage aka Alabama DOT or something owned it before me. Whats special about them is the bumper isn't the chrome bumper the family vehicles got. These were pained white to match the truck and were VERY thick.

How this comes into play is one night when I was driving home I hit a deer with it and it went under the vehicle and I of course slammed on the brakes. This was my first kill with it. I got out and found no damage at all. The deer... well no so much. Since it was under a wheel when I slammed on the brakes it kind of smear deer down the road. Nothing to salvage. But I was impressed with the way the truck came thru.

Next time I spotted a deer I didn't hit the brakes :) Good kill. Good meat.

I bagged probably about 12 or so deer with the thing over time. Never hurt it and with the huge cargo area in the back taking the kill to the meat market was a breeze. I had a mechanical come along I kept in the back that would hook to the top lock post for the door allowing me to lift the deer easily. It had the double doors on the back and not the tailgate like the family models had.

Rust finally claimed that truck. I miss it. The engine is in a trans am I have with over 700,000 miles on the engine now :)
 
yo Red :) ive got a Growatt SPH3600 and a DIY batterypack with Seplos BMS. I can get the Growatt to charge more than 0,7A, not a lot :) So i need to get in contact with the growatt for checking up the parameters and would like to use PVkeeper, got it downloaded but how do i connect ? is it USB growatt - USB PC ( windows ) ? or is it RS232 ?? what com port ? baudrate ? best regards martin
My growatt came with a USB cable, but I had to download the COM driver for it. Once I grabbed that everything talked just fine. It's the CP210X windows driver and I had to install it with the USB cable plugged in and go through Device Manager.

In other news...


20231021_170826.jpg

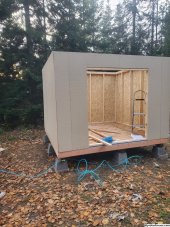
I have a box!!! We ran out of steam before we got rafters but I can get those in on my own and we'll reschedule the roofing once that's all ready.

Range day and Beef Guiness Stew for dinner... so full...
 
Last edited:
My growatt came with a USB cable, but I had to download the COM driver for it. Once I grabbed that everything talked just fine. It's the CP210X windows driver and I had to install it with the USB cable plugged in and go through Device Manager.

In other news...


View attachment 173487

I have a box!!! We ran out of steam before we got rafters but I can get those in on my own and we'll reschedule the roofing once that's all ready.

Range day and Beef Guiness Stew for dinner... so full...
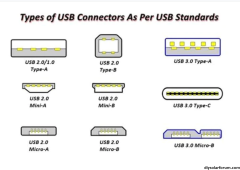
thanks my man,, and for sure the menu sounds good :) what type of USB do you have on the inverter and what type on your PC ?
 

Attachments

  • usb types.png
    usb types.png
    284.8 KB · Views: 5
thanks my man,, and for sure the menu sounds good :) what type of USB do you have on the inverter and what type on your PC ?
It looks like a regular A-B printer cable. The Growatt has the female B end in the bottom next to all the RJ45 ports and such.

In other news, both my heater cores were coked up last night so it was a bit chilly. Raining right now and says rain all week with possible snow. I better get this wrapped up quick. Nothing like doing framing and insulation and wiring and plumbing in the rain. ?
Send that rain south about a 100 miles are wheat needs it dry as hell here
 
It looks like a regular A-B printer cable. The Growatt has the female B end in the bottom next to all the RJ45 ports and such.

In other news, both my heater cores were coked up last night so it was a bit chilly. Raining right now and says rain all week with possible snow. I better get this wrapped up quick. Nothing like doing framing and insulation and wiring and plumbing in the rain. ?

Cold snap coming in later this week. Down to 29 in the Seattle area and colder over that way.
 
What do you think about retiring in that area VS Seattle?

I.E. North Idaho.

Strictly in terms of weather. I've never lived in a continental climate so I don't know whether I would like it or not.
 
What do you think about retiring in that area VS Seattle?

I.E. North Idaho.

Strictly in terms of weather. I've never lived in a continental climate so I don't know whether I would like it or not.
If retirement was an actual thing I would love to get 20ish acres and a cabin out here. Unfortunately divorce resets my retirement, so another 30 years of sailing ahead!

So camp update, today has been busy and productive...

shed1.jpg shed2.jpg

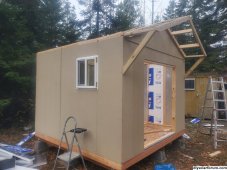
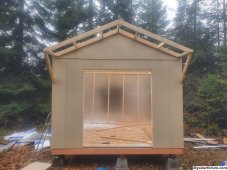
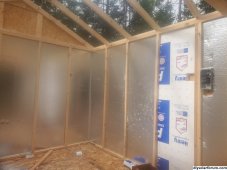
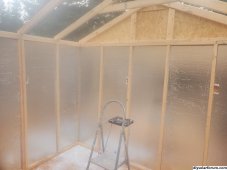
Got the rafters up and secured, got both gable ends together and installed. I copied the truss pieces to make the front extension so the roof length gets to 12ft where plywood and metal roofing both line up.

Cut and stuffed all the foam panels in place. We were real careful in the measurements and guides so of course every panel was a different size and some were crooked. Fought the 2-inches-too-short sawzall blade to get the window hole open and roof sealing goop under the window flange. That should keep the rain out..

Fortunately the weather was cold enough to keep the skeeters and gnats down, but I did have a couple wasps checking out the new real estate... sigh...
 
Last edited:
Rafters but no ceiling joists?
Snow load would want to bow top of walls out?
A tie rod or two would reinforce against that.

You could also use it to chin-ups. Even Giants (if you're a midget.)
 

diy solar

diy solar
Back
Top